Xamarin

New Xamarin.Forms eCourse

I’ve been blessed in my career, having the opportunity to join the Xamarin world over 4 years ago. In my 4 years of Xamarin I’ve been able to publish over 8 Xamarin Applications into the App Stores and work on million dollar Xamarin projects. I’ve been a Xamarin.Forms fan since its first release and released many Xamarin.Forms applications into production. I know that there’s been many developers that haven’t had the same success with Xamarin.Forms. In some cases this could be an issue with Xamarin.Forms or an incorrect application of Xamarin.Forms but the truth is ‘anything that can be done in a Native application can be done in a Xamarin.Forms application’ and faster.

After seeing the potential of Xamarin.Forms and diving in head first I now have an amazing amount of knowledge about developing real world applications with Xamarin.Forms. Considering this I’ve decided to share this knowledge with the world.

Without further ado I’m now announcing my first ever eCourse – ‘The Secrets of a Xamarin.Forms Ninja’.

If you haven’t picked it up the Ninja part is inspired from a book named ‘Secrets of the Javascript Ninja’. I felt this naming was very appropriate as the book and my course have the same goal… to teach the secrets that can only be learnt from years developing production applications.

At the moment this course is in a planning stage, so if you would like to be notified on it’s release please sign up below.


Subscribe to michaelridland.com for eCourse release info


Links and Code from 10 Awesome Xamarin.Forms Tips and Tricks

This blog post contains the links from my Xamarin talk on Xamarin.Forms tips and tricks. The original slides can be found here. Many of these tips and tricks require full blog posts and I’ll be writing them over the next few weeks. For now it’s just the links to the code.

Here are the links

3rd Party FastCell Solution

This is a 3rd party FastCell implementation, I used it before and found it to work quite well.

https://github.com/twintechs/TwinTechsFormsLib

TaskCompletionSource Blog Post

http://www.michaelridland.com/xamarin/taskcompletionsource-xamarin-beautiful-async/ 

Bindable Property Template

https://gist.github.com/rid00z/23b64436dd104f5d810d#file-bindablepropertytemplate-cs

Add some Xamarin.Forms to your MvvmCross app

https://github.com/rid00z/MvvmCrossNavigationDemo

Converting a Xamarin.Forms view into a Native View

https://github.com/rid00z/LoadingFormsViewFromNative

AsyncHelper RunSync

https://gist.github.com/rid00z/96b875f096cbc7cbcba8

These are just the links so keep an eye on the blog for more blogs and maybe even some training videos.

If you need any help using Xamarin or want to develop a mobile apps please feel free to contact me anytime.

Thanks

Michael


Best practices for using Xamarin Plugins

I’m sure by now you’re aware of the great amount of Plugins available for Xamarin. There’s plugins for almost everything, connectivity, localstorage, settings etc etc.

Generally these plugins are very easy to use, you can download from nuget and start using in a few single lines. Most of the documentation/blogs will show the single liners. Which sounds good to begin with but calling a dependency/API directly isn’t good as it tightly couples your business logic and makes unit testing very difficult.

Fortunately most of the plugins are interface based which means they support Inversion of Control, even if they don’t have interfaces you can supply your own interfaces.

Let’s take a look at an example using the Acr UserDialogs plugin.

You’ll notice that even examples call the API directly.

1
await UserDialogs.Instance.AlertAsync("Test alert", "Alert Title");

No, no, no, don’t do this. Highly coupled code will end you in bad places.

The correct way, well one of the correct ways, to implement a service like this is to use a IOC container and have the dependencies injected into your PageModels. Any good Mvvm Framework will support this. In this example I’m going to show you how to implement using FreshMvvm.

Below I add the UserDialogs Instance into the IOC container during my application startup.

It’s a single line: FreshIOC.Container.Register<IUserDialogs> (UserDialogs.Instance);

Screen Shot 2015-07-23 at 10.46.14 am

Because I’m using the Mvvm Framework to push between PageModels I can easily have the plugin dependency injected into the object. In the sample below I’m using my QuotePageModel that shows the dialog when a quote is being saved. NB* Those dependencies are injected into the Model automatically.

Screen Shot 2015-07-23 at 10.56.10 am

The dependencies can now be used from within the Commands.

Screen Shot 2015-07-23 at 10.59.22 am

Now that we’ve setup dependencies correctly we can easily unit test our PageModel methods. In the sample below I’m using the Moq framework to Mock out our dependancies and Verify the Update Quote method gets called.

Screen Shot 2015-07-24 at 10.34.39 am

It’s a very small change and it’s very easy to implement, the tradeoff of using Plugins in this manner is well worth the effort.

All this code is taken from a sample app that I’ve uploaded to github.

Thanks

Michael


Implementing custom navigation in FreshMvvm for Xamarin.Forms

In past posts I’ve already introduced the FreshMvvm framework for Xamarin.Forms. If you haven’t taken a look I suggest this post to give you an overview of FreshMvvm.

I use FreshMvvm in the majority of my projects. I love it’s simplicity but most of all it’s flexibility. The Framework is Interface based and designed to be flexible. One of the most important areas of an app is the Navigation, while FreshMvvm has some great built in Navigation abilities sometimes we might need to extend this and create our own Navigation Service.

FreshMvvm comes with an interface named IFreshNavigationService which allows any type of custom Navigation. The steps to implement a custom navigation service in FreshMvvm are as follows:

1) Implement the IFreshNavigationService interface

2) Register the implementation in the FreshMvvm IOC container

Let’s start by taking a look at the interface.

1
2
3
4
5
6
7
8
9
10
11
12
13
14
15
using System;
using Xamarin.Forms;
using System.Threading.Tasks;
 
namespace FreshMvvm
{
    public interface IFreshNavigationService
    {
        Task PopToRoot(bool animate = true);
 
        Task PushPage (Page page, FreshBasePageModel model, bool modal = false, bool animate = true);
 
        Task PopPage (bool modal = false, bool animate = true);
    }
}

Let’s begin with a simple NavigationService using a basic NavigationPage. We can name this class SimpleCustomNavigationService, inherit from NavigationPage and implement the IFreshNavigationService interface.

1
2
3
4
5
6
7
8
9
10
11
12
13
14
15
16
17
18
19
20
21
22
23
24
25
26
27
public class SimpleCustomNavigationService : NavigationPage, IFreshNavigationService
{
    public SimpleCustomNavigationService (Page page) : base (page)
    {
    }
 
    public async Task PopToRoot (bool animate = true)
    {
        await Navigation.PopToRootAsync (animate);
    }
 
    public async Task PushPage (Page page, FreshMvvm.FreshBasePageModel model, bool modal = false, bool animate = true)
    {
        if (modal)
            await Navigation.PushModalAsync (page, animate);
        else
            await Navigation.PushAsync (page, animate);
    }
 
    public async Task PopPage (bool modal = false, bool animate = true)
    {
        if (modal)
            await Navigation.PopModalAsync (animate);
        else
            await Navigation.PopAsync (animate);
    }
}

Now that we have our Navigation service we just need 1) create the navigation service 2) register the navigation service in the IOC container 3) display the navigation service in the main page.

1
2
3
4
5
6
7
8
9
10
11
//Get the first page to be displayed
var page = FreshPageModelResolver.ResolvePageModel<MainMenuPageModel> ();
 
//create our navigation service
var customNavigationService = new SimpleCustomNavigationService (page);
 
//register the Navigation service in the app, this enables us to push model to model
FreshIOC.Container.Register<IFreshNavigationService> (customNavigationService);
 
//display navigation service in main page
MainPage = customNavigationService;

So now that we’ve correctly implemented the Navigation Service, we can achieve the holy grail, with PageModel to PageModel navigation.From any of our PageModels we can now push the PageModel by using the PushPageModel<T>.  As you would expect the ‘CoreMethods’ property is also interface based making it perfect for unit testing.

1
2
3
4
5
6
7
public Command AddContact {
    get {
        return new Command (async () => {
            await CoreMethods.PushPageModel<ContactPageModel> ();
        });
    }
}

Some more complex examples

What I find people fail to understand is that using this interface you can implement any type of advanced Navigation you like. There’s a few things to understand.

1) You can use custom logic to register a Navigation Service, an example of this would be to use to different types of Navigation Services per platform or based on screensize. In this example I’m using a MasterDetail for the Phone and a TabbedNavigation for the Tablet. You can do anything you like in this case.

1
2
3
4
5
6
7
8
9
10
11
12
if (Device.Idiom == TargetIdiom.Phone) {
    var masterDetailNav = new FreshMasterDetailNavigationContainer ();
    masterDetailNav.Init ("Menu");
    masterDetailNav.AddPage<ContactListPageModel> ("Contacts", null);
    masterDetailNav.AddPage<QuoteListPageModel> ("Quotes", null);
    MainPage = masterDetailNav;
} else {
    var tabbedNavigation = new FreshTabbedNavigationContainer ();
    tabbedNavigation.AddTab<ContactListPageModel> ("Contacts", "contacts.png", null);
    tabbedNavigation.AddTab<QuoteListPageModel> ("Quotes", "document.png", null);
    MainPage = tabbedNavigation;
}

2) The Framework doesn’t care what you put into the Push and Pop methods, you can put any type of UI logic that’s required for your interface. In this example below I’m combining a MasterDetail and a TabbedPage.

1
2
3
4
5
6
7
8
9
10
11
12
13
14
15
16
17
18
19
20
21
22
23
24
25
26
27
28
29
30
31
32
33
34
35
36
37
38
39
40
41
42
43
44
45
46
47
48
49
50
51
52
53
54
55
56
57
58
59
60
61
62
63
64
65
66
67
68
69
70
71
72
73
74
75
76
77
78
79
80
81
82
83
/// <summary>
/// This is a sample custom implemented Navigation. It combines a MasterDetail and a TabbedPage.
/// </summary>
public class MasterTabbedNavigationService : MasterDetailPage, IFreshNavigationService
{
    FreshTabbedNavigationContainer _tabbedNavigationPage;
    Page _contactsPage, _quotesPage;
 
    public MasterTabbedNavigationService ()
    {   
        SetupTabbedPage ();
        CreateMenuPage ("Menu");
        RegisterNavigation ();
    }
 
    void SetupTabbedPage()
    {
        _tabbedNavigationPage = new FreshTabbedNavigationContainer ();
        _contactsPage = _tabbedNavigationPage.AddTab<ContactListPageModel> ("Contacts", "contacts.png");
        _quotesPage = _tabbedNavigationPage.AddTab<QuoteListPageModel> ("Quotes", "document.png");
        this.Detail = _tabbedNavigationPage;
    }
 
    protected void RegisterNavigation()
    {
        FreshIOC.Container.Register<IFreshNavigationService> (this);
    }
 
    protected void CreateMenuPage(string menuPageTitle)
    {
        var _menuPage = new ContentPage ();
        _menuPage.Title = menuPageTitle;
        var listView = new ListView();
 
        listView.ItemsSource = new string[] { "Contacts", "Quotes", "Modal Demo" };
 
        listView.ItemSelected += async (sender, args) =>
        {
 
            switch ((string)args.SelectedItem) {
            case "Contacts":
                _tabbedNavigationPage.CurrentPage = _contactsPage;
                break;
            case "Quotes":
                _tabbedNavigationPage.CurrentPage = _quotesPage;
                break;
            case "Modal Demo":
                var modalPage = FreshPageModelResolver.ResolvePageModel<ModalPageModel>();
                await PushPage(modalPage, null, true);
                break;
            default:
                break;
            }
 
            IsPresented = false;
        };
 
        _menuPage.Content = listView;
 
        Master = new NavigationPage(_menuPage) { Title = "Menu" };
    }
 
    public virtual async Task PushPage (Xamarin.Forms.Page page, FreshBasePageModel model, bool modal = false, bool animated = true)
    {
        if (modal)
            await Navigation.PushModalAsync (new NavigationPage(page), animated);
        else
            await ((NavigationPage)_tabbedNavigationPage.CurrentPage).PushAsync (page, animated); 
    }
 
    public virtual async Task PopPage (bool modal = false, bool animate = true)
    {
        if (modal)
            await Navigation.PopModalAsync ();
        else
            await ((NavigationPage)_tabbedNavigationPage.CurrentPage).PopAsync (); 
    }
 
    public virtual async Task PopToRoot (bool animate = true)
    {
        await ((NavigationPage)_tabbedNavigationPage.CurrentPage).PopToRootAsync (animate);
    }
}

The best part about all of these NavigationService’s is that you can swap them out and never have to change your PageModels.

I’ve uploaded a sample app to github here.

If you have any question please feel free to contact me. 

PS, if you find any parts that need improvements or you have a better options please email me, I’m always trying to improve this Framework and all feedback is welcome.

Thanks

Michael


TaskCompletionSource + Xamarin = Beautiful Async

If you’ve been using Xamarin for a while you probably already know of this functionality.

Just in case you haven’t I just want to give shout out to the TaskCompletionSource class. In short the completion source allows you to create a Task and return it to the caller without having to set the result or use an lambda.

It’s great for working with event based API’s like Native Bluetooth, NSSession and Native mapping engines. All of which provide results via events. The Native Bluetooth API in iOS is a great example of this, so let’s take a look.

TaskCompletionSource and Native API Sample

The function we want to build is below, it returns an awaitable task of float which is the Bluetooth Signal strength.

/// <summary>
/// Gets the Signal strength of Bluetooth Device
/// </summary>
/// <returns>The signal strength.</returns>
public Task<float> GetSignalStrength ()


The problem is that the Bluetooth API is based on events, so there’s no real easy way to support this Async. That’s where TaskCompletionSource comes in.
Let’s start by creating our TCS and returning the Task.
public Task<float> GetSignalStrength ()
{
    var bluetoothCompletion = new TaskCompletionSource<float> ();

    //do bluetooth work

    return bluetoothCompletion.Task; 
}


Now that we have the TaskCompletionSource there’s a few things we can set:

bluetoothCompletion.SetCanceled (); //Set the task as Canceled 
bluetoothCompletion.SetResult (888); //Sets the result as successful
bluetoothCompletion.SetException (new Exception ()); //Sets an exception

Great the caller has a Task that they can await. Now let’s do the Bluetooth work.

var centralManager = new CBCentralManager(DispatchQueue.CurrentQueue);

centralManager.DiscoveredPeripheral += (object sender, CBDiscoveredPeripheralEventArgs e) => {
    bluetoothCompletion.SetResult(e.RSSI.FloatValue);
  };

centralManager.FailedToConnectPeripheral += (object sender, CBPeripheralErrorEventArgs e) => {
    bluetoothCompletion.TrySetException(new Exception("Failed to connect to device"));
  };

Now let’s put them all together.

/// <summary>
/// Gets the Signal strength of Bluetooth Device
/// </summary>
/// <returns>The signal strength.</returns>
public Task<float> GetSignalStrength ()
{
    var bluetoothCompletion = new TaskCompletionSource<float> ();

    var centralManager = new CBCentralManager(DispatchQueue.CurrentQueue);

    centralManager.DiscoveredPeripheral += (object sender, CBDiscoveredPeripheralEventArgs e) => {
        bluetoothCompletion.SetResult(e.RSSI.FloatValue);
    };

    centralManager.FailedToConnectPeripheral += (object sender, CBPeripheralErrorEventArgs e) => {
        bluetoothCompletion.TrySetException(new Exception("Failed to connect to device"));
    };

    return bluetoothCompletion.Task;
}


Great, so now the caller can easily consumer this API in a async way.

var bluetoothStrength = await bluetoothService.GetSignalStrength();

This was a very simple example but the TaskCompletionSource can be used in many scenarios, it can be passed into functions and kept as member variables until you need it. So if it’s not already in your Toolkit, add it and use it, your code will be cleaner.

If you want to know more feel free to drop me a email.

Thanks

Michael

WWDC2015 – The BIG takeaways

apple-wwdc-20150312

Ah, WWDC 2015 what a wild ride, 5 days of content packed sessions.  While I’m still trying to comprehend everything I’ve learned over the past 5 days there’s some big takeaways that I’ve got from WWDC this year.

Native apps still dominate!

Why? Did you know that on iOS 86% of time is spent in apps?

One thing that’s really apparent is that Apple is obsessed with user engagement, experience and performance, and they believe apps are key to this. To get an understanding let’s take a look at some of the new features which Native Apps/APIs can help you engage with your users like never before, some updated in iOS 9 and some brand new in iOS 9.

Apple Watch – Apple is betting big on the Watch, putting the watchOS 2 on level pair with OSX and iOS. WatchOS 2 comes with a set of API allowing developers to build even better Native Apps and they also added to this is the ability to be on a users Watch face. For my details see my blog post on watchOS 2.

Screen Shot 2015-06-12 at 3.20.20 pm

Notifications – Apple Watch now supports long form notifications and actionable notifications.

Screen Shot 2015-06-12 at 3.12.00 pm

Search APIs – Apps are now allowed to interface with search in iOS 9, with the ability to deep link into the app. If you want to know more you can view my blog on Search APIs.

Below is an example in which a person has booked a holiday to Maui, from AirBnB and Kayak.

ios-search

App Extensions  – While not new in iOS9, still a very powerful engagement feature, apps can display widgets in the Today view of Notification Center, providing quick updates or enabling brief tasks — for example, posting updates on package deliveries, the latest surf reports, or breaking news stories.

Screen Shot 2015-06-12 at 4.26.32 pm

Apple will continue pushing people to apps

Apple have shown they will keep pushing users into apps, this is clear with Universal links and Apps now appearing in iOS Search and Safari search.

Apple will continue pushing people to upgrade iOS

Apple has promised developers that they will continue pushing users to upgrade their OS version, specifically users now will only need 1.3 GB of free space to upgrade to iOS9. Apple have also enabled notifications that will prompt users to upgrade their iOS version. Their recommendation is that developers will only need to target the two most recent OS versions.

Swift all the things

During the 5 days of the conference I didn’t see a line of objective-c (thankfully). There was an enormous amount of content on swift and some the sessions on swift were outstanding. Apple is betting big on Swift and with Apple behind Swift it’s going to be a language that’s around for the next 20 years.

watchOS is serious

As mentioned before, with 10+ session on watchOS Apple is betting big on the watch.

Stop thinking about Orientation

With iOS9 Multitasking we need to stop thinking about designs in orientation, we need to be thinking about Size. If you want to read more about multi-tasking you can this blog on iOS9 Multitasking.

Xamarin.Forms is still awesome

After full week living in the Apple future I’m still very confident in Xamarin.Forms and it’s future, the flexibility of Xamarin and Xamarin.Forms allows me (us) to still take advantage of all these new Native APIs but in a cross-platform way. In the next day I’m going to be blogging a Xamarin.Forms app that supports the Multitasking features in iOS9.

Summary

WWDC has been mind blowing, on par with TechEd Europe which I attended a few years back. I’ve learnt alot, made some good friends and I recommend all mobile developers attend at least once.

CHVnO6vUYAEHDLo


iOS 9 Search API – A killer way to engage with users

Note: I’m currently at WWDC watching the live sessions, I haven’t been able to include all session details and only the public information, as more information becomes public I will post more details.

Did you know that in iOS 86% of time is spent in apps?

Apps are now allowed to integrate with the search in iOS9, this is a bit of a killer feature for iOS 9, not only for app developers but also for users.

Imagine the scenario where you’ve booked a hotel room from an app, you want to find some details about the hotel room at a later time, with search API you can put in a query directly in the iOS search bar and details of that booking can appear and deep link you into your app.

Below is an example in which a person has booked a holiday to Maui, from AirBnB and Kayak.

ios-search

As developers we can choose exactly what to index with a lightweight API. As a added bonus the results also appear in the safari search, still including the deep linking into the apps which is awesome. You can also tag content as public, meaning very popular public content will also appear in the search result.

There’s three API for supporting iOS 9 search:
NSUserActivity – Which is previously viewed app content
CoreSpotlight – Which you can add any app content
Web Markup – App content which is also supported on the web

NSUserActivity

Was introduced in iOS 8 but is now indexed and searchable, it works with iOS Search and Safari search and this allows the user to revisit that activity.

In a NSUserActivity you can select many options via the metadata, like if it’s eligible for handoff, if it’s eligible for search and public indexing.

Some of the fields you can handle on this include title, userInfo, keywords, contentAttributeSet, expirationDate, webpageURL, eligibleForSearch, becomeCurrent and thumbnailData.

In order to support returning to your app you need to support the method continueUserActivity.

If you want the Activity to work on the web then you can set – eligibleForPublicIndexing, but this data remains anonymous (via a hash) until the activity is popular enough too appear in the results.

This is also how you can support SIRI smart reminders and Handoff e.g.. ‘remind me about this”

CoreSpotlight

CoreSpotlight allows you to index any part of your application, you can take a list of data from your backend and index all the items in the list using the CSSearchableIndex and CSSearchableItem. You can add a bunch of attribute data using CSSearchableItemAttributeSet like title, description, thumbnail and data.

In order to handle this deep linking you only need to handle Appdelegate.continueUserActivity.

It’s up to you/your app to manage the indexed content you have you can update a Item by using the same ID and calling indexSearchableItem and if you want to delete you can use deleteSearchableItem.

This is a basic overview but generally it is this simple.

WebMarkup

This is a App Deeplink, so it will be a simple URL (a real URL, like www.apple.com/product/iphone) that goes to a website when on OS X but on IOS will Deep Link into your app.

There’s a few requirements for WebMarkup:

  • The website must contain the Markup for Deeplinks
  • It should match the support URL and marketing URL
  • Ensure your website has smart app banners

Universal Links are better then customURL schemes, as their Unique, Secure and Flexible.

Apple are also going to be supporting Twitter Cards and Facebook App Links. I’m sure more details on this will come soon, but overall it’s very cool.

Best Practices

Make sure you give the items that same ID, you don’t want to be duplicating any items.

Apple have put in a lot of work to protect relevance, spammers are downlinked and engagement ratios are tracked.

Some tips for indexing:

  • Use a description
  • Use a thumbnail
  • Provide the key information
  • Use keywords
  • Proactivityely index items

iOS search is flexible and limitless, it’s going to be very awesome for both User and Developers, I’m really looking forward to it.

If you have any questions please contact me on my website, I’m happy to answer any questions.

Thanks

Michael


Introduction to iOS9 Multitasking and Xamarin.Forms first-thoughts

Note: I’m currently at WWDC watching the live sessions, I haven’t been able to include all session details and only the public information, as more information becomes public I will post more details.

Split screens on iPad, ah scary, now we have even more things to worry about.

Just in case you haven’t heard about what multitasking is on the iOS9, it’s basically being able to run two apps side by side on an iPad. There’s three different modes, Slideover, SplitView and Picture-in-Picture.

Slideover

slideover

SplitView

splitview

Picture-In-Picture

picture-in-picture

One of the first things you need to understand about multitasking in general, the User is in control of the apps and the sizes of the apps. You can never set the size of a window.

We all now need to adopt a multitasking mindset, which means two things 1) avoid using device idiom or interface orientation and instead adapt to the window size 2) we need to ensure our apps are ‘good citizens’ and not leaking memory, growing in an unbounded fashion, or blocking the main thread

In regards to handling different sizes and layout, Adaptivity is the solution, if you’ve been using the features like AutoLayout and Size classes then supporting multitasking in your app should be easy. Apple aren’t afraid to say I told you so, ‘participating in iOS 9 multitasking is straightforward when you’ve adopted Apple’s best-practice recommendations for iOS 8.’

If you’re developing with Xamarin.iOS and you’ve been doing it with best practices then this should be a simple transition.

The basic steps to support multi-tasking in your app are:

1) Build your app with iOS 9 SDK
2) Support all orientations
3) Use launch storyboards

If you want to opt-out of multitasking then you can add the key ‘UIRequiresFullScreen’ in your plist, this is not recommended as user will expect that your apps support multitasking and their not going to be happy if they can’t use multitasking. Apple recommends Most apps should adopt Slide Over and Split View.

The simulator in xcode 7 will allow you to simulate the functionality so testing your app them should be fairly easy. Currently only the iPad Air 2 support the full SplitView, I would guess this is due to performance.

The biggest change is about resource management. Every iOS app—even one that opts out of using multitasking features—needs to operate as a good citizen in iOS 9. Now, even full-screen apps don’t have exclusive use of screen real estate, the CPU, memory, or other resources.

It’s important to note that we shouldn’t be using rotation events in iOS9, the events we should be using are similar to this (more details TBA).

willTransitionToTraitCollection
viewWillTransitiontoSize
traitCollectionDidChange
animateAlongsideTransition
completion


Multitasking with Xamarin.Forms first thoughts

If you’re using Xamarin.Forms then there’s no direct support for autolayout or size classes but if you design your layouts to look good at all sizes then you should be ok. I’m feeling that in general multitasking won’t be an issue in Xamarin.Forms, even ‘as-is’ Xamarin.Forms we can use the current system to have adaptable screen sizes using the various Xamarin.Forms layouts like StackLayout, Grid and RelativeLayout. Additionally this is just a thought but possibly, the Xamarin.Forms team could add a Device.Size property which could help us make a decision on how to layout the main areas of the screen, possibly add even a event.

Here’s some initial thoughts on handling the new feature.

  • Avoid making layout decisions on Idoim(Tablet/Phone), use the window size
  • Avoid making layout decisions on device orientation
  • Avoid absolute layout
  • Use RelativeLayout, StackLayout and Grid to help with adaptable screen sizes
  • MasterDetail should already function correctly
  • It would be possible to add (polyfil) an event into Xamarin.Forms to notify when a Screen Size changes, allowing us to change the primary navigation style

One other thing to note is Xamarin.Forms has no concept of ‘readable content guide’, so if you want text content to be a good reading experience in your Xamarin.Forms applications then you’ll need to come up with a alternative solution.

If you have any questions about iOS9 multitasking or Xamarin.Forms feel free to get in touch as I’m always keen to help.

Thanks

Michael


Introducing WatchKit and watchOS 2

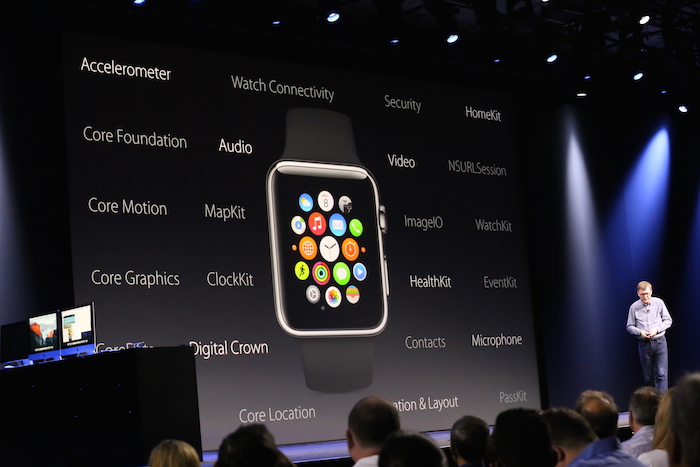
Watch development now has three new frameworks, WatchKit, ClockKit and Watch Connectivity.

WatchKit

As I mentioned before the WatchKit extension now runs on the watch but apart from the architectural changes the extension primarily stays the same. There’s a few implications on how you develop your WatchKit extension.

You must implement your extension using the watchOS SDK instead of the iOS SDK. If a API isn’t available in the watchOS then you’ll need to rely on your iPhone app to perform the task. It’s very surprising but the API available on the watch is very large, ClockKit, Contacts, CoreData, HomeKit, CoreGraphics, CoreLocation, CoreMotion, EventKit, HealthKit, Watch Connectivity.

Your extension now stores files and data on the Apple Watch, but any data that’s not a part of your Watch app or WatchKit extension bundle must be fetched from the network or companion iOS app running on the iPhone. You cannot rely on a shared group container to exchange files with your iOS app.

WatchKit now has support for Networking via the NSURLSession object, with full access to the NSURLSession capabilities include the ability to download files in the background. While I think this is very cool it also scares me how much this can be abused by app developers and dramatically reduce the battery life on the watch.

One more thing to note is that WatchKit extensions not longer have direct access to iCloud technologies.

ClockKit and Complications

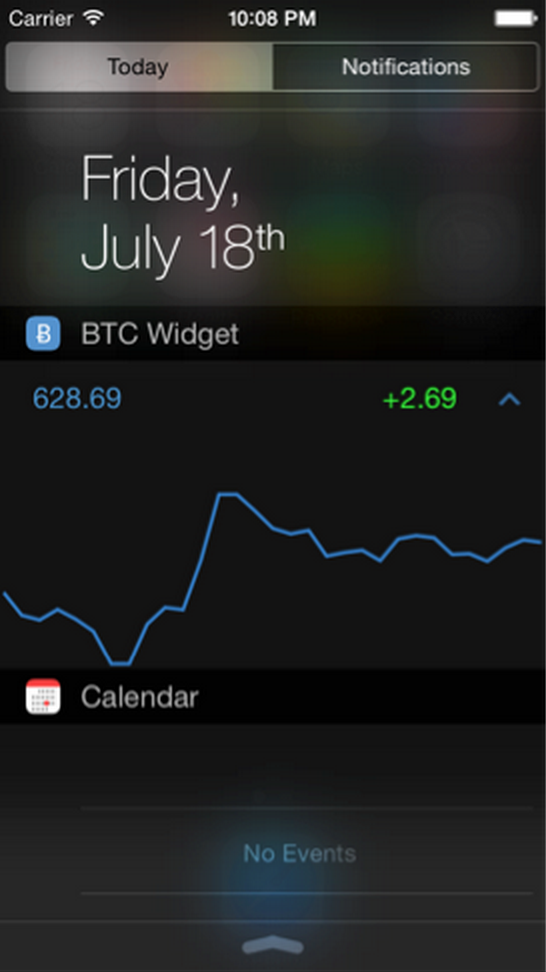
A complication is a small UI element that displays custom information on the clock face of Apple Watch. Like your app’s glance, complications are a way to display your app’s most important information to the user quickly. Your complications can be displayed alongside system complications for displaying the current date, moon phases, sunrise times, user activity, and many other types of information.

There’s a few different methods to update complications in your apps, if you’re complication data is known from now and into the future then you can send all the data for the timelines up to the complication, this also allows your complication to support the Time Travel feature. Other options to update data include scheduled updates and certain types of push notifications.

All apps the support a complication must have a class that implements the CLKComplicationDataSource and all methods must be implemented, to register this in your app add the key CLKComplicationsPrincipalClass into your Info.plist.

ClockKit manages the life cycle of your complication, launching your extension at appropriate times, creating your data source object, and asking it for data. Complications run on an update cycle, which your able to configure via getNextRequestedUpdateDateWithHandler. You provide the ClockKit with data from the past, present and future data. It’s recommended to provide enough data for hours and not minutes, then if your data changes you can invalidate the data using CLKComplicationServer.

To display the UI for your complication you use a placeholder template, ClockKit only ask for your placeholder templates once after your app is installed on the device. It caches the data your provide and does not refresh unless your app is reinstalled or updated. Templates seem to support Images and Text must support the different shapes, ring, small and large.

Connectivity

The WatchConnectivity framework provide a two way communication between an iOS app and Watch app and basically we can use it to pass data back and forth between the phone and watch, live communication is possible when both apps are active otherwise data is sent in the background.

The new framework consists of just a few classes, WCSession, WCSessionFile, WCSessionFileTransfer, WCSessionUserInfoTransfer and finally the WCSessionDelegate.

The WCSession (and it’s delegate) is the primary facilitator of communication between the Watch and Phone. The WatchKit extension and the iOS app must configure their own session objects, activating the session opens a channel that allows each app to communicate with its counterpart.

When both apps are active you can send data directly using sendMessage otherwise you can send messages in the background using transferUserInfo or transferFile. All messages are delivered in the same order that they are sent.

The transferCurrentComplicationUserInfo on the WCSession allows iOS Apps to directly send data to the WatchApps and update the complication.

Custom Interfaces for Notifications

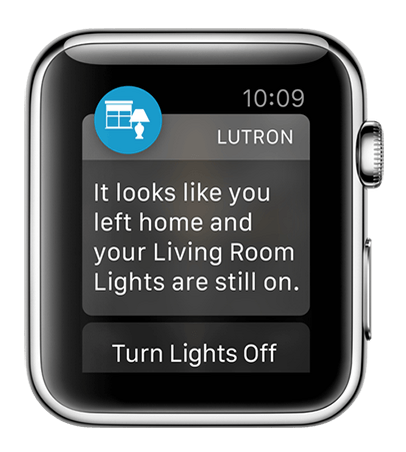
Yippee, Watch apps now have support for Actionable notifications introduced in iOS 8, which is a way to add buttons to your notification interface. This is something I’ve been waiting for as currently I find Notifications on the Watch aren’t amazingly useful. Apple Watch automatically adds the button to the notification, as developers we just need to handle the action the user selects.

Notifications have a short look that cannot be customised and the long look which can be customised. The long look also contains any action buttons that you support.

Summary

Apple has really thought about how developers can build awesome user experiences with the Apple Watch and they’ve opened up a lot more than I would have expected. Well it looks like us app developers have our work cut out, there’s a lot to learn about Watch development, and Apple is betting big on the Watch.

Current none of these APIs are supported by Xamarin and I’m sure it wouldn’t too far away, except they do have a bit of work cut out for them.


WWDC n+1 – The Keynote + Platforms State of the Union

Considering WWDC is a developers conference the keynote seemed more like a advertisement for Apple Music than anything else. We got 30 minutes of Apple Music, 2 minutes of swift and no code.  The Platforms presentation was much more interesting and finally included some code.

Below I list my highlights as a Xamarin developer, I’m going to keep these blogs focused on the interesting parts for Xamarin developers.

Multitasking in iOS 9  

More specifically designed for iPad Multitasking allows you to view two apps in a Slide Over, Split View, and Picture in Picture. The most interesting part of this is the layout, if you’ve been using auto layout it’s possible that your app might work with this already but if you haven’t then you might have a bit of work on your hands. If you’re using Xamarin.Forms this might be even more of a problem, but we will see once we’ve spent some more time with the new feature, this seems like a good item for some R&D and a blog post.

Search APIs in iOS 9

Apps are now allowed to interface with search in iOS 9, with the ability to deep link into the app. The API is called CoreSpotlight and is not supported by Xamarin yet. If your building website, there’s also the ability to include webmarkup that will appear in users search results. More info in a future blog post.

New game development APIs

Advancements in SceneKit, SpriteKit, and Metal. New APIs including GameplayKit makes it simple to build better quality games that involve complex rules, states, and behaviors. Model I/O gives you powerful control over the rendering of physical object models with materials and realistic lighting. ReplayKit lets users easily record and share great game content.

App Thinning

With iOS 9, the App Store allows users to download apps that are specifically optimized for their device. This means apps will download, install and launch faster while taking up less storage space than before. Build support for slicing, on-demand resources, and bitcode, and give your users smaller, more convenient updates to your apps. At the moment I’m not sure how this will work but stay tuned and you’ll find out soon.

Swift 2.0 and Open Source

The next version of swift has been announced with advanced error-handling, availability checking, and lots of enhancements to syntax. In even bigger news Apple is planning to make swift open source sometime this year, I’m not sure exactly how this relates to Xamarin but it’s still good news for developers.

WatchKit for watchOS 2

Apple announced a updated watch operating named watch OS 2, giving developers a bunch of new APIs and functionality, such as programmatic access to the Digital Crown and animation APIs for more dynamic user interfaces. New APIs for playing audio, video and microphone. Access to the Taptic engine, you can add haptic feedback in your Apple Watch apps. Extensions now run Native on the watch and don’t require a round trip to the phone resulting in a faster and responsive watchapp, developers can also create iPhone not present apps and full networking with NSSession and can work when iPhone is out of range. WatchApps now have a larger API a little similar to the iOS API, but with the extras like Digital Crown, Tapic Engine etc.

watchOS 2 also includes many enhancements to other existing frameworks such as HealthKit, enabling access to the health sensors that access heart rate and health information in real-time. CoreMotion enhancements include the ability to use the accelerometer to create engaging experiences on Apple Watch. Notifications on the watch can now have custom buttons and actions directly from the notification.

ClockKit, Time Travel and Complications

Well we all wanted it but weren’t sure if we would get it, but WE DID. Apps can now have their own data/information on the watch clock face, this information can be live updated via few different methods. And with the new Time Travel feature in watchOS 2, users can turn the Digital Crown to go backward and forward in time to display information in Complications from that time. Users can even enable multiple versions of your app’s Complications on the same clock face to display a variety of information.

Free App Development + $99 for all platforms

It’s now Free for developers to develop apps for all platform and now it’s only $99 if you want a developer account. The developer account is required to distribute and has a range of other features like access to early versions.

OS Upgrade Improvements 

Apple noted the problem of ‘free-space’ that many faced when attempting to update to iOS 8, so now iOS 9 will only require 1.4 GB of freespace to update. Apple are committed to pushing users to upgrade their OS.

iOS 9 Improved Battery Life & Low Power Mode

iOS 9 has an extra hour of battery life over iOS 8. iOS 9 now comes with a low power mode which can increase battery life by 3 hours..

Universal Links

App developers are now able to have a single link that opens in safari on the desktop but deep link into a app on the iPhone.

Summary

It’s been a long day but I’m very excited about learning more about these new features. I’ve got many more blog posts to come so stay tuned.

Thanks

Michael