In this post we’re going to dive into ARKit, we’ll find out what it is and get started with building our first augmented reality experience in ARKit.
ARKit is Apple’s toolkit for building augmented reality experiences on iOS devices. It was initially released at WWDC 2017, then ARKit 2.0 was released at WWDC 2018.
Before we jump into any code it’s important to understand what ARKit is and why we need it. Augmented Reality on mobile devices is hard, it’s hard because of the heavy calculations/triangulations/mathematics. It’s also very hard to do AR without killing the users battery or reducing the frame rates. ARKit takes care of all the hard parts for you hence allowing you to use a clean and simple API.
The Basics of ARKit
In order to Augment our Reality then we need to be able to track reality, eg how do we map the world so that we know what it looks like in a digital form. Devices like HoloLens have special sensors specifically designed for AR tracking. Mobile devices don’t have anything specifically designed for world tracking, but they do have enough sensors that when combined with great software we can track the world.
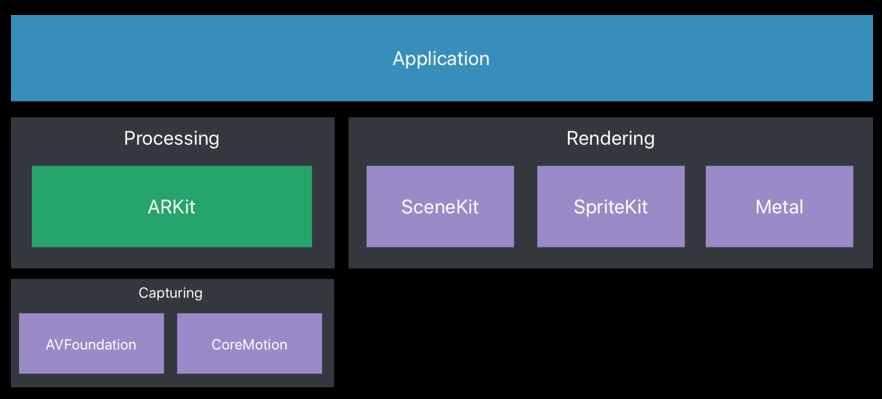
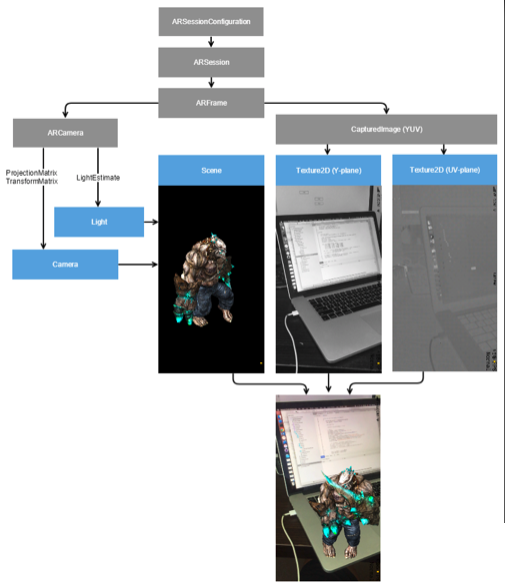
ARKit takes advantage of the sensors (camera, gyroscope, accelerometer, motion) already available on the device. As you can see in the diagram below ARKit is only responsible for the processing and basically this means sensor reading and advanced mathematical calculations. The rendering can be handled by any 2D/3D rendering engine, which includes SceneKit as you see below but majority of the apps will be using a 3D engine like Unreal or Unity.
Understanding the World
The primary function of ARKit is to take in sensor data, process that data and build a 3D world. In order to do this ARKit uses a truckload of mathematical calculations, we can simplify and name some of the methods ARKit is using.
The diagram below shows Inertial Odometry, Inertial Odometry takes in motion data for processing. This input data is processed at a high frame rate.
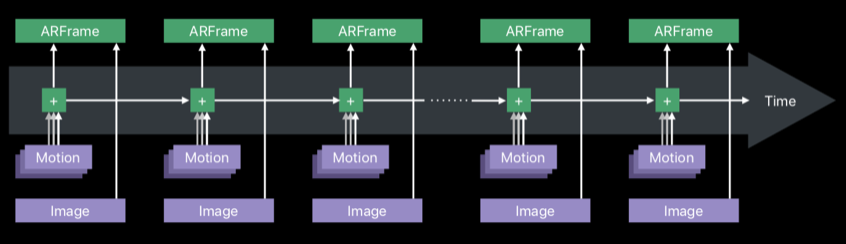
The diagram below shows Visual Odometry, Visual Odometry takes in Video data from the camera for processing. The processing of visual data is done at a lower framerate and this is due to the fact processing the visual data is CPU intensive.

ARKit then combines the odometries to make what’s called Visual Inertial Odometry. This will have the motion data processed at a high framerate, the visual data processed at a lower framework and differences between the processing normalised. You can see Visual Inertial Odometry in the diagram below.

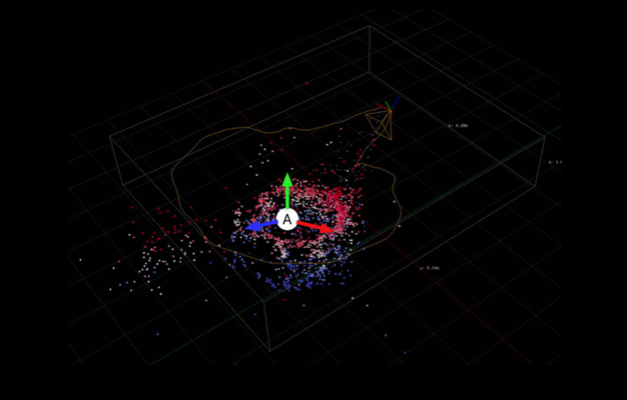
Triangulation allows the world mapping
In a very simple explanation triangulation is what allows ARKit to create a model of the world. In a similar way to humans, so as the phone is moved around ARKit will do calculations against the differences allowing ARKit to essentially see in 3D. A digital map of the world is created.
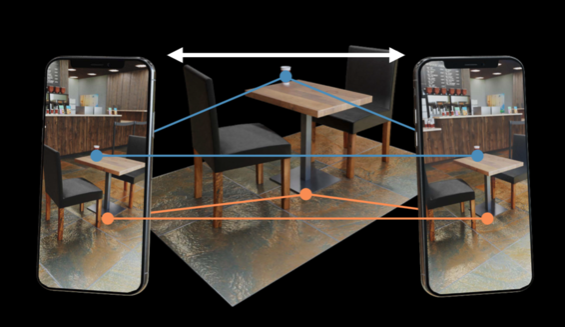
As you can see below a world map is created within ARKit.
Augmenting Reality (with Anchor Points)
As the world is mapped ARKit will create and update Anchor Points, these anchor points allow us to add items in reference to the anchor point. As you can see in the diagram below ARKit has added Anchor points and we’ve placed an object (3D vase) near the anchor point. As the devices is moved around these anchor points are updated, so it’s important that we track these changes and update our augmentations of the world.
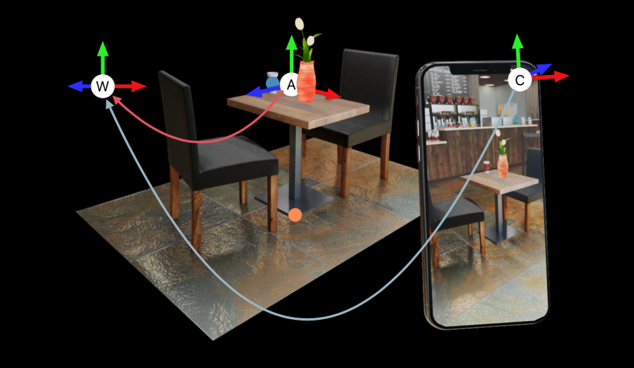
As I mentioned before ARKit only does the processing and provide the data. It’s up to us to render objects in the 3D world. Below shows how you’ll combine both the video captured and then overlay a 3D rendering. As we move both the video capture and the 3D rendering is updated.
Tracking Options/Features.
ARKit has a few different tracking options and features that I will go over below.
Orientation Tracking
This is the most basic type of tracking available in ARKit, this will track your orientation within the world. It will not track your location in physical space, in essence it’s like your standing still and can view 360 degrees in the world.
![]()
World Tracking
This option in ARKit is the most common, in this scenario ARKit tracks and builds a complete world maps and allows you to move freely within the world. It’s important to note that World Tracking includes the majority of features in ARKit including Plane Detection, Maps, Image Tracking and Object Detection.
Plane Detection
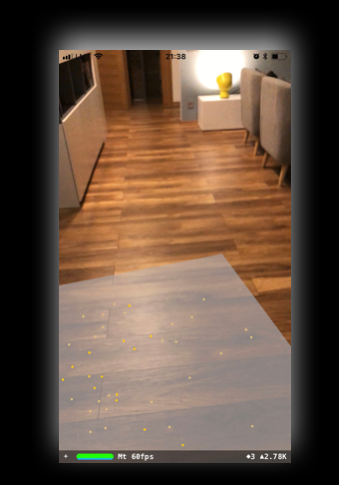
As we’re moving around the 3D world we need to know about the different surfaces in the world this is where plane detection comes in. The first release of ARKit included only horizontal orientation, in ARKit 2 we now have the option of both vertical and horizontal orientation. In the image below you can see the floor being detected as a plane.
Saving & Loading Maps
In ARKit 2.0 we can now save, load and share the world map. In ARKit 1.0 the map was internal and only ever kept around for a single users session. This meant that in ARKit 1.0 you could not save sessions (maps) to be resumed later or share. This allows for a few scenarios including multiplayer games and the ability to save world maps.
Below is a video of a multi player game that leverages ARKit 2.0 map sharing feature.

Image Tracking
Imaging tracking allows your app to easily detect an image in the real world, this for example might be a photo or a business card or a dvd case. Once you’ve detected this image then you’ll be able to easily augment the reality around image. Normally a task like this would be really difficult but again ARKit makes this really easy for us, the only steps we need to take are a reference (eg the image we need to track) with the physical size, once we set that up we use a single option to set turn on the feature and add the reference images into ARKit.
Below I’ve included a reference video that leverages Image Tracking. While it looks very impressive the application below could be implemented with ARKit 2.0 without a huge amount of effort, around 80-100 lines of code.
Object Detection
Object Detection (ARKit 2.0 feature) allows us to both scan and detect 3D objects. I think the best way to understand this would be a simple video.
Building your first ARKit Experience
To give you a feel for how easy it is to build a ARKit experience I’m going to take you through a simple application in which you can see in the video below. As you move the phone around a plane is detected (which ARKit does for you), we place a Node on that surface then if a users taps the Node we add a box on top of that node where the user tapped.
Let’s jump into some code to see how easy it is to get started with ARKit.
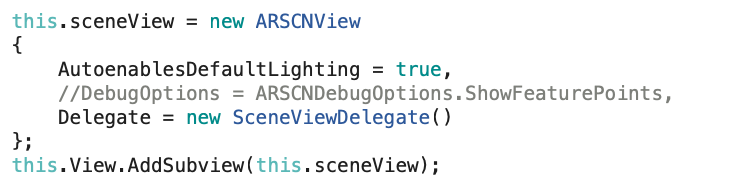
The first thing we do in this app is create a SceneView and add it as a SubView to the visible ViewController, as we see below.
The next step we need is to call the run command on the scene with the world tracking configuration, as we see below.

As we move the phone around and surfaces are detected the DidAddNode method is called by ARKit. As you can see below if the anchor is a ARPlaneAnchor we then add our PlaneNode, which is the blue we see in the video.

Then if a user touches the PlaneNode we then add a Cube on top of where the user just touched.

That’s it, all we need to do for our first AR Experience. You can see the full code file below or get all the code from https://github.com/rid00z/ARKitExample
using System;
using System.Collections.Generic;
using System.Linq;
using ARKit;
using ARKitExample.Nodes;
using Foundation;
using SceneKit;
using UIKit;

namespace ARKitExample
{
    public partial class ViewController : UIViewController
    {
        private readonly ARSCNView sceneView;

        protected ViewController(IntPtr handle) : base(handle)
        {
            this.sceneView = new ARSCNView
            {
                AutoenablesDefaultLighting = true,
                //DebugOptions = ARSCNDebugOptions.ShowFeaturePoints,
                Delegate = new SceneViewDelegate()
            };
            this.View.AddSubview(this.sceneView);
        }

        public override void ViewDidLoad()
        {
            base.ViewDidLoad();

            this.sceneView.Frame = this.View.Frame;
        }

        public override void ViewDidAppear(bool animated)
        {
            base.ViewDidAppear(animated);

            this.sceneView.Session.Run(new ARWorldTrackingConfiguration
            {
                AutoFocusEnabled = true,
                PlaneDetection = ARPlaneDetection.Horizontal,
                LightEstimationEnabled = true,
                WorldAlignment = ARWorldAlignment.GravityAndHeading
            }, ARSessionRunOptions.ResetTracking | ARSessionRunOptions.RemoveExistingAnchors);
        }

        public override void ViewDidDisappear(bool animated)
        {
            base.ViewDidDisappear(animated);

            this.sceneView.Session.Pause();
        }

        public override void TouchesEnded(NSSet touches, UIEvent evt)
        {
            base.TouchesEnded(touches, evt);

            if (touches.AnyObject is UITouch touch)
            {
                var point = touch.LocationInView(this.sceneView);
                var hits = this.sceneView.HitTest(point, ARHitTestResultType.ExistingPlaneUsingExtent);
                var hit = hits.FirstOrDefault();

                if (hit == null) return;

                var cubeNode = new CubeNode(0.05f, UIColor.White)
                {
                    Position = new SCNVector3(
                        hit.WorldTransform.Column3.X,
                        hit.WorldTransform.Column3.Y + 0.1f,
                        hit.WorldTransform.Column3.Z
                    )
                };

                this.sceneView.Scene.RootNode.AddChildNode(cubeNode);
            }
        }

        class SceneViewDelegate : ARSCNViewDelegate
        {
            private readonly IDictionary<NSUuid, PlaneNode> planeNodes = new Dictionary<NSUuid, PlaneNode>();

            public override void DidAddNode(ISCNSceneRenderer renderer, SCNNode node, ARAnchor anchor)
            {
                if (anchor is ARPlaneAnchor planeAnchor)
                {
                    var planeNode = new PlaneNode(planeAnchor);
                    node.AddChildNode(planeNode);
                    this.planeNodes.Add(anchor.Identifier, planeNode);
                }
            }

            public override void DidRemoveNode(ISCNSceneRenderer renderer, SCNNode node, ARAnchor anchor)
            {
                if (anchor is ARPlaneAnchor planeAnchor)
                {
                    this.planeNodes[anchor.Identifier].RemoveFromParentNode();
                    this.planeNodes.Remove(anchor.Identifier);
                }
            }

            public override void DidUpdateNode(ISCNSceneRenderer renderer, SCNNode node, ARAnchor anchor)
            {
                if (anchor is ARPlaneAnchor planeAnchor)
                {
                    //this.planeNodes[anchor.Identifier].Update(planeAnchor);
                }
            }
        }
    }
}