Announcing FreshMvvm 1.0.1 Release

No bugs to fix, Yay!

Only some awesome new features, actually really nice extended and very useful features. With such a big take up of FreshMvvm we’ve ramped up the development. As always we take feedback and iterate on it so let us know of anything.

WhenAny

I’ve always loved the WhenAny feature in ReactiveUI and just wanted to have it. Not to mention it’s strongly typed which makes it so much better.

So now your ViewModels (or anything with INotifyPropertyChanged) you can subscribe to the changes of a property using the WhenAny features.

Here’s how you can use it:

public ContactPageModel (IDatabaseService dataService)
{
    _dataService = dataService;

    this.WhenAny(HandleContactChanged, o => o.Contact);
}

void HandleContactChanged(string propertyName)
{
    //handle the property changed, nice
}

Pushing different views

Another awesome feature that we’ve been loving is the ability to push with a different view. This means you can have multiple views for a single ViewModel.

Here’s the signature:

Task PushPageModel<T, TPage> (object data, bool modal = false) where T : FreshBasePageModel where TPage : Page;

So it’s as easy as:

PushPageModel<MyViewModel, MySecondView>();

Clean up after page is Popped

FreshBasePageModel now has a PageWasPopped event, this can be used to cleanup after a page has been Popped.

/// <summary>
/// This event is raise when a page is Popped, this might not be raise everytime a page is Popped. 
/// Note* this might be raised multiple times. 
/// </summary>
public event EventHandler PageWasPopped;

We’ve linked up all the parts within the FreshMvvm project so that the event is always called and always called once, but this might not always be the case if you use a CustomNavigationService and don’t implement correctly.

This is a breaking change on the IFreshNavigationService as it now has a NotifyChildrenPageWasPopped().

If you have a custom navigation service you will need to implement this, here’s a sample of how the builtin master detail service handles it.

public void NotifyChildrenPageWasPopped()
{
    if (Master is NavigationPage)
        ((NavigationPage)Master).NotifyAllChildrenPopped();
    foreach (var page in this.Pages.Values)
    {
        if (page is NavigationPage)
            ((NavigationPage)page).NotifyAllChildrenPopped();
    }
}

As always I love your feedback, please let me know how it do

Thanks

FreshMvvm 1.0 Released

So it’s official, FreshMvvm is now 1.0 and available in nuget.

Let’s take a look at some of the new features.

  • Ability to use ViewModel naming instead of PageModel, thanks to this contribution by Olexandr Leuschenko
  • Multiple Navigation Services
  • Support for custom IOC containers
  • Ability to Push a NavigationContainer
  • It also handles async better thanks to Olexandr Leuschenko

Let’s take a look at some of the bigger features in the release.

Multiple Navigation Services

It’s always been possible to do any type of navigation in FreshMvvm, with custom or advanced scenarios were done by implementing a custom navigation service. Even with this ability people found it a little hard to do advanced navigation scenarios in FreshMvvm. After I reviewed all the support questions that came in for FreshMvvm I found that the basic issue people had was they wanted to be able to use our built in navigation containers multiple times, two primary examples are 1) within a master detail having a navigation stack in a master and another in the detail 2) The ability to push modally with a new navigation container. In order to support both these scenarios I concluded that the FreshMvvm required the ability to have named NavigationServices so that we could support multiple NavigationService’s.

Using multiple navigation containers

Below we’re running two navigation stacks, in a single MasterDetail.

var masterDetailsMultiple = new MasterDetailPage (); //generic master detail page

//we setup the first navigation container with ContactList
var contactListPage = FreshPageModelResolver.ResolvePageModel<ContactListPageModel> ();
contactListPage.Title = "Contact List";
//we setup the first navigation container with name MasterPageArea
var masterPageArea = new FreshNavigationContainer (contactListPage, "MasterPageArea");
masterPageArea.Title = "Menu";

masterDetailsMultiple.Master = masterPageArea; //set the first navigation container to the Master

//we setup the second navigation container with the QuoteList 
var quoteListPage = FreshPageModelResolver.ResolvePageModel<QuoteListPageModel> ();
quoteListPage.Title = "Quote List";
//we setup the second navigation container with name DetailPageArea
var detailPageArea = new FreshNavigationContainer (quoteListPage, "DetailPageArea");

masterDetailsMultiple.Detail = detailPageArea; //set the second navigation container to the Detail

MainPage = masterDetailsMultiple;

PushModally with new navigation stack

//push a basic page Modally
var page = FreshPageModelResolver.ResolvePageModel<MainMenuPageModel> ();
var basicNavContainer = new FreshNavigationContainer (page, "secondNavPage");
await CoreMethods.PushNewNavigationServiceModal(basicNavContainer, new FreshBasePageModel[] { page.GetModel() }); 

//push a tabbed page Modally
var tabbedNavigation = new FreshTabbedNavigationContainer ("secondNavPage");
tabbedNavigation.AddTab<ContactListPageModel> ("Contacts", "contacts.png", null);
tabbedNavigation.AddTab<QuoteListPageModel> ("Quotes", "document.png", null);
await CoreMethods.PushNewNavigationServiceModal(tabbedNavigation);

//push a master detail page Modally
var masterDetailNav = new FreshMasterDetailNavigationContainer ("secondNavPage");
masterDetailNav.Init ("Menu", "Menu.png");
masterDetailNav.AddPage<ContactListPageModel> ("Contacts", null);
masterDetailNav.AddPage<QuoteListPageModel> ("Quotes", null);
await CoreMethods.PushNewNavigationServiceModal(masterDetailNav);

Custom IOC Container

The second major request for FreshMvvm 1.0 was to allow custom IOC containers. In the case that your application already has a container that you want to leverage.

Using a custom IOC container is very simple in that you only need to implement a single interface.

public interface IFreshIOC
{
    object Resolve(Type resolveType);
    void Register<RegisterType>(RegisterType instance) where RegisterType : class;
    void Register<RegisterType>(RegisterType instance, string name) where RegisterType : class;
    ResolveType Resolve<ResolveType>() where ResolveType : class;
    ResolveType Resolve<ResolveType>(string name) where ResolveType : class;
    void Register<RegisterType, RegisterImplementation> ()
        where RegisterType : class
        where RegisterImplementation : class, RegisterType;
}

And then set the IOC container in the System.

FreshIOC.OverrideContainer(myContainer);

This release can be found in nuget and the source code on github.

https://www.nuget.org/packages/FreshMvvm/

https://github.com/rid00z/FreshMvvm

Thanks


XAML Attached Properties Tricks in Xamarin.Forms

I’m sure you know of behaviours in Xamarin.Forms but have you heard of Attached Properties?

Have you ever wondered how you define properties for a Grid on a Label, eg <Label Grid.Row=”5″, and the Grid just seems to know about it. This is attaching a piece of data onto the Label so that the Grid can reference the data.

Let’s take a look at how it works in the Grids case. In our Xaml we’d normally have something like the code above, so somehow we tell the Grid that we want to be on Row number  5. In order for this to work the Grid needs to have a static ‘attached’ bindable property. Let’s take a look at what the Grid actually has.

public static readonly BindableProperty RowProperty = BindableProperty.CreateAttached ("Row", typeof(int), ...);

So yep the Grid has the attached property for Row, awesome, now how does the Grid get that data?

In order for the Grid to be able to access that data it needs a static method which will extract it as follows.

public static int GetRow (BindableObject bindable)
{
    return (int)bindable.GetValue (Grid.RowProperty);
}

We can also see that the Grid calls this method to get the data from the child element.

int row2 = Grid.GetRow (child);

So that’s some pretty cool stuff.

Now for the Trick

Considering this is a bindable property we can actually attach anything to this static property, our own object or even a command. We can also get notifications when the property changes, during that notification we can obtain references to both the Element and the bindable property. This means we can link up custom behaviours without even using behaviours.

Say for instance we wanted to attached a TapGesture for a View to a Command? Normally this is fairly verbose to add in Xaml but setup correctly it can become just a property on the View.

local:TappedGestureAttached.Command="{Binding OpenNewPage}"

So what’s TappedGestureAttached? Let’s take a look.

Below we have a Static property called CommandProperty, that property name is Command, has a return type of ICommand and a declaring type of View. You can also see it’s linked to  the OnItemTappedChanged command, which means when the property changes that event gets called.

public class TappedGestureAttached
{
    public static readonly BindableProperty CommandProperty =
        BindableProperty.CreateAttached (
            propertyName: "Command",
            returnType: typeof(ICommand),
            declaringType: typeof(View),
            defaultValue: null,
            defaultBindingMode: BindingMode.OneWay,
            validateValue: null,
            propertyChanged: OnItemTappedChanged);

Below we have the OnItemTappedChanged command, as I mentioned before we have access to both the View and the Command hence we can wire up the TapGestureRecognizer.

public static void OnItemTappedChanged(BindableObject bindable, object oldValue, object newValue)
{
    var control = bindable as View;

    if (control != null) {
        control.GestureRecognizers.Clear ();
        control.GestureRecognizers.Add (
            new TapGestureRecognizer() {
                Command = new Command((o) => {

                    var command = GetItemTapped (control);

                    if (command != null && command.CanExecute (null))
                        command.Execute (null);
                })
            }
        );
    }
}

There we have it wiring up a TapGestureRecognizer in less than a line.

Here’s the full code.

public class TappedGestureAttached
{
    public static readonly BindableProperty CommandProperty =
        BindableProperty.CreateAttached (
            propertyName: "Command",
            returnType: typeof(ICommand),
            declaringType: typeof(View),
            defaultValue: null,
            defaultBindingMode: BindingMode.OneWay,
            validateValue: null,
            propertyChanged: OnItemTappedChanged);


    public static ICommand GetItemTapped(BindableObject bindable)
    {
        return (ICommand)bindable.GetValue (CommandProperty);
    }

    public static void SetItemTapped(BindableObject bindable, ICommand value)
    {
        bindable.SetValue (CommandProperty, value);
    }

    public static void OnItemTappedChanged(BindableObject bindable, object oldValue, object newValue)
    {
        var control = bindable as View;

        if (control != null) {
            control.GestureRecognizers.Clear ();
            control.GestureRecognizers.Add (
                new TapGestureRecognizer() {
                    Command = new Command((o) => {

                        var command = GetItemTapped (control);

                        if (command != null && command.CanExecute (null))
                            command.Execute (null);
                    })
                }
            );
        }
    }
}

We can also use this to hook up events that are directly on the control without using the code behind of the Xaml. Below we link up the ListView.ItemTapped event to a Command, which will be inside our ViewModel rather than codebehind.

public class ItemTappedAttached
{
    public static readonly BindableProperty CommandProperty =
        BindableProperty.CreateAttached (
            propertyName: "Command",
            returnType: typeof(ICommand),
            declaringType: typeof(ListView),
            defaultValue: null,
            defaultBindingMode: BindingMode.OneWay,
            validateValue: null,
            propertyChanged: OnItemTappedChanged);


    public static ICommand GetItemTapped(BindableObject bindable)
    {
        return (ICommand)bindable.GetValue (CommandProperty);
    }

    public static void SetItemTapped(BindableObject bindable, ICommand value)
    {
        bindable.SetValue (CommandProperty, value);
    }

    public static void OnItemTappedChanged(BindableObject bindable, object oldValue, object newValue)
    {
        var control = bindable as ListView;
        if (control != null)
            control.ItemTapped += OnItemTapped;
    }

    private static void OnItemTapped(object sender, ItemTappedEventArgs e)
    {
        var control = sender as ListView;
        var command = GetItemTapped (control);

        if (command != null && command.CanExecute (e.Item))
            command.Execute (e.Item);
    }
}


Announcing SlideOverKit for Xamarin.Forms

I’m very happy to announce XAM Consulting’s first Premium component release, SlideOverKit for Xamarin.Forms. As I’ve discussed before at XAM Consulting we have a goal to contribute to the Xamarin ecosystem and help companies build great things, our premium components are one part of this goal.

This component is something we’ve been working on for a while after being frustrated with the lack of high quality sliders in Xamarin.Forms.

This component is flexible enough to create any type of Slider you might like, some examples might be a Large Menu that slides from the top of the screen, a small draggable context menu from the right/bottom of the screen or even a right side master detail. There’s a large amount of options that you can tweak to allow you to get your menu looking just right. In this component we’ve done all the slider code in Native (eg we’ve done the hard native work), this means that the component is… 1) it’s super quick 2) you don’t need to use the slow Xamarin.Forms layouts 3) the touch/gesture support is very smooth.

In some ways we would love to give it away for free but after consideration we would prefer to offer a higher quality product with support rather than a half finished product with no support, hence why it’s a ‘Premium Component’. If you would like to read more about our thoughts in regards to pricing components please take a look at this blog post on Pricing Xamarin.Forms Components.

SlideOverKit is available in nuget right now and is available for purchase @ $100 USD. Please head over the the SlideOverKit for Xamarin.Forms website to get more details on how to get started. We have a github repository with a bunch of samples for the component.

Take a look below to see some of the awesome options available for the SlideOverKit.

So check it out SlideOverKit for Xamarin.Forms.


So check it out SlideOverKit for Xamarin.Forms.

How to price Xamarin.Forms components

This post is primarily documenting my thought process when trying to come up with pricing for two premium components that we’re about to release at XAM Consulting. We’re very excited about releasing these components. We’re looking forward to contributing to the Xamarin ecosystem and helping developers build great things. Many companies I’ve worked for have clearly stated that their whole company has been built on the back of great component vendors like DevExpress and Telerik. It’s pretty amazing to know that something you’ve built has also helped build an amazing company or change the world.

The first component we are releasing is called SlideOverKit. This is a powerful component that allows you to slide over from anywhere on the screen, with nice smooth animations. It can be used to create slide menus such as a Right Side Master Detail, Mini Context Menu’s or the display of Contextual Information. The key advantage of this menu is that internally we’ve built the code using Native APIs and therefore it is has the advantages of not only being incredibly quick but it also supports swipe/touch gestures. (Note* that when I refer to Native APIs, that’s only from our internal perspective, from a developer’s perspective the component is built completely from Xamarin.Forms). To illustrate its performance and ease of use, I’ve included some samples below with the SlideOverKit component.

The second component, called TEditor, is a rich/html text editing component designed for Xamarin.Forms. It is intended to be used for the editing, importing and exporting of HTML documents. As such, it supports the majority of rich text editing functions such as Bold, Italic to text color. Like the first component, it takes only a few lines of code to include this component in a project.

So what price do I sell it for?

This is a very hard question; if you price it too high then people won’t see it’s value and if you price it too low then you won’t have enough money to continue it’s development. It’s important to me that we have continued development on the components that we sell. Nobody wants a component vendor that’s not committed.

To investigate further, I researched the components supplied within the ecosystem. There’s the many big vendors like DevExpress and Telerik, who sell their components at over $1000 per year. I’ve also know about the MR.Gestures component developed by Michael Rumpler, who sells it at a very affordable $10. That’s a huge difference in pricing, so I wanted to reach out to Michael and see if he could provide any insights based on his experiences. Michael mentioned that the amount of demand was much less than was suggested on the uservoice website for his component. He also mentioned that at the price of $10, combined with the amount of sales, it wasn’t anywhere near the amount of effort he had to put in to develop it. Michael confirmed a few suspicions that I had:

1) there’s likely to be a much lower demand than you think for a component and

2) there’s a reason companies like telerik must charge so much for their components. eg. component development is hard and it’s very time consuming.

I’ve been in software long enough to know there’s a lot of hidden time and costs in software. At a minimum you need to calculate:

  • Initial development costs
  • Costs in writing documentation
  • Costs in handling support requests (per sale)
  • Maintenance development costs

Xamarin.Forms is a fast moving target, not only because of the speed of development from the Xamarin team, but also because of the rapidly changing underlying platforms (iOS, Android and Windows). The other issues we also encounter is that most components need to use the Native APIs on the platforms.

So far we’ve spent ~150 hours on each of the components, and on top of this there is a yearly maintenance of ~50 hours. Adding these up, based on an estimate of $75 per hour development cost, leads to a cost of $11,250 in the first year and $3,750 each year after that.

It would be nice if the components were to break even in the 24 months. In order to calculate this, we need to guesstimate the amount of sales each component will generate each year. Given that each component is a niche component inside Xamarin.Forms, which is a niche in Xamarin, which is a niche in Native Apps, which is a niche in the software world. I’m really not expecting a huge amount of sales each year, for SlideOverKit. I don’t think that I would expect more than 50-100 sales per year. Assuming 75 sales in 12 months, the costs are $15,000 in the first 2 years, then $15,000 / 150 = $100 per component. Now the RichTextEditor is an even more Niche component, which I’m only expecting a few sales each per year. Assuming 10 sales per year, then $15,000 / 20 = $750.

Shouldn’t it be free and open source like in XLabs and other components?

Open source software is great, I get a lot from the open source community and love contributing to the open source community, I spent a lot of time developing the FreshMvvm Framework. The problem with projects like XLabs, is that many of the components are not feature complete or are half finished (or are implemented on only a single platform). The reason for this is that most of us contributors to XLabs, also have full-time jobs and can only work on the project in our spare time.

XLabs works great if you’re an expert in Forms, Android, or iOS and don’t mind getting your hands dirty delving deep into code. Many developers and business don’t have all day and night to be working on building components.

So I wanted to put in the effort up front so that I can help time-poor developers and businesses, so we invest in developing production ready components that are easy to use, feature rich, well documented and production ready and developers can just build awesome stuff.

If you would like early access to any of the components please feel free to contact me anytime.

Thanks

Michael


FreshMvvm 1.0 Preview Release

Since the first release of FreshMvvm it’s been a wild ride, the up take of FreshMvvm has been very impressive it’s really good to see others having success using FreshMvvm. While I’ve been using and loving FreshMvvm for a long long time, even since before it was called FreshMvvm, it’s great to see others also enjoying the Framework.

Since this release has a few large features and breaking changes I’ve decided bump the version up to 1.0 preview. Please see below of a description of the features.

Multiple Navigation Services

It’s always been possible to do any type of navigation in FreshMvvm, with custom or advanced scenarios were done by implementing a custom navigation service. Even with this ability people found it a little hard to do advanced navigation scenarios in FreshMvvm. After I reviewed all the support questions that came in for FreshMvvm I found that the basic issue people had was they wanted to be able to use our built in navigation containers multiple times, two primary examples are 1) within a master detail having a navigation stack in a master and another in the detail 2) The ability to push modally with a new navigation container. In order to support both these scenarios I concluded that the FreshMvvm required the ability to have named NavigationServices so that we could support multiple NavigationService’s.

Using multiple navigation containers

Below we’re running two navigation stacks, in a single MasterDetail.

var masterDetailsMultiple = new MasterDetailPage (); //generic master detail page

//we setup the first navigation container with ContactList
var contactListPage = FreshPageModelResolver.ResolvePageModel<ContactListPageModel> ();
contactListPage.Title = "Contact List";
//we setup the first navigation container with name MasterPageArea
var masterPageArea = new FreshNavigationContainer (contactListPage, "MasterPageArea");
masterPageArea.Title = "Menu";

masterDetailsMultiple.Master = masterPageArea; //set the first navigation container to the Master

//we setup the second navigation container with the QuoteList 
var quoteListPage = FreshPageModelResolver.ResolvePageModel<QuoteListPageModel> ();
quoteListPage.Title = "Quote List";
//we setup the second navigation container with name DetailPageArea
var detailPageArea = new FreshNavigationContainer (quoteListPage, "DetailPageArea");

masterDetailsMultiple.Detail = detailPageArea; //set the second navigation container to the Detail

MainPage = masterDetailsMultiple;

PushModally with new navigation stack

//push a basic page Modally
var page = FreshPageModelResolver.ResolvePageModel<MainMenuPageModel> ();
var basicNavContainer = new FreshNavigationContainer (page, "secondNavPage");
await CoreMethods.PushNewNavigationServiceModal(basicNavContainer, new FreshBasePageModel[] { page.GetModel() }); 

//push a tabbed page Modally
var tabbedNavigation = new FreshTabbedNavigationContainer ("secondNavPage");
tabbedNavigation.AddTab<ContactListPageModel> ("Contacts", "contacts.png", null);
tabbedNavigation.AddTab<QuoteListPageModel> ("Quotes", "document.png", null);
await CoreMethods.PushNewNavigationServiceModal(tabbedNavigation);

//push a master detail page Modally
var masterDetailNav = new FreshMasterDetailNavigationContainer ("secondNavPage");
masterDetailNav.Init ("Menu", "Menu.png");
masterDetailNav.AddPage<ContactListPageModel> ("Contacts", null);
masterDetailNav.AddPage<QuoteListPageModel> ("Quotes", null);
await CoreMethods.PushNewNavigationServiceModal(masterDetailNav);

Custom IOC Container

The second major request for FreshMvvm 1.0 was to allow custom IOC containers. In the case that your application already has a container that you want to leverage.

Using a custom IOC container is very simple in that you only need to implement a single interface.

public interface IFreshIOC
{
    object Resolve(Type resolveType);
    void Register<RegisterType>(RegisterType instance) where RegisterType : class;
    void Register<RegisterType>(RegisterType instance, string name) where RegisterType : class;
    ResolveType Resolve<ResolveType>() where ResolveType : class;
    ResolveType Resolve<ResolveType>(string name) where ResolveType : class;
    void Register<RegisterType, RegisterImplementation> ()
        where RegisterType : class
        where RegisterImplementation : class, RegisterType;
}

And then set the IOC container in the System.

FreshIOC.OverrideContainer(myContainer);

Breaking Changes

Please remember whenever you register a IFreshNavigationService it now has to have a name.

FreshIOC.Container.Register<IFreshNavigationService> (this, Constants.DefaultNavigationServiceName);

Please find this pre-release in nuget. – https://www.nuget.org/packages/FreshMvvm/1.0.0-pre1

FYI – This nuget is a pre-release nuget and you’ll need to have the ‘pre-release’ option selected on nuget.

The main repo for FreshMvvm can be found on github – https://github.com/rid00z/FreshMvvm.

Please post any issues on the github repository.

Thanks

Michael


MVVM / MVC is dead? Is Unidirectional a MVVM / MVC Killer?

Ah so now when you’ve learnt MVC/MVVM, everyone’s decided that we shouldn’t do it anymore? Huh?

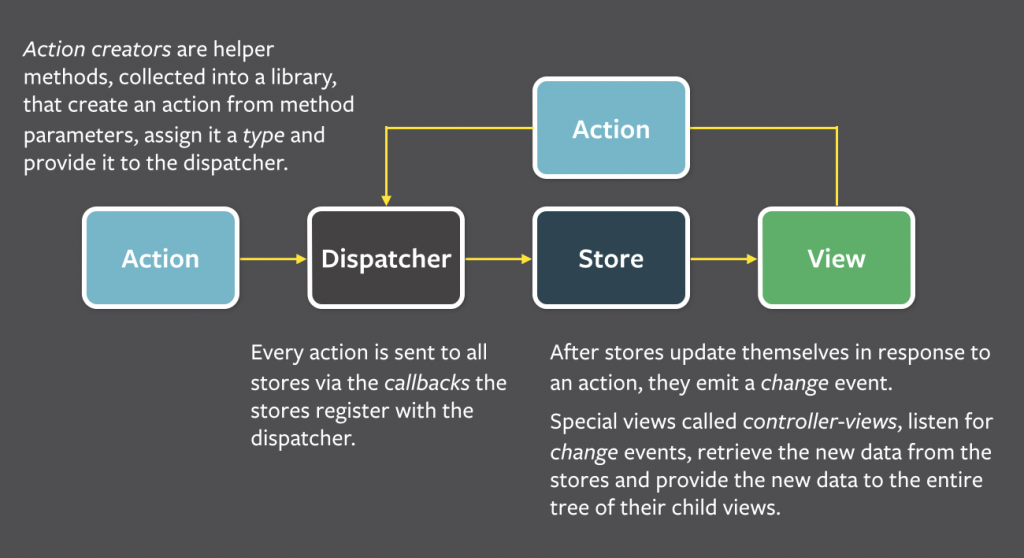
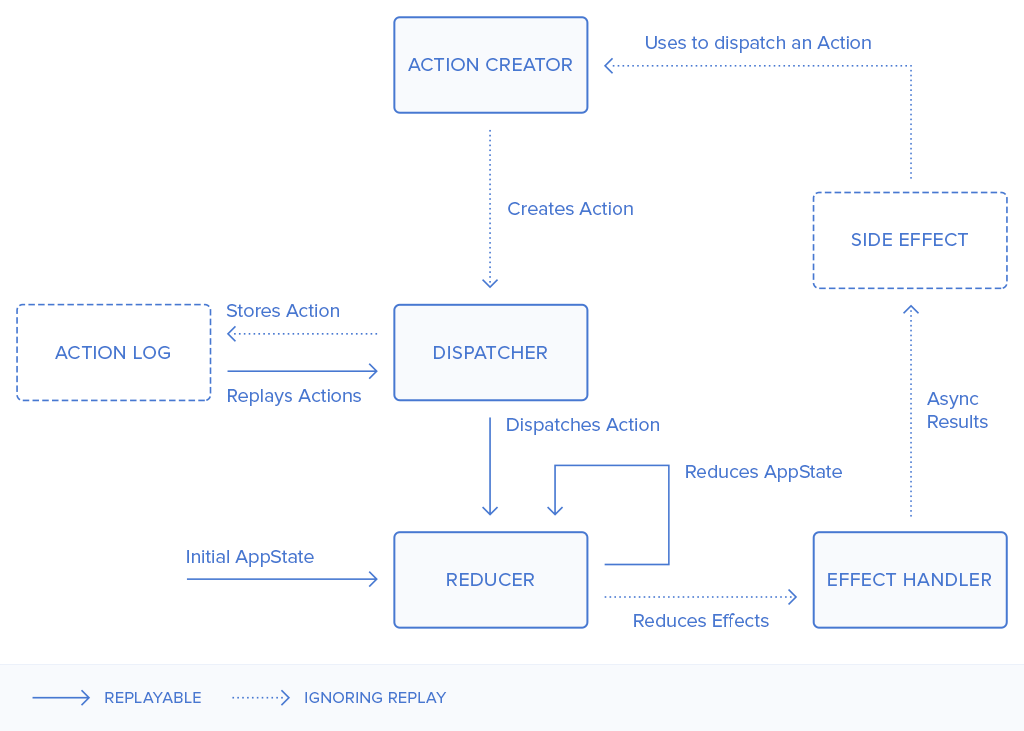
MVVM is a great pattern which allows for a clean separation between views and logic, it also lends itself well to unit testing, but is it the only way? If you didn’t already know there’s some new kids on the block, Unidirectional User Interface Architectures which is basically applying the CRQS/Event Sourcing pattern on the client side. The idea of these patterns is to have a single DataStore which is the source of truth and data is updated via events, all Views read from the single source of Data and can only update via events/actions. From what I can gather at the moment, the specific problems they solve are 1) Avoid data being duplicated across viewmodels and stale data 2) Avoid the situation of Fat ViewModels. At the moment this concept is being driven from the web clientside world, but eventually it might make it’s way into the Xamarin world and become popular, maybe? 

There’s new unidirectional frameworks appearing all the time, the ones I’ve looked into recently are Flux and Redux.

Flux Diagram 

flux-diagram

Redux Diagram

Redux Diagram

So can we have these in Xamarin? Yes, these are simply design patterns and can easily be implemented in C#. Infact someone has already created a project based on Redux named Redux.net. In some R&D we’ve been doing on a project we’ve also implemented a Xamarin.Forms sample for the Redux.net project.

Here’s some code from the redux project:

Let’s start with our Application state.

public class ApplicationState
{
    public ImmutableArray<Todo> Todos { get; set; }

    public TodosFilter Filter { get; set; }
}

The Actions are basically any changes in your apps state.

public class AddTodoAction : IAction
{
    public string Text { get; set; }
}

public class DeleteTodoAction : IAction
{
    public Guid TodoId { get; set; }
}

public class CompleteTodoAction : IAction
{
    public Guid TodoId { get; set; }
}

public class CompleteAllTodosAction : IAction
{
    public bool IsCompleted { get; set; }
}

public class ClearCompletedTodosAction : IAction
{

}

public class FilterTodosAction : IAction
{
    public TodosFilter Filter { get; set; }
}

The application reducer will then take an Action and modify the state.

public static class ApplicationReducer
{
    public static ImmutableArray<Todo> AddTodoReducer(ImmutableArray<Todo> previousState, AddTodoAction action)
    {
        return previousState
            .Insert(0, new Todo
                {
                    Id = Guid.NewGuid(),
                    Text = action.Text
                });
    }

    public static ImmutableArray<Todo> ClearCompletedTodosReducer(ImmutableArray<Todo> previousState, ClearCompletedTodosAction action)
    {
        return previousState.RemoveAll(todo => todo.IsCompleted);
    }

    public static ImmutableArray<Todo> CompleteAllTodosReducer(ImmutableArray<Todo> previousState, CompleteAllTodosAction action)
    {
        return previousState
            .Select(x => new Todo
                {
                    Id = x.Id,
                    Text = x.Text,
                    IsCompleted = action.IsCompleted
                })
            .ToImmutableArray();
    }

    public static ImmutableArray<Todo> CompleteTodoReducer(ImmutableArray<Todo> previousState, CompleteTodoAction action)
    {
        var todoToEdit = previousState.First(todo => todo.Id == action.TodoId);

        return previousState
            .Replace(todoToEdit, new Todo
                {
                    Id = todoToEdit.Id,
                    Text = todoToEdit.Text,
                    IsCompleted = !todoToEdit.IsCompleted
                });
    }

    public static ImmutableArray<Todo> DeleteTodoReducer(ImmutableArray<Todo> previousState, DeleteTodoAction action)
    {
        var todoToDelete = previousState.First(todo => todo.Id == action.TodoId);

        return previousState.Remove(todoToDelete);
    }

    public static ImmutableArray<Todo> TodosReducer(ImmutableArray<Todo> previousState, IAction action)
    {
        if (action is AddTodoAction)
        {
            return AddTodoReducer(previousState, (AddTodoAction)action);
        }

        if (action is ClearCompletedTodosAction)
        {
            return ClearCompletedTodosReducer(previousState, (ClearCompletedTodosAction)action);
        }

        if (action is CompleteAllTodosAction)
        {
            return CompleteAllTodosReducer(previousState, (CompleteAllTodosAction)action);
        }

        if (action is CompleteTodoAction)
        {
            return CompleteTodoReducer(previousState, (CompleteTodoAction)action);
        }

        if (action is DeleteTodoAction)
        {
            return DeleteTodoReducer(previousState, (DeleteTodoAction)action);
        }

        return previousState;
    }

    public static ApplicationState Execute(ApplicationState previousState, IAction action)
    {
        return new ApplicationState
        {
            Filter = action is FilterTodosAction ? ((FilterTodosAction)action).Filter : previousState.Filter,
            Todos = TodosReducer(previousState.Todos, action)
        };
    }
}

Then the UI will be updated, below we see  a UI element binding directly to the state and updating on changes.

public partial class MainSection : ContentView
{
    public MainSection()
    {
        this.InitializeComponent();

        App.Store.Subscribe((ApplicationState state) =>
            {
                TodosItemsControl.ItemsSource = FilterTodos(state.Todos,state.Filter);
            });
    }

    private IEnumerable<Todo> FilterTodos(IEnumerable<Todo> todos, TodosFilter filter)
    {
        if(filter == TodosFilter.Completed)
        {
            return todos.Where(x => x.IsCompleted);
        }

        if(filter == TodosFilter.InProgress)
        {
            return todos.Where(x => !x.IsCompleted);
        }

        return todos;
    }
}

Should I use this over Mvvm? Will this kill Mvvm? 

In all truthfulness I (like most people) don’t know if Unidirectional User Interface Architectures are the answer but I feel like they’re going to be around for a while.

I feel like I’ve hardly done these architectures justice in my explanations but I encourage you to look further into these patterns (maybe even try them or built a Unidirectional Framework for Xamarin). Anyways here’s some links for further reading.

https://facebook.github.io/flux/

https://github.com/rackt/redux

https://github.com/GuillaumeSalles/redux.NET

http://staltz.com/unidirectional-user-interface-architectures.html


Dont forget to subscribe to michaelridland.com.


FreshMvvm n=3: Navigation in FreshMvvm

Here’s the next video in the  FreshMvvm n+1 series. The idea of this series is to get the video’s out to the eager listeners (you) as quickly as possible, therefore these videos are done live with almost no editing.

Episode Title: n=3: Navigation in FreshMvvm

In this episode we discuss:

  • Review FreshMvvm’s built in Navigation Abilities
  • Understand how navigation works in FreshMvvm

I hope you enjoy.

FreshMvvm n=2 – IOC and Constructor Injection

Here’s the next video in the  FreshMvvm n+1 series. The idea of this series is to get the video’s out to the eager listeners (you) as quickly as possible, therefore these videos are done live with almost no editing.

Episode Title: n=2 – IOC and Constructor Injection

In this episode we discuss:

  • Review FreshMvvm’s built in IOC container
  • Setup a decoupled Data Service with interface
  • Use the PageModel Constructor Injection
  • Use a 3rd Party Library in the IOC Container

I hope you enjoy.