FreshMvvm n=1 : Your first FreshMvvm Application

Here’s the next video in the  FreshMvvm n+1 series. The idea of this series is to get the video’s out to the eager listeners (you) as quickly as possible, therefore these videos are done live with almost no editing.

Episode Title: n=1 Your first FreshMvvm Application

In this episode we discuss:

  • Creating a New Project adding FreshMvvm
  • Automatic wiring of BindingContext
  • PageModel to PageModel Navigation
  • Automatic wiring of Page events (eg. appearing)
  • Basic methods (with values) on PageModel (init, reverseinit)

I hope you enjoy.


Also, if you want to know more awesome things about Xamarin.Forms then my eCourse is a must do! ‘Secrets of a Xamarin.Forms Ninja

Thanks

Michael


Mixing MvvmCross Native Views and Xamarin.Forms Pages

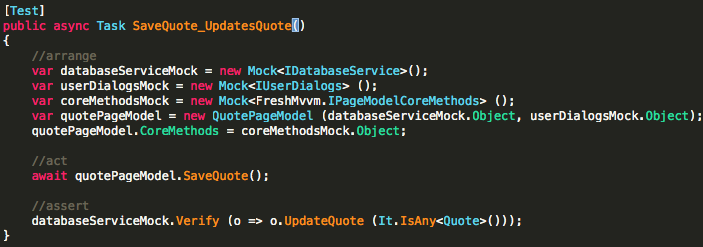
If you’ve read my blog before you probably already know that I’m a avid Mvvm supporter. You’ll also know that I use FreshMvvm alot in my Xamarin.Forms solutions. While I love FreshMvvm it’s always important to pick the right tool for the job.

In a recent project at XAM Consulting we had a project to enhance a large pre-existing application that was built in MvvmCross and ‘Xamarin Traditional’. There was a few things to consider on this project a) it was a pre-existing app with a large amount of business logic b) there was a large amount of changes required c) there was also a large amount of existing Native Views.

If you’ve been in software long enough you know rewriting is the wrong thing to do in the majority of cases. The original application had nice clean code and good architecture, we wanted to keep this but when building new screens it’s very hard to look past the advantages of Xamarin.Forms.

So essentially we wanted to both keep the Native Views and add in a few pages of Xamarin.Forms. Currently all the solutions for MvvmCross and Xamarin.Forms are related to having a Forms app with MvvmCross backend, not mixing the two.

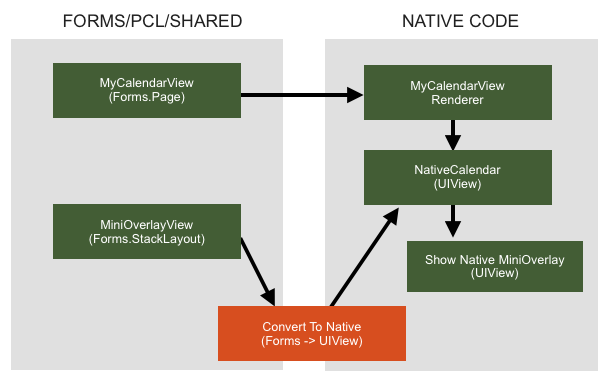
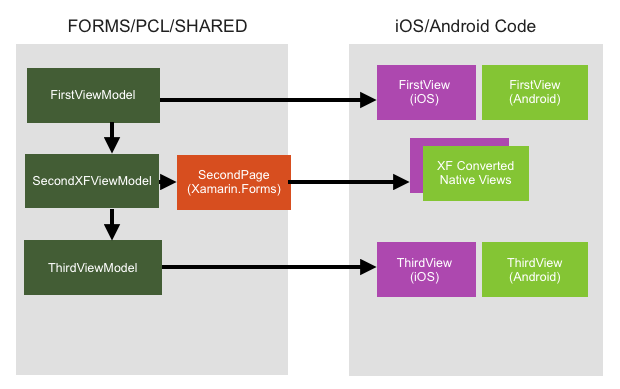
I’ve included a diagram below to help you understand what’s happening in the app.

MvvmCrossAndXamarinForms

So what’s the secret sauce? 

It’s important to understand this is really a MvvmCross application but with support Xamarin.Forms pages instead of Native View.

Here’s some of the major components done to implement this, not a step by step guide.

1) Implementing custom MvvmCross presenters

This need to be done in both the iOS project and the Android project. In iOS the class we need to inherit is MvxTouchViewPresenter and we need to override the Show method. In Android the class we need to inherit is MvxAndroidViewPresenter. 

In Android

1
public class MvxFormsDroidPagePresenter : MvxAndroidViewPresenter, IMvxAndroidViewPresenter

In iOS

1
public class MvxFormsTouchPagePresenter : MvxTouchViewPresenter

2) Setup MvvmCross to use the new presenters

To do this we need to override the CreatePresenter method on the Setup.

In Android

1
2
3
4
protected override IMvxAndroidViewPresenter CreateViewPresenter ()
{
    return new MvxFormsDroidPagePresenter ();
}

In iOS 

1
2
3
4
5
protected override IMvxTouchViewPresenter CreatePresenter ()
{
    Forms.Init ();
    return new MvxFormsTouchPagePresenter (ApplicationDelegate ,Window);
}

3) The Secret Sauce

Generally the concepts are the same on both platforms, when we come across a ViewModel ending with XFViewModel then we assume it’s Xamarin.Forms View Model. When it’s Xamarin.Forms ViewModel we 1) Find the Xamarin.Forms Views 2) Convert it into a Native View 3) Setup the BindingContext 4) Display/Native the Native view as if it’s a MvvmCross view.

In iOS 

iOS is was much easier, primarily because Xamarin.Forms allows you to easily create a ViewController.

1
2
3
4
5
6
7
8
9
10
11
12
13
14
15
16
17
18
19
20
21
22
23
24
25
26
27
28
29
30
31
32
33
34
35
public override void Show (MvxViewModelRequest request)
{
    // XFViewModel means we need a Forms View
    if (request.ViewModelType.FullName.Contains ("XFViewModel")) 
    {
        //get the xamarin.forms page from the ViewModel
        var contentPage = MvxPresenterHelpers.CreatePage (request); 
 
        //MvvmCross call to create the view model with DI etc
        var viewModel = MvxPresenterHelpers.LoadViewModel (request); 
 
        //Assign it to the Forms Binding Content
        contentPage.BindingContext = viewModel;             
 
        //Creating the view controller from the content page
        var viewController = contentPage.CreateViewController ();
 
        if (this.MasterNavigationController == null) 
        {
            // If it's the first view 
            this.ShowFirstView (viewController);
        } 
        else 
        {
            // If it's already in the stack
            this.MasterNavigationController.PushViewController (viewController, true);
        }
 
    } 
    else 
    {
        //Using a normal MvvmCross View
        base.Show (request);
    }
}

In Android

It turns out this is a bit harder in Android. This is because Xamarin.Forms Navigation and MvvmCross navigation is very different, Xamarin.Forms has a single Activity for a application while MvvmCross has an activity per page, we need to trick the Xamarin.Forms pages into using a single activity.


Below is the Xamarin.Forms container activity, normally there would only be a single Activity but in this case we want to create a Activity for every page. You’ll also notice we resolve the MvcAndroidLifetimeMonitor and we pass the Forms activity events, this hooks the Xamarin.Forms page into the MvvmCross Navigation.

1
2
3
4
5
6
7
8
9
10
11
12
13
14
15
16
17
18
19
20
21
22
23
24
25
26
27
28
29
30
31
32
33
34
35
36
37
38
39
40
41
42
43
44
45
[Activity (Label = "XamarinForm", Theme = "@android:style/Theme.Holo.Light", NoHistory = false)]
public class MvxFormsApplicationActivity : FormsApplicationActivity
{
    public static Page CurrentPage;
 
    protected override void OnCreate (Bundle bundle)
    {
        base.OnCreate (bundle);
 
        Forms.Init (this, bundle);
 
        SetPage (CurrentPage);
 
        var lifetimeMonitor = Mvx.Resolve<IMvxAndroidCurrentTopActivity> () as MvxAndroidLifetimeMonitor;
        lifetimeMonitor.OnCreate (this);
    }
 
    protected override void OnStart ()
    {
        base.OnStart ();
        var lifetimeMonitor = Mvx.Resolve<IMvxAndroidCurrentTopActivity> () as MvxAndroidLifetimeMonitor;
        lifetimeMonitor.OnStart (this);
    }
 
    protected override void OnRestart ()
    {
        base.OnRestart ();
        var lifetimeMonitor = Mvx.Resolve<IMvxAndroidCurrentTopActivity> () as MvxAndroidLifetimeMonitor;
        lifetimeMonitor.OnRestart (this);
    }
 
    protected override void OnResume ()
    {
        base.OnResume ();
        var lifetimeMonitor = Mvx.Resolve<IMvxAndroidCurrentTopActivity> () as MvxAndroidLifetimeMonitor;
        lifetimeMonitor.OnResume (this);
    }
 
    protected override void OnDestroy ()
    {
        base.OnDestroy ();
        var lifetimeMonitor = Mvx.Resolve<IMvxAndroidCurrentTopActivity> () as MvxAndroidLifetimeMonitor;
        lifetimeMonitor.OnDestroy (this);
    }
}


Now that we have the container for the Xamarin.Forms Page we can override the show method and handle the Xamarin.Forms ViewModel requests.

1
2
3
4
5
6
7
8
9
10
11
12
13
14
15
16
17
18
19
20
21
22
23
24
public override void Show (MvxViewModelRequest request)
{
    //detect if we want a Forms View 
    if (request.ViewModelType.FullName.Contains ("XFViewModel")) {
 
        //get the Forms page from the request 
        var contentPage = MvxPresenterHelpers.CreatePage (request);
 
        //set DataContext of page to LoadViewModel
        var viewModel = MvxPresenterHelpers.LoadViewModel (request);
 
        //set the binding context of the content page
        contentPage.BindingContext = viewModel;
 
        //set the current page of the activity 
        MvxFormsApplicationActivity.CurrentPage = contentPage;
 
        //Start the Xamarin.Forms Activity
        Activity.StartActivity (typeof(MvxFormsApplicationActivity));
 
    } else {
        base.Show (request);
    }
}


Android also requires some extra work when Pages/Views are closed, this is because MvvmCross ignores close events if it’s not a MvvmCross view, which in this case it isn’t. So we need to handle the close ourselves and skip the ignore clauses.

1
2
3
4
5
6
7
8
9
10
11
12
13
14
public override void ChangePresentation (MvxPresentationHint hint)
{
    if (hint is MvxClosePresentationHint) {
        var viewModel = (hint as MvxClosePresentationHint).ViewModelToClose;
 
        Activity activity = this.Activity;
 
        IMvxView mvxView = activity as IMvxView;
 
        activity.Finish ();
 
        return;
    }                
}

4) The helper methods

You might have noticed both the iOS project and the Android project referenced some helper function, here’s the code from the helper classes. The functions are used to help create the View Models and Pages.

1
2
3
4
5
6
7
8
9
10
11
12
13
14
15
16
17
18
19
20
21
22
23
24
25
26
27
28
29
30
31
32
33
public static class MvxPresenterHelpers
{
    /// <summary>
    /// Creates a view model from a view model request
    /// </summary>
    public static IMvxViewModel LoadViewModel (MvxViewModelRequest request)
    {
        var viewModelLoader = Mvx.Resolve<IMvxViewModelLoader> ();
        var viewModel = viewModelLoader.LoadViewModel (request, null);
        return viewModel;
    }
 
    /// <summary>
    /// Create a Xamarin.Forms page from a View Model request
    /// </summary>
    public static Page CreatePage (MvxViewModelRequest request)
    {
        var viewModelName = request.ViewModelType.Name;
        var pageName = viewModelName.Replace ("XFViewModel", "Page");
        var pageType = request.ViewModelType.GetTypeInfo ().Assembly.CreatableTypes ()
            .FirstOrDefault (t => t.Name == pageName);
        if (pageType == null) {
            Mvx.Trace ("Page not found for {0}", pageName);
            return null;
        }
 
        var page = Activator.CreateInstance (pageType) as Page;
        if (page == null) {
            Mvx.Error ("Failed to create ContentPage {0}", pageName);
        }
        return page;
    }
}

The End

So that’s the core pieces of the puzzles, this blog is not a step by step guide so if you want a easy way to see this code work I recommend looking at it on github.

Github Sample Repository

Need an App built or Xamarin.Forms training? – You can hire me!

Want to be a Awesome Xamarin.Forms developer? I’m building a eCourse that’ll teach you all that you everything you need to know.

SecretsOfAXamarinFormsNinja

Creating a Native View from a Xamarin.Forms View

WARNING: this is a expert level technique and isn’t officially supported by Xamarin.

Personally I feel like this is the holy grail of Xamarin.Forms development, having the ability to jump between both Xamarin.Forms Views and Native Views. I’ve used this technique multiple times in Xamarin.Forms apps.

It’s primarily used when you’ve created a custom renderer and you’re working against Native UI APIs, this could be in the native maps API or a 3rd party native component. Now once you’re in the Native area of the application there’s cases where you need to show a view for the user but you still want to have the View shared between the platforms.

To give you an idea the structure might be as follows.

Xamarin.Forms -> Native View

In the diagram above the secret sauce is in orange, taking a Xamarin.Form View and converting that into a native view. This converts to a UIView in iOS and ViewGroup in Android.

Below I’ve written two helper classes that take a Xamarin.Forms view and convert it into the NativeViews. In my experience this code works the best when the Xamarin.Forms view is a Layout.

iOS Converter Class

1
2
3
4
5
6
7
8
9
10
11
12
13
14
15
16
17
18
19
20
public class FormsViewToNativeiOS
{
    public static UIView ConvertFormsToNative(Xamarin.Forms.View view, CGRect size)
    {
        var renderer = RendererFactory.GetRenderer (view);
 
        renderer.NativeView.Frame = size;
 
        renderer.NativeView.AutoresizingMask = UIViewAutoresizing.All;
        renderer.NativeView.ContentMode = UIViewContentMode.ScaleToFill;
 
        renderer.Element.Layout (size.ToRectangle());
 
        var nativeView = renderer.NativeView;
 
        nativeView.SetNeedsLayout ();
 
        return nativeView;
    }
}

Android converter class

1
2
3
4
5
6
7
8
9
10
11
12
13
14
public class FormsToNativeDroid
{
    public static ViewGroup ConvertFormsToNative(Xamarin.Forms.View view, Rectangle size)
    {
        var vRenderer = RendererFactory.GetRenderer (view);
        var viewGroup = vRenderer.ViewGroup;
        vRenderer.Tracker.UpdateLayout ();
        var layoutParams = new ViewGroup.LayoutParams ((int)size.Width, (int)size.Height);
        viewGroup.LayoutParameters = layoutParams;
        view.Layout (size);
        viewGroup.Layout (0, 0, (int)view.WidthRequest, (int)view.HeightRequest);
        return viewGroup; 
    }
}

I’ve created a github sample application, please find it https://github.com/rid00z/LoadingFormsViewFromNative. *** Please note this iOS project uses UIPopover which is only available on iPad so you must use the iPad for this demo.

If you want to know more awesome Xamarin.Forms techniques then my eCourse is a must do! ‘Secrets of a Xamarin.Forms Ninja

Thanks

Michael


New Xamarin.Forms eCourse

I’ve been blessed in my career, having the opportunity to join the Xamarin world over 4 years ago. In my 4 years of Xamarin I’ve been able to publish over 8 Xamarin Applications into the App Stores and work on million dollar Xamarin projects. I’ve been a Xamarin.Forms fan since its first release and released many Xamarin.Forms applications into production. I know that there’s been many developers that haven’t had the same success with Xamarin.Forms. In some cases this could be an issue with Xamarin.Forms or an incorrect application of Xamarin.Forms but the truth is ‘anything that can be done in a Native application can be done in a Xamarin.Forms application’ and faster.

After seeing the potential of Xamarin.Forms and diving in head first I now have an amazing amount of knowledge about developing real world applications with Xamarin.Forms. Considering this I’ve decided to share this knowledge with the world.

Without further ado I’m now announcing my first ever eCourse – ‘The Secrets of a Xamarin.Forms Ninja’.

If you haven’t picked it up the Ninja part is inspired from a book named ‘Secrets of the Javascript Ninja’. I felt this naming was very appropriate as the book and my course have the same goal… to teach the secrets that can only be learnt from years developing production applications.

At the moment this course is in a planning stage, so if you would like to be notified on it’s release please sign up below.


Subscribe to michaelridland.com for eCourse release info


Links and Code from 10 Awesome Xamarin.Forms Tips and Tricks

This blog post contains the links from my Xamarin talk on Xamarin.Forms tips and tricks. The original slides can be found here. Many of these tips and tricks require full blog posts and I’ll be writing them over the next few weeks. For now it’s just the links to the code.

Here are the links

3rd Party FastCell Solution

This is a 3rd party FastCell implementation, I used it before and found it to work quite well.

https://github.com/twintechs/TwinTechsFormsLib

TaskCompletionSource Blog Post

http://www.michaelridland.com/xamarin/taskcompletionsource-xamarin-beautiful-async/ 

Bindable Property Template

https://gist.github.com/rid00z/23b64436dd104f5d810d#file-bindablepropertytemplate-cs

Add some Xamarin.Forms to your MvvmCross app

https://github.com/rid00z/MvvmCrossNavigationDemo

Converting a Xamarin.Forms view into a Native View

https://github.com/rid00z/LoadingFormsViewFromNative

AsyncHelper RunSync

https://gist.github.com/rid00z/96b875f096cbc7cbcba8

These are just the links so keep an eye on the blog for more blogs and maybe even some training videos.

If you need any help using Xamarin or want to develop a mobile apps please feel free to contact me anytime.

Thanks

Michael


Best practices for using Xamarin Plugins

I’m sure by now you’re aware of the great amount of Plugins available for Xamarin. There’s plugins for almost everything, connectivity, localstorage, settings etc etc.

Generally these plugins are very easy to use, you can download from nuget and start using in a few single lines. Most of the documentation/blogs will show the single liners. Which sounds good to begin with but calling a dependency/API directly isn’t good as it tightly couples your business logic and makes unit testing very difficult.

Fortunately most of the plugins are interface based which means they support Inversion of Control, even if they don’t have interfaces you can supply your own interfaces.

Let’s take a look at an example using the Acr UserDialogs plugin.

You’ll notice that even examples call the API directly.

1
await UserDialogs.Instance.AlertAsync("Test alert", "Alert Title");

No, no, no, don’t do this. Highly coupled code will end you in bad places.

The correct way, well one of the correct ways, to implement a service like this is to use a IOC container and have the dependencies injected into your PageModels. Any good Mvvm Framework will support this. In this example I’m going to show you how to implement using FreshMvvm.

Below I add the UserDialogs Instance into the IOC container during my application startup.

It’s a single line: FreshIOC.Container.Register<IUserDialogs> (UserDialogs.Instance);

Screen Shot 2015-07-23 at 10.46.14 am

Because I’m using the Mvvm Framework to push between PageModels I can easily have the plugin dependency injected into the object. In the sample below I’m using my QuotePageModel that shows the dialog when a quote is being saved. NB* Those dependencies are injected into the Model automatically.

Screen Shot 2015-07-23 at 10.56.10 am

The dependencies can now be used from within the Commands.

Screen Shot 2015-07-23 at 10.59.22 am

Now that we’ve setup dependencies correctly we can easily unit test our PageModel methods. In the sample below I’m using the Moq framework to Mock out our dependancies and Verify the Update Quote method gets called.

Screen Shot 2015-07-24 at 10.34.39 am

It’s a very small change and it’s very easy to implement, the tradeoff of using Plugins in this manner is well worth the effort.

All this code is taken from a sample app that I’ve uploaded to github.

Thanks

Michael


Implementing custom navigation in FreshMvvm for Xamarin.Forms

In past posts I’ve already introduced the FreshMvvm framework for Xamarin.Forms. If you haven’t taken a look I suggest this post to give you an overview of FreshMvvm.

I use FreshMvvm in the majority of my projects. I love it’s simplicity but most of all it’s flexibility. The Framework is Interface based and designed to be flexible. One of the most important areas of an app is the Navigation, while FreshMvvm has some great built in Navigation abilities sometimes we might need to extend this and create our own Navigation Service.

FreshMvvm comes with an interface named IFreshNavigationService which allows any type of custom Navigation. The steps to implement a custom navigation service in FreshMvvm are as follows:

1) Implement the IFreshNavigationService interface

2) Register the implementation in the FreshMvvm IOC container

Let’s start by taking a look at the interface.

1
2
3
4
5
6
7
8
9
10
11
12
13
14
15
using System;
using Xamarin.Forms;
using System.Threading.Tasks;
 
namespace FreshMvvm
{
    public interface IFreshNavigationService
    {
        Task PopToRoot(bool animate = true);
 
        Task PushPage (Page page, FreshBasePageModel model, bool modal = false, bool animate = true);
 
        Task PopPage (bool modal = false, bool animate = true);
    }
}

Let’s begin with a simple NavigationService using a basic NavigationPage. We can name this class SimpleCustomNavigationService, inherit from NavigationPage and implement the IFreshNavigationService interface.

1
2
3
4
5
6
7
8
9
10
11
12
13
14
15
16
17
18
19
20
21
22
23
24
25
26
27
public class SimpleCustomNavigationService : NavigationPage, IFreshNavigationService
{
    public SimpleCustomNavigationService (Page page) : base (page)
    {
    }
 
    public async Task PopToRoot (bool animate = true)
    {
        await Navigation.PopToRootAsync (animate);
    }
 
    public async Task PushPage (Page page, FreshMvvm.FreshBasePageModel model, bool modal = false, bool animate = true)
    {
        if (modal)
            await Navigation.PushModalAsync (page, animate);
        else
            await Navigation.PushAsync (page, animate);
    }
 
    public async Task PopPage (bool modal = false, bool animate = true)
    {
        if (modal)
            await Navigation.PopModalAsync (animate);
        else
            await Navigation.PopAsync (animate);
    }
}

Now that we have our Navigation service we just need 1) create the navigation service 2) register the navigation service in the IOC container 3) display the navigation service in the main page.

1
2
3
4
5
6
7
8
9
10
11
//Get the first page to be displayed
var page = FreshPageModelResolver.ResolvePageModel<MainMenuPageModel> ();
 
//create our navigation service
var customNavigationService = new SimpleCustomNavigationService (page);
 
//register the Navigation service in the app, this enables us to push model to model
FreshIOC.Container.Register<IFreshNavigationService> (customNavigationService);
 
//display navigation service in main page
MainPage = customNavigationService;

So now that we’ve correctly implemented the Navigation Service, we can achieve the holy grail, with PageModel to PageModel navigation.From any of our PageModels we can now push the PageModel by using the PushPageModel<T>.  As you would expect the ‘CoreMethods’ property is also interface based making it perfect for unit testing.

1
2
3
4
5
6
7
public Command AddContact {
    get {
        return new Command (async () => {
            await CoreMethods.PushPageModel<ContactPageModel> ();
        });
    }
}

Some more complex examples

What I find people fail to understand is that using this interface you can implement any type of advanced Navigation you like. There’s a few things to understand.

1) You can use custom logic to register a Navigation Service, an example of this would be to use to different types of Navigation Services per platform or based on screensize. In this example I’m using a MasterDetail for the Phone and a TabbedNavigation for the Tablet. You can do anything you like in this case.

1
2
3
4
5
6
7
8
9
10
11
12
if (Device.Idiom == TargetIdiom.Phone) {
    var masterDetailNav = new FreshMasterDetailNavigationContainer ();
    masterDetailNav.Init ("Menu");
    masterDetailNav.AddPage<ContactListPageModel> ("Contacts", null);
    masterDetailNav.AddPage<QuoteListPageModel> ("Quotes", null);
    MainPage = masterDetailNav;
} else {
    var tabbedNavigation = new FreshTabbedNavigationContainer ();
    tabbedNavigation.AddTab<ContactListPageModel> ("Contacts", "contacts.png", null);
    tabbedNavigation.AddTab<QuoteListPageModel> ("Quotes", "document.png", null);
    MainPage = tabbedNavigation;
}

2) The Framework doesn’t care what you put into the Push and Pop methods, you can put any type of UI logic that’s required for your interface. In this example below I’m combining a MasterDetail and a TabbedPage.

1
2
3
4
5
6
7
8
9
10
11
12
13
14
15
16
17
18
19
20
21
22
23
24
25
26
27
28
29
30
31
32
33
34
35
36
37
38
39
40
41
42
43
44
45
46
47
48
49
50
51
52
53
54
55
56
57
58
59
60
61
62
63
64
65
66
67
68
69
70
71
72
73
74
75
76
77
78
79
80
81
82
83
/// <summary>
/// This is a sample custom implemented Navigation. It combines a MasterDetail and a TabbedPage.
/// </summary>
public class MasterTabbedNavigationService : MasterDetailPage, IFreshNavigationService
{
    FreshTabbedNavigationContainer _tabbedNavigationPage;
    Page _contactsPage, _quotesPage;
 
    public MasterTabbedNavigationService ()
    {   
        SetupTabbedPage ();
        CreateMenuPage ("Menu");
        RegisterNavigation ();
    }
 
    void SetupTabbedPage()
    {
        _tabbedNavigationPage = new FreshTabbedNavigationContainer ();
        _contactsPage = _tabbedNavigationPage.AddTab<ContactListPageModel> ("Contacts", "contacts.png");
        _quotesPage = _tabbedNavigationPage.AddTab<QuoteListPageModel> ("Quotes", "document.png");
        this.Detail = _tabbedNavigationPage;
    }
 
    protected void RegisterNavigation()
    {
        FreshIOC.Container.Register<IFreshNavigationService> (this);
    }
 
    protected void CreateMenuPage(string menuPageTitle)
    {
        var _menuPage = new ContentPage ();
        _menuPage.Title = menuPageTitle;
        var listView = new ListView();
 
        listView.ItemsSource = new string[] { "Contacts", "Quotes", "Modal Demo" };
 
        listView.ItemSelected += async (sender, args) =>
        {
 
            switch ((string)args.SelectedItem) {
            case "Contacts":
                _tabbedNavigationPage.CurrentPage = _contactsPage;
                break;
            case "Quotes":
                _tabbedNavigationPage.CurrentPage = _quotesPage;
                break;
            case "Modal Demo":
                var modalPage = FreshPageModelResolver.ResolvePageModel<ModalPageModel>();
                await PushPage(modalPage, null, true);
                break;
            default:
                break;
            }
 
            IsPresented = false;
        };
 
        _menuPage.Content = listView;
 
        Master = new NavigationPage(_menuPage) { Title = "Menu" };
    }
 
    public virtual async Task PushPage (Xamarin.Forms.Page page, FreshBasePageModel model, bool modal = false, bool animated = true)
    {
        if (modal)
            await Navigation.PushModalAsync (new NavigationPage(page), animated);
        else
            await ((NavigationPage)_tabbedNavigationPage.CurrentPage).PushAsync (page, animated); 
    }
 
    public virtual async Task PopPage (bool modal = false, bool animate = true)
    {
        if (modal)
            await Navigation.PopModalAsync ();
        else
            await ((NavigationPage)_tabbedNavigationPage.CurrentPage).PopAsync (); 
    }
 
    public virtual async Task PopToRoot (bool animate = true)
    {
        await ((NavigationPage)_tabbedNavigationPage.CurrentPage).PopToRootAsync (animate);
    }
}

The best part about all of these NavigationService’s is that you can swap them out and never have to change your PageModels.

I’ve uploaded a sample app to github here.

If you have any question please feel free to contact me. 

PS, if you find any parts that need improvements or you have a better options please email me, I’m always trying to improve this Framework and all feedback is welcome.

Thanks

Michael


TaskCompletionSource + Xamarin = Beautiful Async

If you’ve been using Xamarin for a while you probably already know of this functionality.

Just in case you haven’t I just want to give shout out to the TaskCompletionSource class. In short the completion source allows you to create a Task and return it to the caller without having to set the result or use an lambda.

It’s great for working with event based API’s like Native Bluetooth, NSSession and Native mapping engines. All of which provide results via events. The Native Bluetooth API in iOS is a great example of this, so let’s take a look.

TaskCompletionSource and Native API Sample

The function we want to build is below, it returns an awaitable task of float which is the Bluetooth Signal strength.

/// <summary>
/// Gets the Signal strength of Bluetooth Device
/// </summary>
/// <returns>The signal strength.</returns>
public Task<float> GetSignalStrength ()


The problem is that the Bluetooth API is based on events, so there’s no real easy way to support this Async. That’s where TaskCompletionSource comes in.
Let’s start by creating our TCS and returning the Task.
public Task<float> GetSignalStrength ()
{
    var bluetoothCompletion = new TaskCompletionSource<float> ();

    //do bluetooth work

    return bluetoothCompletion.Task; 
}


Now that we have the TaskCompletionSource there’s a few things we can set:

bluetoothCompletion.SetCanceled (); //Set the task as Canceled 
bluetoothCompletion.SetResult (888); //Sets the result as successful
bluetoothCompletion.SetException (new Exception ()); //Sets an exception

Great the caller has a Task that they can await. Now let’s do the Bluetooth work.

var centralManager = new CBCentralManager(DispatchQueue.CurrentQueue);

centralManager.DiscoveredPeripheral += (object sender, CBDiscoveredPeripheralEventArgs e) => {
    bluetoothCompletion.SetResult(e.RSSI.FloatValue);
  };

centralManager.FailedToConnectPeripheral += (object sender, CBPeripheralErrorEventArgs e) => {
    bluetoothCompletion.TrySetException(new Exception("Failed to connect to device"));
  };

Now let’s put them all together.

/// <summary>
/// Gets the Signal strength of Bluetooth Device
/// </summary>
/// <returns>The signal strength.</returns>
public Task<float> GetSignalStrength ()
{
    var bluetoothCompletion = new TaskCompletionSource<float> ();

    var centralManager = new CBCentralManager(DispatchQueue.CurrentQueue);

    centralManager.DiscoveredPeripheral += (object sender, CBDiscoveredPeripheralEventArgs e) => {
        bluetoothCompletion.SetResult(e.RSSI.FloatValue);
    };

    centralManager.FailedToConnectPeripheral += (object sender, CBPeripheralErrorEventArgs e) => {
        bluetoothCompletion.TrySetException(new Exception("Failed to connect to device"));
    };

    return bluetoothCompletion.Task;
}


Great, so now the caller can easily consumer this API in a async way.

var bluetoothStrength = await bluetoothService.GetSignalStrength();

This was a very simple example but the TaskCompletionSource can be used in many scenarios, it can be passed into functions and kept as member variables until you need it. So if it’s not already in your Toolkit, add it and use it, your code will be cleaner.

If you want to know more feel free to drop me a email.

Thanks

Michael

WWDC2015 – The BIG takeaways

apple-wwdc-20150312

Ah, WWDC 2015 what a wild ride, 5 days of content packed sessions.  While I’m still trying to comprehend everything I’ve learned over the past 5 days there’s some big takeaways that I’ve got from WWDC this year.

Native apps still dominate!

Why? Did you know that on iOS 86% of time is spent in apps?

One thing that’s really apparent is that Apple is obsessed with user engagement, experience and performance, and they believe apps are key to this. To get an understanding let’s take a look at some of the new features which Native Apps/APIs can help you engage with your users like never before, some updated in iOS 9 and some brand new in iOS 9.

Apple Watch – Apple is betting big on the Watch, putting the watchOS 2 on level pair with OSX and iOS. WatchOS 2 comes with a set of API allowing developers to build even better Native Apps and they also added to this is the ability to be on a users Watch face. For my details see my blog post on watchOS 2.

Screen Shot 2015-06-12 at 3.20.20 pm

Notifications – Apple Watch now supports long form notifications and actionable notifications.

Screen Shot 2015-06-12 at 3.12.00 pm

Search APIs – Apps are now allowed to interface with search in iOS 9, with the ability to deep link into the app. If you want to know more you can view my blog on Search APIs.

Below is an example in which a person has booked a holiday to Maui, from AirBnB and Kayak.

ios-search

App Extensions  – While not new in iOS9, still a very powerful engagement feature, apps can display widgets in the Today view of Notification Center, providing quick updates or enabling brief tasks — for example, posting updates on package deliveries, the latest surf reports, or breaking news stories.

Screen Shot 2015-06-12 at 4.26.32 pm

Apple will continue pushing people to apps

Apple have shown they will keep pushing users into apps, this is clear with Universal links and Apps now appearing in iOS Search and Safari search.

Apple will continue pushing people to upgrade iOS

Apple has promised developers that they will continue pushing users to upgrade their OS version, specifically users now will only need 1.3 GB of free space to upgrade to iOS9. Apple have also enabled notifications that will prompt users to upgrade their iOS version. Their recommendation is that developers will only need to target the two most recent OS versions.

Swift all the things

During the 5 days of the conference I didn’t see a line of objective-c (thankfully). There was an enormous amount of content on swift and some the sessions on swift were outstanding. Apple is betting big on Swift and with Apple behind Swift it’s going to be a language that’s around for the next 20 years.

watchOS is serious

As mentioned before, with 10+ session on watchOS Apple is betting big on the watch.

Stop thinking about Orientation

With iOS9 Multitasking we need to stop thinking about designs in orientation, we need to be thinking about Size. If you want to read more about multi-tasking you can this blog on iOS9 Multitasking.

Xamarin.Forms is still awesome

After full week living in the Apple future I’m still very confident in Xamarin.Forms and it’s future, the flexibility of Xamarin and Xamarin.Forms allows me (us) to still take advantage of all these new Native APIs but in a cross-platform way. In the next day I’m going to be blogging a Xamarin.Forms app that supports the Multitasking features in iOS9.

Summary

WWDC has been mind blowing, on par with TechEd Europe which I attended a few years back. I’ve learnt alot, made some good friends and I recommend all mobile developers attend at least once.

CHVnO6vUYAEHDLo