Mobile

Easy real-time, event-driven and serverless with Azure

One of the most exciting parts of modern cloud platforms is serverless and the event driven architectures you can build with it. The reason that it’s so exciting is because it’s a double win, not only does it give you all the advantages of the cloud like easy elastic scale, isolation, easy deployment, low management etc but it’s also extremely easy to get started. We can also avoid the container and container management rabbit hole.

Azure Functions

Azure Functions is a serverless offering on the Azure platform. In a nutshell you create individual functions that you upload into the cloud and run individually. Here’s an example of a simple function that you can call via Http.

[FunctionName("SimpleFunction")]
public static async Task<IActionResult> Run(
    [HttpTrigger(AuthorizationLevel.Function, "get", "post", Route = null)] HttpRequest req,
    ILogger log)
{
    log.LogInformation("C# HTTP trigger function processed a request.");

    string name = req.Query["name"];

    string requestBody = await new StreamReader(req.Body).ReadToEndAsync();
    dynamic data = JsonConvert.DeserializeObject(requestBody);
    name = name ?? data?.name;

    return name != null
        ? (ActionResult)new OkObjectResult($"Hello, {name}")
        : new BadRequestObjectResult("Please pass a name on the query string or in the request body");
}

This simple function is triggered via Http and returns a string saying Hello {name}. The name is passed in via a query string parameter.

Azure Functions are made up of 2 primary things, Triggers and Bindings.

Triggers

A trigger is how a Function is started, as we see the sample above is a HttpTrigger. Functions has a number of triggers that we can use including:
Http trigger – function that runs when a http end point is hit
Timer trigger – runs on a schedule
Queue trigger – runs when a message is added to a queue storage
Blob trigger – runs whenever a blob is added to a specificied container
EventHub trigger – runs whenever event hub recieves a new message
IoT Hub Trigger – runs whenever an iot hub recieves a new event on the event hub endpoint
ServiceBus Queue trigger – runs when a message is added to a specified Service Bus queu
ServiceBus Topic trigger – runs when a message is added to s specified ServiceBus topic
CosmosDB trigger – runs when documents change in a document collection

In this post we’ll be focusing on the Cosmos DB trigger.

Bindings

Bindings are a way of declaratively connecting another resource to the function eg binding to Cosmos DB provides you a CosmosDB Connection and allows you to insert data into CosmosDB; bindings may be connected as input bindings, output bindings, or both. Data from bindings is provided to the function as parameters.

Cosmos DB

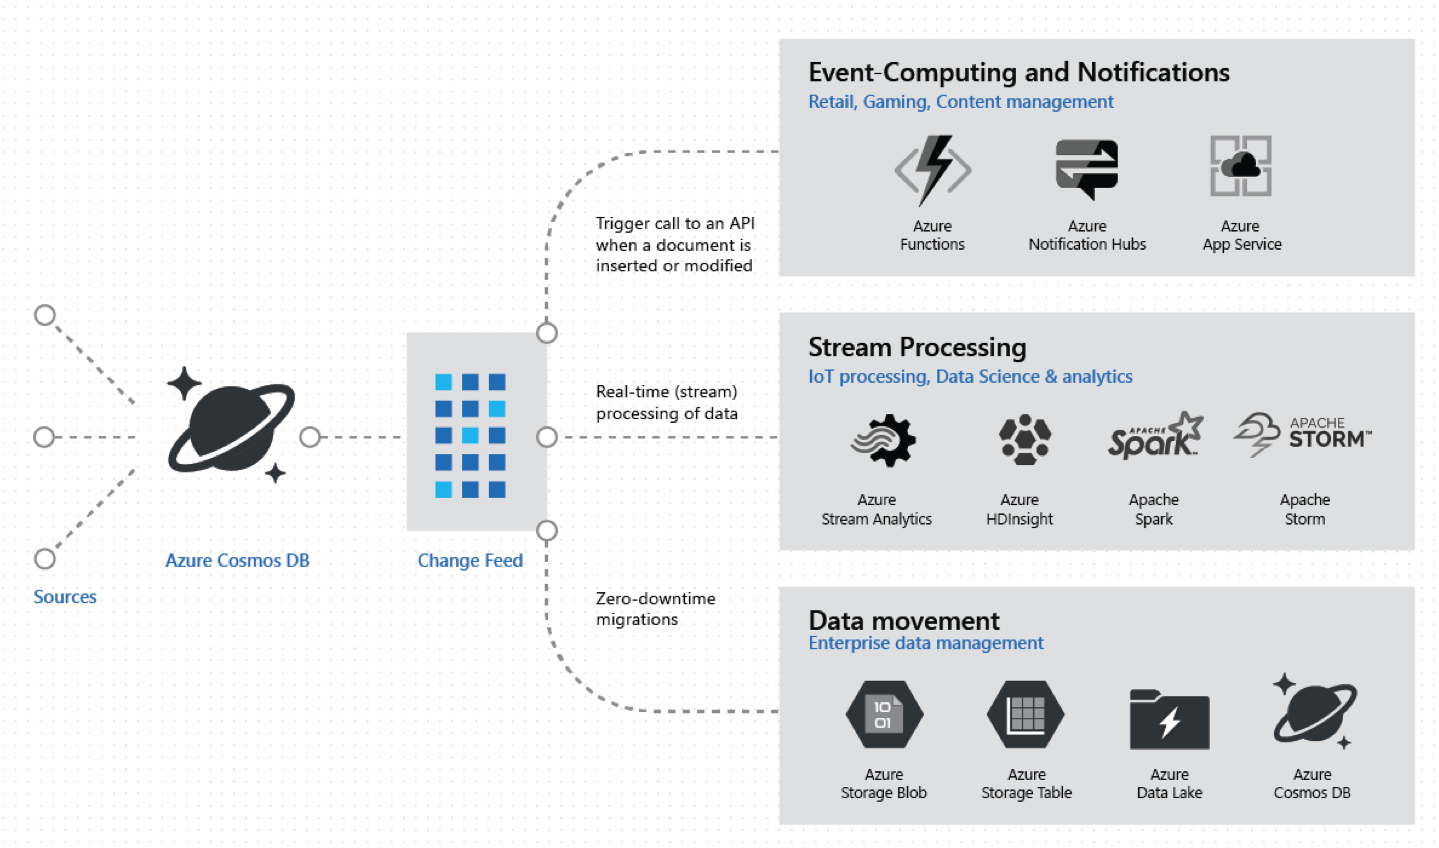
Cosmos DB is a multi-model global scale database with easy single touch geo-replication. It’s fast and has more SLA’s than any another cloud database on the market. One of the advanced features we get in Cosmos DB is change feed, Cosmos DB Change Feed is a log of all the changes that have occurred on a collection in the database. You’ll be able to see inserts, updates and deletes. As mentioned before Cosmos DB has a Azure Function trigger that uses change feed, so in essence we can call a function every-time a CosmosDB is triggered and pass in the data.

You can see below we’ve got a Cosmos DB triggered functions, a list of changed documents is provided into the function.

[FunctionName("CosmosTrigger")]
public static async Task CosmosTrigger([CosmosDBTrigger(
    databaseName: "CDALocations",
    collectionName: "Location",
    ConnectionStringSetting = "AzureWebJobsCosmosDBConnectionString",
    LeaseCollectionName = "leases",
    FeedPollDelay = 1000,
    CreateLeaseCollectionIfNotExists = true)]IReadOnlyList<Document> documents,
    ILogger log)
{
    if (documents != null && documents.Count > 0)
    {
        log.LogInformation($"Documents modified: {documents.Count}");
        log.LogInformation($"First document Id: {documents[0].Id}");
    }
}

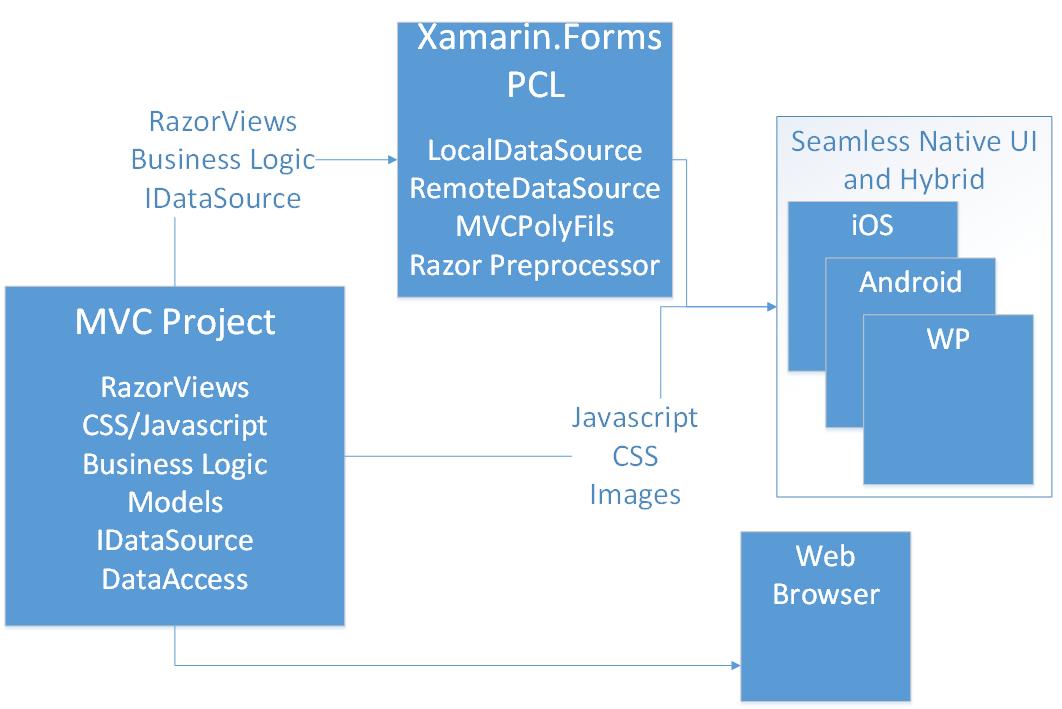
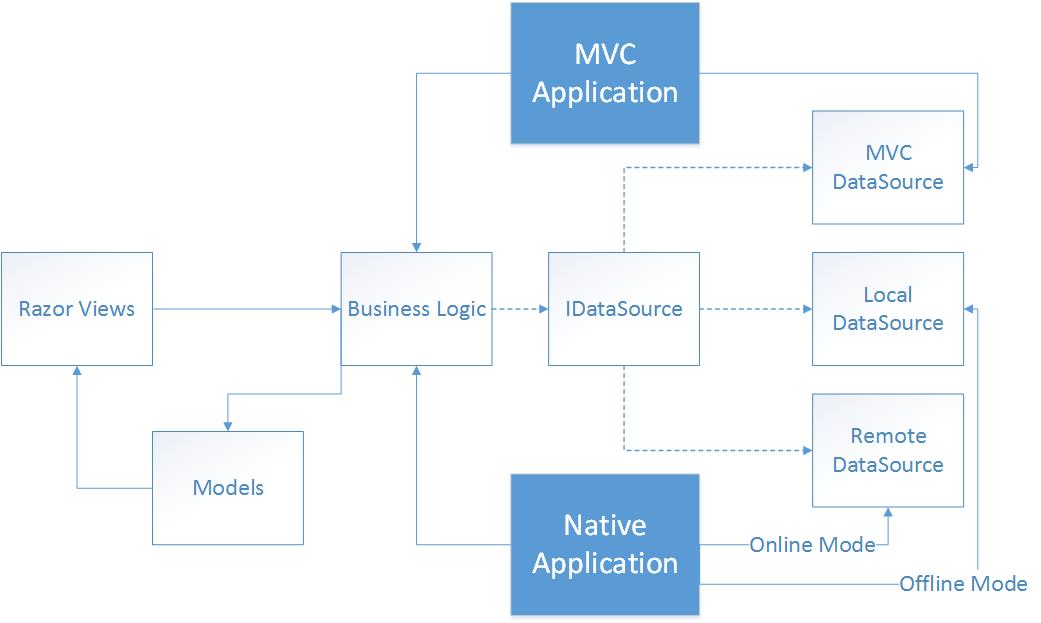
To show you a diagram in a diagram see below:

CosmosDB Change Feed

SignalR Service w Real World Example

SignalR service is fully managed real-time communications service.

Let’s put this into a real world scenario. The legendary James Montemagno built a Cloud Enabled Xamarin Application called GEO Contacts which we can find on github here. Geo Contacts is a cross-platform mobile contact application sample for iOS and Android built with Xamarin.Forms and leverages several services inside of Azure including Azure AD B2C, Functions, and Cosmos DB. This application allows you to check into locations and see who else has checked into a location near you, which is awesome but there’s a little bit of missing functionality that I would like, if I’ve already checked into a location I would like to be notified if another person checks in near me.

The process flow will be as follows:
1) A user checks in at a location like Sydney, Australia
2) Azure Function is called to store the data inside Cosmos DB
4) The Azure Function that is subscribed to that change feed is called with the change documents
5) The function will then notify other users via SignalR.

Setup the SignalR Service

We first have to setup SignalR Service and integrate with the Functions and the Mobile app.

Go into Azure and create a new SignalR service.

newsignalr

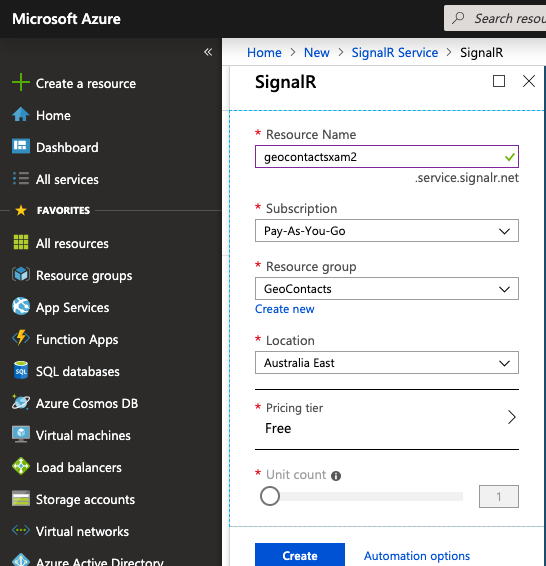
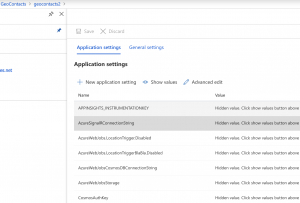
Then take the keys from the SignalR service and add the configuration into the Azure Function.

signalrsettings

If we want to get the SignalR configuration into the client Azure Functions makes this easy. We create a simple function that returns the SignalR details.

[FunctionName("GetSignalRInfo")]
public static SignalRConnectionInfo GetSignalRInfo(
    [HttpTrigger(AuthorizationLevel.Anonymous)]HttpRequest req,
    [SignalRConnectionInfo(HubName = "locations")]SignalRConnectionInfo connectionInfo)
{
    return connectionInfo;
}

Then we create the signalr client in the Xamarin application.

var client = new HttpClient();
string result = await client.GetStringAsync("https://geocontacts2.azurewebsites.net/api/GetSignalRInfo");
SignalRConnectionInfo signalRConnectionInfo = JsonConvert.DeserializeObject<SignalRConnectionInfo>(result);

if (hubConnection == null)
{
    hubConnection = new HubConnectionBuilder()
                        .WithUrl(signalRConnectionInfo.Url, options =>
                        {
                            options.AccessTokenProvider = () => Task.FromResult(signalRConnectionInfo.AccessToken);
                        })
                        .Build();

    await hubConnection.StartAsync();
}

Setup the Change Feed

Now that we have the SignalR setup we can setup the change feed. The only thing we need to setup for change feed is the leases collection.

Now that we’ve setup the leases collection building the event driven function is very simple. We only need to use the CosmosDBTrigger with the correct configuration and then add the SignalR binding.

In the function below, we can see it uses the CosmosDBTrigger it gets executed when a location is added into the Location collection, we’re also have the SignalR binding which means we can easily sending messages to the Xamarin clients we setup.

[FunctionName("CosmosTrigger")]
public static async Task CosmosTrigger([CosmosDBTrigger(
    databaseName: "CDALocations",
    collectionName: "Location",
    ConnectionStringSetting = "AzureWebJobsCosmosDBConnectionString",
    LeaseCollectionName = "leases",
    FeedPollDelay = 1000,
    CreateLeaseCollectionIfNotExists = true)]IReadOnlyList<Document> documents,
    [SignalR(HubName = "locations")]IAsyncCollector<SignalRMessage> signalRMessages,
    ILogger log)
{

    List<LocationUpdate> locations = new List<LocationUpdate>();

    if (documents != null && documents.Count > 0)
    {
        log.LogInformation($"Documents modified: {documents.Count}");
        log.LogInformation($"First document Id: {documents[0].Id}");

        locations.Add(await documents[0].ReadAsAsync<LocationUpdate>());
    }

    await signalRMessages.AddAsync(
       new SignalRMessage
       {
           Target = "nearMe",
           Arguments = new[] { locations.ToArray() }
       });

    log.LogInformation($"Sent SignalR Message");
}

That’s it, now we have a scalable, real-time and event-driven system.

Introduction to Augmented Reality with ARKit

In this post we’re going to dive into ARKit, we’ll find out what it is and get started with building our first augmented reality experience in ARKit.

ARKit is Apple’s toolkit for building augmented reality experiences on iOS devices. It was initially released at WWDC 2017, then ARKit 2.0 was released at WWDC 2018.

Before we jump into any code it’s important to understand what ARKit is and why we need it. Augmented Reality on mobile devices is hard, it’s hard because of the heavy calculations/triangulations/mathematics. It’s also very hard to do AR without killing the users battery or reducing the frame rates. ARKit takes care of all the hard parts for you hence allowing you to use a clean and simple API.

The Basics of ARKit

In order to Augment our Reality then we need to be able to track reality, eg how do we map the world so that we know what it looks like in a digital form. Devices like HoloLens have special sensors specifically designed for AR tracking. Mobile devices don’t have anything specifically designed for world tracking, but they do have enough sensors that when combined with great software we can track the world.

sensors

ARKit takes advantage of the sensors (camera, gyroscope, accelerometer, motion) already available on the device. As you can see in the diagram below ARKit is only responsible for the processing and basically this means sensor reading and advanced mathematical calculations. The rendering can be handled by any 2D/3D rendering engine, which includes SceneKit as you see below but majority of the apps will be using a 3D engine like Unreal or Unity.

arkit diagram


Understanding the World

The primary function of ARKit is to take in sensor data, process that data and build a 3D world. In order to do this ARKit uses a truckload of mathematical calculations, we can simplify and name some of the methods ARKit is using.

The diagram below shows Inertial Odometry, Inertial Odometry takes in motion data for processing. This input data is processed at a high frame rate.

inertialodometry

The diagram below shows Visual Odometry, Visual Odometry takes in Video data from the camera for processing. The processing of visual data is done at a lower framerate and this is due to the fact processing the visual data is CPU intensive.

visualodometry

ARKit then combines the odometries to make what’s called Visual Inertial Odometry. This will have the motion data processed at a high framerate, the visual data processed at a lower framework and differences between the processing normalised. You can see Visual Inertial Odometry in the diagram below.

visualinertialodometry


Triangulation allows the world mapping

In a very simple explanation triangulation is what allows ARKit to create a model of the world. In a similar way to humans, so as the phone is moved around ARKit will do calculations against the differences allowing ARKit to essentially see in 3D. A digital map of the world is created.

triangulation

As you can see below a world map is created within ARKit.
worldmap

Augmenting Reality (with Anchor Points)

As the world is mapped ARKit will create and update Anchor Points, these anchor points allow us to add items in reference to the anchor point. As you can see in the diagram below ARKit has added Anchor points and we’ve placed an object (3D vase) near the anchor point. As the devices is moved around these anchor points are updated, so it’s important that we track these changes and update our augmentations of the world.

anchorpoints

As I mentioned before ARKit only does the processing and provide the data. It’s up to us to render objects in the 3D world. Below shows how you’ll combine both the video captured and then overlay a 3D rendering. As we move both the video capture and the 3D rendering is updated.

overlay

Tracking Options/Features.

ARKit has a few different tracking options and features that I will go over below.

Orientation Tracking

This is the most basic type of tracking available in ARKit, this will track your orientation within the world. It will not track your location in physical space, in essence it’s like your standing still and can view 360 degrees in the world.

orientation tracking

World Tracking

This option in ARKit is the most common, in this scenario ARKit tracks and builds a complete world maps and allows you to move freely within the world. It’s important to note that World Tracking includes the majority of features in ARKit including Plane Detection, Maps, Image Tracking and Object Detection.

triangulation

Plane Detection

As we’re moving around the 3D world we need to know about the different surfaces in the world this is where plane detection comes in. The first release of ARKit included only horizontal orientation, in ARKit 2 we now have the option of both vertical and horizontal orientation. In the image below you can see the floor being detected as a plane.

planedetection

Saving & Loading Maps 

In ARKit 2.0 we can now save, load and share the world map. In ARKit 1.0 the map was internal and only ever kept around for a single users session. This meant that in ARKit 1.0 you could not save sessions (maps) to be resumed later or share. This allows for a few scenarios including multiplayer games and the ability to save world maps.

Below is a video of a multi player game that leverages ARKit 2.0 map sharing feature.

Worldmapsharing

Image Tracking

Imaging tracking allows your app to easily detect an image in the real world, this for example might be a photo or a business card or a dvd case. Once you’ve detected this image then you’ll be able to easily augment the reality around image. Normally a task like this would be really difficult but again ARKit makes this really easy for us, the only steps we need to take are a reference (eg the image we need to track) with the physical size, once we set that up we use a single option to set turn on the feature and add the reference images into ARKit.

Below I’ve included a reference video that leverages Image Tracking. While it looks very impressive the application below could be implemented with ARKit 2.0 without a huge amount of effort, around 80-100 lines of code.


Object Detection

Object Detection (ARKit 2.0 feature) allows us to both scan and detect 3D objects. I think the best way to understand this would be a simple video.

Building your first ARKit Experience

To give you a feel for how easy it is to build a ARKit experience I’m going to take you through a simple application in which you can see in the video below. As you move the phone around a plane is detected (which ARKit does for you), we place a Node on that surface then if a users taps the Node we add a box on top of that node where the user tapped.

Let’s jump into some code to see how easy it is to get started with ARKit.

The first thing we do in this app is create a SceneView and add it as a SubView to the visible ViewController, as we see below.

scene

The next step we need is to call the run command on the scene with the world tracking configuration, as we see below.

setuparkit

As we move the phone around and surfaces are detected the DidAddNode method is called by ARKit. As you can see below if the anchor is a ARPlaneAnchor we then add our PlaneNode, which is the blue we see in the video.

addsurface

Then if a user touches the PlaneNode we then add a Cube on top of where the user just touched.

addcube

That’s it, all we need to do for our first AR Experience. You can see the full code file below or get all the code from https://github.com/rid00z/ARKitExample

using System;
using System.Collections.Generic;
using System.Linq;
using ARKit;
using ARKitExample.Nodes;
using Foundation;
using SceneKit;
using UIKit;

namespace ARKitExample
{
    public partial class ViewController : UIViewController
    {
        private readonly ARSCNView sceneView;

        protected ViewController(IntPtr handle) : base(handle)
        {
            this.sceneView = new ARSCNView
            {
                AutoenablesDefaultLighting = true,
                //DebugOptions = ARSCNDebugOptions.ShowFeaturePoints,
                Delegate = new SceneViewDelegate()
            };
            this.View.AddSubview(this.sceneView);
        }

        public override void ViewDidLoad()
        {
            base.ViewDidLoad();

            this.sceneView.Frame = this.View.Frame;
        }

        public override void ViewDidAppear(bool animated)
        {
            base.ViewDidAppear(animated);

            this.sceneView.Session.Run(new ARWorldTrackingConfiguration
            {
                AutoFocusEnabled = true,
                PlaneDetection = ARPlaneDetection.Horizontal,
                LightEstimationEnabled = true,
                WorldAlignment = ARWorldAlignment.GravityAndHeading
            }, ARSessionRunOptions.ResetTracking | ARSessionRunOptions.RemoveExistingAnchors);
        }

        public override void ViewDidDisappear(bool animated)
        {
            base.ViewDidDisappear(animated);

            this.sceneView.Session.Pause();
        }

        public override void TouchesEnded(NSSet touches, UIEvent evt)
        {
            base.TouchesEnded(touches, evt);

            if (touches.AnyObject is UITouch touch)
            {
                var point = touch.LocationInView(this.sceneView);
                var hits = this.sceneView.HitTest(point, ARHitTestResultType.ExistingPlaneUsingExtent);
                var hit = hits.FirstOrDefault();

                if (hit == null) return;

                var cubeNode = new CubeNode(0.05f, UIColor.White)
                {
                    Position = new SCNVector3(
                        hit.WorldTransform.Column3.X,
                        hit.WorldTransform.Column3.Y + 0.1f,
                        hit.WorldTransform.Column3.Z
                    )
                };

                this.sceneView.Scene.RootNode.AddChildNode(cubeNode);
            }
        }

        class SceneViewDelegate : ARSCNViewDelegate
        {
            private readonly IDictionary<NSUuid, PlaneNode> planeNodes = new Dictionary<NSUuid, PlaneNode>();

            public override void DidAddNode(ISCNSceneRenderer renderer, SCNNode node, ARAnchor anchor)
            {
                if (anchor is ARPlaneAnchor planeAnchor)
                {
                    var planeNode = new PlaneNode(planeAnchor);
                    node.AddChildNode(planeNode);
                    this.planeNodes.Add(anchor.Identifier, planeNode);
                }
            }

            public override void DidRemoveNode(ISCNSceneRenderer renderer, SCNNode node, ARAnchor anchor)
            {
                if (anchor is ARPlaneAnchor planeAnchor)
                {
                    this.planeNodes[anchor.Identifier].RemoveFromParentNode();
                    this.planeNodes.Remove(anchor.Identifier);
                }
            }

            public override void DidUpdateNode(ISCNSceneRenderer renderer, SCNNode node, ARAnchor anchor)
            {
                if (anchor is ARPlaneAnchor planeAnchor)
                {
                    //this.planeNodes[anchor.Identifier].Update(planeAnchor);
                }
            }
        }
    }
}


Beautiful Xamarin – Facebook Clone in Xamarin.Forms

I’ve actually had this project around since this start of the year but I never blogged it. I did this code for my speaking session at Microsoft Ignite in Australia.

Warning – This code is a playground there’s lots of play code and not reflective of a production application. This project is for only used for learning about Xamarin.Forms features.

In this blog post I’ll go over some of the features want to demo with this app, with some screenshots. Over the coming weeks I plan to demonstrate that anyone who says you cannot build fast and beautiful apps in Xamarin.Forms is simply wrong, lying or ignorant. The deal is that you just need to know how Xamarin.Forms work.

Post-Layout Animations/Translations – Right Slide Bar

One of the most powerful features of Xamarin.Forms are the Post-Layout translations. fbforms-sidebar

People are so surprised when I tell them this is done without any custom renders, let’s take a look at how.

In this case I make use of the Grid in Xamarin.Forms, in actual fact the sidebar is layered over the listview which in the background. The Grid only has a single column.

<Grid>
  <FriendList ... (300 Set Width)
  <Header ...(Full Screen Width)
  <ListView ...(Full Screen Width)
</Grid>

So the FriendList normally sits on top of the List but what we actually do is translate the X coordinate so it sits off the screen, just after the page size allocated.

protected override void OnSizeAllocated(double width, double height)
{
    base.OnSizeAllocated(width, height);

    friendList.TranslationX = this.Width;
}

Then the awesomely simple part, when a user taps the menu button we just translate the views.

void FriendListTapped(object sender, System.EventArgs e)
{
    if (friendList.TranslationX == Width) // determine if open
    {
        friendList.TranslateTo(Width - 300, 0, 100); //open the friendlist
        myListView.TranslateTo(-300, myListView.TranslationY, 100); //move the listview to allow for friendlist
        header.TranslateTo(-300, header.TranslationY, 100); //move the header to allow for friendlist
    }
    else
    {
        friendList.TranslateTo(Width, 0); //close the friendlist
        header.TranslateTo(0, header.TranslationY, 100); //put the header back
        myListView.TranslateTo(0, myListView.TranslationY, 100);  //put the listview back
    }
}

Disappearing NavigationBar

This one was a little harder and it’s still not working perfectly.

fbforms-navigationbar

In this case our grid has 2 rows, 80 at the top for the header size and a * for the rest.

<Grid.RowDefinitions>
    <RowDefinition Height="80"></RowDefinition>
    <RowDefinition Height="*"></RowDefinition>
</Grid.RowDefinitions>

On the default state the header just sits in the first row.

<Grid x:Name="header" BackgroundColor="{StaticResource BlueHeaderColor}" >

While the ListView actually uses the Grid.RowSpan=”2″ so it goes over multiple rows, I had to do this because the height of the listview needs to be the full height of the screen once the header disappears. I also make use of the ability to set post-layout values in Xaml, setting the TranslationY to 60 on the ListView (this moves it down into the correct position by default).

<local:AdvancedListView BackgroundColor="#D7DBDF" HasUnevenRows="true" TranslationY="60" Grid.RowSpan="2" 			
        x:Name="myListView" 
		ItemsSource="{Binding Items}" ItemTemplate="{StaticResource homeWallListTemplateSelector}" 
		SeparatorVisibility="None"
		> 
</local:AdvancedListView>

So when we want to hide the navigation bar we must hook into the Scrolled event on the listview and translate the Y values on the views depending on the scroll position. This part is really just for a demo, it’s not thought out and very prototype.

void MyListView_Scrolled(Point obj)
{
    var headerHeight = 60;

    if (obj.Y <= 0)
    {
        header.TranslationY = 0;
        myListView.TranslationY = headerHeight;
    }
    else if (obj.Y <= headerHeight)
    {
        header.TranslationY = -obj.Y;
        myListView.TranslationY = -obj.Y + headerHeight;
    }
    else if (obj.Y > headerHeight) //scrolled 
    {
        header.TranslationY = -headerHeight;
        myListView.TranslationY = 0;
    }
}

Like Animations

One other thing I like about this app is the animated likes buttons.

fbforms-like

In this case I cheated a little bit and used a Animated Gif, it worked ok. I also used a few other features.

As with all the other cases I leveraged the Grid. You’ll also notice that I used a few extra controls, AdvancedFrame from FreshEssentials to allow for the rounded edges and a GifImageViewControl.

<ContentView Grid.Row="5" Grid.Column="1" Grid.ColumnSpan="4" x:Name="likeArea"  Opacity="0">
    <fe:AdvancedFrame Padding="15, 4" HasShadow="true" OutlineColor="#EEEEEE" CornerRadius="70" Corners="all"  InnerBackground="White"  >
        <local:GifImageViewControl  Aspect="AspectFill" Source="facebookreactionsanimation.gif"></local:GifImageViewControl>
    </fe:AdvancedFrame>
</ContentView>

As with all the other samples we simply leverage some Translations and in this case we also leveraged the FadeTo animation.

async void Handle_Clicked(object sender, System.EventArgs e)
{
    if (likeArea.TranslationY == -35)
    {
        await likeArea.TranslateTo(0, 0, 100, Easing.Linear);
        await Task.Delay(50);
        await likeArea.FadeTo(0, 50);
    }
    else
    {
        await likeArea.FadeTo(1d, 20);
        await likeArea.TranslateTo(0, -35, 100, Easing.Linear);
    }
}

If you want to check out the code base please find it here: https://github.com/XAM-Consulting/FacebookForms

Thanks


Should I use Xamarin for Mobile Development? YES you should!

Should I use Xamarin for Mobile Development?  – This a very important question and a question that can cost you alot of time and money if you get it wrong. After wasting many months of my time playing with open web platforms I eventually found Xamarin and since then I’ve not found anything that compares.

So that answer is YES! In my opinion Xamarin is hands down one of the best mobile development platforms available in the market today. Many people don’t know what they’re missing out on by not using Xamarin so I’m going to highlight some reasons I think people should be using Xamarin.

1) It’s Native but with 80%+ code share?

So for those that aren’t aware of Xamarin or how it works, Xamarin allows you to develop apps for iOS, Android and Mac from a single code base. When I say this I don’t mean in a webview or customised API, it actually uses the Native APIs. So for example when developing on Xamarin.iOS you’ll be using UIKit which is the same API that a native developer would be using.

2) C# and F# are Modern languages

C# might not be the hipster language of the year but it is a continually evolving language with solid features like type inference, dynamic types,  language integrated query (LINQ), async/await and first class functions. C# is designed for developing large robust applications. And for the functional types there’s F#.

Both languages have been aggressively developed for many years and it’s not slowing down, C# 6 and F# 4 are soon to be released. If you’ve seen C# a few years ago I encourage you to give it another go as it’s evolved in leaps and bounds.

3) async/await

.. ‘wait but javascript is all async’ i hear you say…  C#/F# async/await is different to what people normally think async is. C#/F# async/await tackles the callback hell problems in rich clients, anyone who works with rich clients will know of these problems. This is a problem that’s attempted to be solved with promises and generators but neither are at the level of async/await.

Here’s a little before/after sample:

Before:

doAsync1(function () {

doAsync2(function () {

doAsync3(function () {

doAsync4(function () {

      })
     })
   })
})
After:

await doAsync1()
await doAsync2()
await doAsync3()
await doAsync4()

4) Watches, Google Glass wearables and the future of devices.

In case you haven’t noticed the future isn’t just mobiles it’s wearables, devices and IOT. Xamarin has same day support for all these platforms including android wear, google glass, Amazon TV and more. As I’ve said before Xamarin uses the Native APIs and compiles down to native so using Xamarin you’re in the perfect position develop all modern platforms.

5) It’s ready now!

All the time I hear people say ‘html is a fast moving target’ or ‘it will get there eventually’. Xamarin is here now, it’s Native and it’s cross platform. Why wait to have a great app when you can have it now and as a bonus know that your application is future proof for future devices.

6) It’s fast and stable

From personal experience the Xamarin traditional (Xamarin.iOS and Xamarin.Android) platform is solid, fast and stable. You’d be hard pressed to find a problem with the core parts of the platform, any app bugs will likely be your own bugs.

7) Documentation

The documentation for Xamarin is solid and there’s 100s of sample app on github. Provided by Xamarin and others in the community.

8) Xamarin.Forms

So how about 100% codeshare and still be Native? Xamarin.Forms allows you to program against a single API and have that single API mapped to native controls on each platform. Hanselman describes it well, ‘Write Once Run Everywhere AND Be Native’.

It’s still early days for the product but the top component developers like Telerik and DevExpress are already developing components for Xamarin.Forms.

9) It’s the best of all worlds (Hybrid and Native)

If you’ve taken a look at my Xamarin mashup blog you’d already know that the possibilities with Xamarin are vast, you can essentially create your own Cordova and you can completely integrate it with your C# Mvvm/c# Native Code. So you have the full power of the .net framework to build your client application architecture which becomes very useful when you have complex requirements like Offline.

10) Large Community

Xamarin uses the .net framework and because of this it’s inherited the pre-existing community, this means that even though it’s a fairly new platform we already have support for Awesome projects like Json.net, Fody and ReactiveExtensions/ReactiveUI.

11) Profitable Innovative Company

Xamarin as a company has a passion for enabling mobile developers to deliver leading experiences. Their products cost money Yes.. but it’s good for us as customers. I see many people complain about the pricing but Xamarin charging money for products allows them to put money back into building amazing products for us. This year at Evolve Xamarin released some great new products including Insights – Analytics Cloud Service, a faster Android emulator, Test Cloud and a performance profiler. In the future Xamarin is on the rise and this means our tools are only going to get better and better.

This is why I choose Xamarin and I think you should too….

If you have any questions regarding Xamarin or need any help please contact me I’m always happy to help.

Thanks

Michael

Ultimate guide to ASP.NET MVC and Xamarin.Forms Mashups

In this blog I show you how to take an asp.net application and then code share both Razor Views and Business logic with a Xamarin.Forms native application. This integration will allow full sharing between the application, so changes to the Razor views or Business Logic will apply to both projects. The mobile application will also work completely offline in which the Razor Views and Business Logic run completely locally on the device.

And that’s just the start of it! Imagine being able to jump in and out of native/web elements, sharing razor views when it’s a good fit and then jumping into a gorgeous native UI when you like.

This blog takes a already existing ASP.NET MVC project that’s been setup as a sample application with typical Views, Script and Styles.

Video: Seamless Native and Hybrid

Video: 3Way Communication between C#/Native and Hybrid/JS Integration

Diagram: Shared Files Setup

Hybrid Razor File Setup

Diagram: Offline Support with Shared Views and Logic

Offline Mode

Step 1. Create new solutions

Create a new Xamarin.Forms PCL solution and place it in a directory next to the asp.net MVC project. Because we’re sharing files between projects the directory setup is important. In this case we can call it JellyBeanTracker.Mobile.

Step 2. Adding the external files and RazorTemplatePreprocessor

In this example I’ve added the files from the MVC project into the XF PCL project as ‘linked’ files. Create a new directory called ‘External’ and add the following files as per the screenshot. ps, to add files right click the directory and hit add files, Xamarin studio will then ask you if you’d like to link or copy files, in this case you need to link.

Screen Shot 2014-08-13 at 8.15.13 am

Secondly you need to add the javascript files and css files to the resources directory on each of the platform projects, as per screenshot.

Screen Shot 2014-08-13 at 8.20.55 am

For each of the razor files you need to right click->properties and set the Custom tool to the RazorTemplatePreprocessor.

Screen Shot 2014-08-13 at 8.22.15 am

Step 3. Clone and Add the MVCPolyfils into your Xamarin.Forms Project

Available here: https://github.com/rid00z/MVCPolyFils

Step 4. Use the Polyfils

On the Razor page remove @model and replace with @inherits System.Web.Mvc.WebViewPage<T> (from MVCPolyfils).

This step is required to have the file work in both MVC and the Xamarin.

Screen Shot 2014-08-19 at 9.29.47 pm

Step 5. Install Xamarin.Forms.Labs which has a HybridWebView

I’ve done a few modifications to the Xamarin.Forms.Labs project to get this to work and only just put it in my fork, so you’ll need to get the code from my fork until it gets put in the actual project.

https://github.com/rid00z/Xamarin-Forms-Labs

Step 6. Setup the Xamarin.Forms Project, with the Page and PageModels

This step requires knowledge of Xamarin.Forms, if you’ve not used Xamarin.Forms before then there’s some good videos over here: http://www.michaelridland.com/mobile/xamarin-hack-day-talks-thanks-retrospective/

Step 7. Sharing Business Logic and Offline

It’s possible to have shared business logic between both of the projects. You can share it via file linking, PCL or a shared project. In my sample application I’ve used file linking so it’s the same as the razor files.

In order to share business logic between asp.net and Xamarin Native you need to code your business logic classes against abstractions/interfaces. If we take a look at the JellyBeanGraph Calculator we can see that it uses a IDataSource for it’s calculations.

The IDataSource needs to be implemented in two or three places, two places if you’re not supporting offline and three place if you are supporting offline. As you can see in the sample project there’s two sources in the Xamarin project, a LocalDataSource and a RemoteDataSource. These two classes a switched between depending on if it’s online or offline.

LocalDataSource

RemoteDataSource

Step 8. Diff Logic in Razor Views using compiler directives

It’s not highly recommended to have logic within your Razor views but it is possible to have different view logic between the platforms. If you’re using file linking the best option is it use #ifdefs, to do this you need to add a compiler Symbol to the native project, as per screen shot.

Screen Shot 2014-08-14 at 8.10.36 am

Once you’ve setup the compiler Symbol you can then add setup a static IsNative boolean value in a shared file. As per below.

Screen Shot 2014-08-20 at 9.32.21 am

Finally you can add different functionality for the Native applications within your Razor views.

Screen Shot 2014-08-20 at 9.32.40 am

Step 8. Partial Views and Shared Partials

In the open source project I’ve release with this blog post there’s the ability to use Partial views within the Xamarin app. If you provide the classname as a string into the partial the framework will pick it up and run the razor view locally. In order to have the partials work on both the MVC and Xamarin application you need to have the partial views come from a static variable on a class.

Step 9. Combining the Javascript Logic

It’s also possible to take your javascript files and share them with Xamarin. Mostly they will just function as normal unless you’re doing ajax calls to collect the data. In the case you’re doing ajax calls and want to support offline then you need to communication back and forth between the C#/native and javascript.

There’s three type of communication available in this solution using the HybridWebView (soon to be)in Xamarin.Forms.Labs

a) Injecting javascript from c#

b) Calling a c# method from javascript

c) Calling a c# Func and returning into a closure

Step 9a. Injecting Javascript

Using the HybridWebView available in Xamarin.Forms you’re able to execute javascript from outside a webview. This is as easy as calling a method named InjectJavaScript, as per example below.

1
2
string data = JsonConvert.SerializeObject (PageModel.GraphData).Replace ("\r\n", "");
_hybridWebView.InjectJavaScript ("JellyBeanTrackerApp.buildChartStr('" + data + "');");

 Step 9b. Calling Native Methods

Also using the HybridWebView you’re able to call Native methods, so this is going from within javascript running in the web view out to a native method written in c#. As a little side note, this works with Mvvm so your business logic is contained within your view model.

Registering a method with the HybridWebView.

1
2
3
_hybridWebView.RegisterCallback ("EditVisible", (data) => {
  PageModel.EditVisible.Execute(data);
});

Calling the native method from javascript

1
2
3
$('#editVisible').click(function() {
  Native('EditVisible', JellyBeanTrackerApp.currentChartData);
});

The c# method that’s called from the javascript.

1
2
3
4
5
6
7
8
public Command<string> EditVisible
{
  get {
    return new Command<string> ((data) => {
      PushViewModel<ManageGraphPageModel>(data, true);
    });
  }
}

 Step 9c. Calling Native Funcs with Closure support

This one I’m a bit proud of as it’s pretty sweet. Using the HybridWebView you now have the ability to call a Native function and the return values of the Native function is injected back into the original closure. Also same as above this works with Mvvm.

Registering the Function in the WebView

1
2
3
_hybridWebView.RegisterNativeFunction ("GetGraphData", (input) => {
  return PageModel.GetGraphData(input);
});

Calling the function from javascript with the closure being called on return.

1
2
3
4
5
$('#getGraphData').click(function() {
    NativeFunc('GetGraphData', null, function (returnData) {
        JellyBeanTrackerApp.buildChartStr(returnData);
    } );
});

The c# function that runs

1
2
3
4
5
6
7
8
9
public Func<string, object[]> GetGraphData
{
  get {
    return (data) => {
      GraphData = new JellyBeanGraphCalculator (_dataSourceFactory.GetDataSource ()).GetGraphData();
      return new object[] { GraphData };
    };
  }
}

Step 10. Debugging from Safari

Another thing I should mention is Safari has the ability to debug UIWebViews, the setup details can be found here.

Just another (awesome)tool for the belt!

This is just one tool for the belt, it’s not the only mobile architecture that you can implement. There’s also the traditional Xamarin approach(Native UI for each platform) and Xamarin.Forms approaches which are still great architectures for mobile applications.

So when should you use this Hybrid type solution?

My personal belief is that using the HybridWebView is acceptable when the view is Not highly interactive as when interacting with a user you want to have everything looking and feeling native. Really it’s up to you to decided and initially it’s good to prototype and test within a device. Of course when you’ve got a large investment in web/mvc assets this is also a good choice.

All the code is available on https://github.com/rid00z/JellyBeanTracker, currently it’s only working with iOS devices. I will attempt add other platforms soon.

Thanks


Xamarin Hack Day Talks, Thanks and Retrospective

In June this year I put together a Xamarin hack day(with some amazing help by SSW)  in Sydney. The idea of the Hack Day was to get Sydney’s most experienced Xamarin professionals and people who want to learn Xamarin together for a day of learning and loving Xamarin. The day started with some presentations on various Xamarin technology’s and then the attendees sat down with their laptops to code with the help of the Xamarin experts.

The vibe of the day was great as everyone was very helpful towards each other and attendees were able to help each other.

People are doing amazing things in Xamarin, we all know this but the problem is that we’re all so busy making great products that we don’t get the time to share notes and that’s why I wanted to start the Xamarin hack day. Thanks to SSW the Xamarin hack day has become even more than I expected, it’s now global. Xamarin hack day events will be hosed worldwide including Brisbane, Melbourne, Hong Kong and more. Visit the Xamarin Hack Day website to find out more details on locations.

I would like to thank the experts and presenters Filip, Alec, Geoffrey, David and Rod. I’d also like to thank Adam Cogan and the SSW team for hosting the event and the huge amount of effort they put into the website. A big thank you to all the attendees who made the day a success.

We’re always taking feedback and improving the days for the attendees, so future hack days are only going to get better. I’ve embedded the videos below for your viewing pleasure.

Please sign up for the next Hack Day at http://xamarinhackday.com/


Introduction to Xamarin

Xamarin.Forms Deep Dive

Introduction to iBeacons with Xamarin

Implementing ModernHttpClient in MvvmCross

Earlier this week Paul Betts started a new open source project called ModernHttpClient which is a Xamarin wrapper around two native libs.

https://github.com/paulcbetts/ModernHttpClient

“This library brings the latest platform-specific networking libraries to Xamarin applications via a custom HttpClient handler. Write your app using System.Net.Http, but drop this library in and it will go drastically faster. This is made possible by two native libraries:
On iOS, AFNetworking 1.3.3
On Android, via OkHttp 1.2.1″

While Paul does claim your app will go drastically faster he’s not actually very specific about why it will go drastically faster but after a query I’m now aware that for iOS the AFNetworking library has better thread handling than the standard httpclient. So after some tests I confirmed that for single requests the webclient is no faster than the standard client, I’m yet to test performance in an app with many simultaneous client requests but in theory it should be faster.

If you’re using the Image Downloader in MvvmCross implementing the library is a little tricky, but luckily Stuart has done a great job of keeping it extensible.

To get started you’ll need to clone the repo but because it has external projects you’ll need to use the recursive command.

UPDATE, there’s an easier way to get it: Paul Betts Comment

git clone –recursive https://github.com/paulcbetts/ModernHttpClient.git

Once you’ve got a copy of it you’ll need to build both the Xamarin binding for AFNetworking and the ModernHttpClient.

The binding solution is in vendor/AFNetworking and the ModernHttpClient is in the root directory.

Now that you’ve built both the assemblies you need to add them to your Xamarin.iOS solution.

After a little dive into the MvvmCross source code I discovered that there’s a simple interface that I can implement and register. If you’re not sure what I’m talking about you can read up on MvvmCross plugins here: https://github.com/MvvmCross/MvvmCross/wiki/MvvmCross-plugins

1
2
3
4
public interface IMvxHttpFileDownloader
{ 
    void RequestDownload(string url, string downloadPath, Action success, Action<Exception> error);
}

So in the Xamarin.iOS project create a plugins directory and add two files MvxFastHttpFileDownloader and MvxFastFileDownloadRequest.

Because the standard MvvmCross plugins have already registered the interface IMvxhttpFileDownloader you need to make sure you register your downloader last, so put it at the bottom of the InitializeLastChance overide in your setup.cs file.

1
2
3
4
5
6
7
protected override void InitializeLastChance ()
{
    Cirrious.MvvmCross.Plugins.DownloadCache.PluginLoader.Instance.EnsureLoaded();
    Cirrious.MvvmCross.Plugins.File.PluginLoader.Instance.EnsureLoaded();
    Mvx.RegisterSingleton<IMvxHttpFileDownloader>(() => new MvxFastHttpFileDownloader());
    base.InitializeLastChance();
}


MvxFastHttpFileDownloader


1
2
3
4
5
6
7
8
9
10
11
12
13
14
15
16
17
18
19
20
21
22
23
24
25
26
27
28
29
30
31
32
33
34
35
36
37
38
39
40
41
42
43
44
45
46
47
48
49
50
51
52
53
54
55
56
57
58
59
60
61
62
63
64
65
66
67
68
69
70
71
72
73
74
75
76
77
78
79
80
using System;
using Cirrious.CrossCore.Core;
using Cirrious.MvvmCross.Plugins.DownloadCache;
using System.Collections.Generic;
using System.Linq;
 
namespace Ridland.MvvmCross.Plugins
{
    public class MvxFastHttpFileDownloader 
        : MvxLockableObject
            , IMvxHttpFileDownloader
    {
        private readonly Dictionary<MvxFastFileDownloadRequest, bool> _currentRequests =
            new Dictionary<MvxFastFileDownloadRequest, bool>();
 
        private const int DefaultMaxConcurrentDownloads = 30;
        private readonly int _maxConcurrentDownloads;
        private readonly Queue<MvxFastFileDownloadRequest> _queuedRequests = new Queue<MvxFastFileDownloadRequest>();
 
        public MvxFastHttpFileDownloader(int maxConcurrentDownloads = DefaultMaxConcurrentDownloads)
        {
            _maxConcurrentDownloads = maxConcurrentDownloads;
        }
 
        public void RequestDownload(string url, string downloadPath, Action success, Action<Exception> error)
        {
            var request = new MvxFastFileDownloadRequest(url, downloadPath);
            request.DownloadComplete += (sender, args) =>
            {
                OnRequestFinished(request);
                success();
            };
            request.DownloadFailed += (sender, args) =>
            {
                OnRequestFinished(request);
                error(args.Value);
            };
 
            RunSyncOrAsyncWithLock( () =>
                                   {
                _queuedRequests.Enqueue(request);
                if (_currentRequests.Count < _maxConcurrentDownloads)
                {
                    StartNextQueuedItem();
                }
            });
        }
 
        private void OnRequestFinished(MvxFastFileDownloadRequest request)
        {
            RunSyncOrAsyncWithLock(() =>
                                   {
                _currentRequests.Remove(request);
                if (_queuedRequests.Any())
                {
                    StartNextQueuedItem();
                }
            });
        }
 
        private void StartNextQueuedItem()
        {
            if (_currentRequests.Count >= _maxConcurrentDownloads)
                return;
 
            RunSyncOrAsyncWithLock(() =>
                                   {
                if (_currentRequests.Count >= _maxConcurrentDownloads)
                    return;
 
                if (!_queuedRequests.Any())
                    return;
 
                var request = _queuedRequests.Dequeue();
                _currentRequests.Add(request, true);
                request.Start();
            });
        }
    }
}

MvxFastFileDownloadRequest

1
2
3
4
5
6
7
8
9
10
11
12
13
14
15
16
17
18
19
20
21
22
23
24
25
26
27
28
29
30
31
32
33
34
35
36
37
38
39
40
41
42
43
44
45
46
47
48
49
50
51
52
53
54
55
56
57
58
59
60
61
62
63
64
65
66
67
68
69
70
71
72
73
74
75
76
77
78
79
80
81
82
83
84
85
86
87
88
89
90
91
92
using System;
using Cirrious.MvvmCross.Plugins.DownloadCache;
using Cirrious.CrossCore.Core;
using System.Net.Http;
using ModernHttpClient;
using System.Threading.Tasks;
using System.IO;
 
namespace Ridland.MvvmCross.iOS.Plugins
{
    public class MvxFastFileDownloadRequest
    {
        public MvxFastFileDownloadRequest(string url, string downloadPath)
        {
            Url = url;
            DownloadPath = downloadPath;
        }
 
        public string DownloadPath { get; private set; }
        public string Url { get; private set; }
 
        public event EventHandler<MvxFileDownloadedEventArgs> DownloadComplete;
        public event EventHandler<MvxValueEventArgs<Exception>> DownloadFailed;
 
        HttpClient CreateClient()
        {
            return new HttpClient(new AFNetworkHandler());
        }
 
        public void Start()
        {
            var client = CreateClient();
 
            Task<HttpResponseMessage> result;
 
            result = client.GetAsync(Url);
 
            result.ContinueWith(res =>  {
 
                var httpResult = res.Result;
                httpResult.EnsureSuccessStatusCode(); 
                httpResult.Content.ReadAsStreamAsync()
                    .ContinueWith(HandleSuccess, 
                    TaskContinuationOptions.NotOnFaulted)
                        .ContinueWith(ae => FireDownloadFailed(ae.Exception), 
                                      TaskContinuationOptions.OnlyOnFaulted);
 
            }).ContinueWith(ae => FireDownloadFailed(ae.Exception), TaskContinuationOptions.OnlyOnFaulted);
 
        }
 
        private void HandleSuccess(Task<Stream> result)
        {
            try
            {
                var fileService = MvxFileStoreHelper.SafeGetFileStore();
                var tempFilePath = DownloadPath + ".tmp";
 
                using (result.Result)
                {
                    fileService.WriteFile(tempFilePath,
                                          (fileStream) =>
                    {
                        result.Result.CopyTo(fileStream);
                    });
                }
                fileService.TryMove(tempFilePath, DownloadPath, true);
            }
            catch (Exception exception)
            {
                FireDownloadFailed(exception);
                return;
            }
 
            FireDownloadComplete();
        }
 
        private void FireDownloadFailed(Exception exception)
        {
            var handler = DownloadFailed;
            if (handler != null)
                handler(this, new MvxValueEventArgs<Exception>(exception));
        }
 
        private void FireDownloadComplete()
        {
            var handler = DownloadComplete;
            if (handler != null)
                handler(this, new MvxFileDownloadedEventArgs(Url, DownloadPath));
        }
    }
}

Getting started with Calabash on Xamarin Studio

Here’s a little setup guide to using Calabash with Xamarin Studio on Mac.

  • In a terminal, go to your Xamarin Studio Solution Directory
    • cd path-to-solution
  • Install calabash-cucumber gem (this make take some time because of dependencies)
    • gem install calabash-cucumber
    • (Note you may need to run sudo gem install calabash-cucumber if you get ERROR: While executing gem … (Gem::FilePermissionError)).
  • Setup your project for Calabash-iOS.
    • calabash-ios setup (Answer the questions and read the output 🙂
  • Generate a skeleton features folder for your tests
    • calabash-ios gen (this also copies the scripts irb_iosX.sh for “interactive development” into your current dir)
  • Download the Calabash-framework in the project directory(i.e the path where your .csproj
    file is present).

    • cd path-to-mainproject
    • calabash-ios download
    NOTE: you can also download manually from download from their framework downloads link
  • In the Xamarin studio, on the IOS project of your app(say Myapp.ios.csproj), you have to
    configure the option to force load the calabash-framework. The reason that we have to do
    this for calabash-ios is because the calabash server runs as part of the app itself(rather than
    in android the instrumentation server will run on a seperate app). And its better you
    configure this in Debug configuration so that release builds does not have this.
    In the Additional mtouch arguments, configure

    -gcc_flags “-framework CFNetwork -framework CoreGraphics -force_load $(ProjectDir)/calabash.framework/calabash -lstdc++”


  • Now from your solution directory you should be able to run the tests (if the features folder is present)
    The only way I’ve got it working is to prelaunch the app from Xamarin Studio and use the NO_LAUNCH command
    • cucumber NO_LAUNCH=1

Html5 vs Native

For the past two years I’ve been in charge of the development of the mobile version of the Jim2 Business Engine at Happen Business. I wanted to share some experiences we’ve had with going mobile.

Before we move on I think it’s important to understand it’s not just html5 vs native as there’s two types of html5 there’s html5 that’s embedded in a native app and there’s html5 that’s used via a browser. In iOS there’s actually a massive performance difference when using embedded html5.

Believing in the power of html5 and the promise of cross platform we spent the first nine months developing in html5, personally I have a soft spot for JavaScript and html so I was happy. The architecture was done using backbone, jquery and moutashe. We ended up with a working app that ran ok. The primary problem we ran into was even after intense optimisation the html5 app just didn’t run fast enough for the level of user experience we wanted. Second issue was the time spent in optimisation, truth is html5 is build once and optimize everywhere.

We ended up playing around with native applications, and found everything just worked and worked well. There’s quite a hard mental shift in developing native vs html as the way you create UI is very different. From that point on we been having a blast and we’ve come up with an app that’s provides an amazing user experience. It’s very challenging to put a rich business application onto a small touch screen but it can be done with some hard work.

That said there’s definitely some places for html5, if your a end user type website a mobile friendly website is essential. Even though you might go with a native app for user experience you must also consider that many users like to be in their browser, so having a mobile friendly website(in addition to native) is also important for user experience in this case.

Something else you need to consider, ‘is your app an essential part of a users day’? Then a native app is essential. As our users spend over 40 hours a week working we’re an essential part of the users life, so our choice was an app. But also on the roadmap we have a mobile friend website.

TLDR; avoid embedded html5 because of performance issues eg phonegap. If your a website have a mobile friendly version and maybe an app. If your critical function of a users life then a app is a must and a mobile friendly website is good to have.

FYI many companies that once went html5 have now gone back to native include us, Facebook and Xero.

Ps, if you take a look at Senchas response ‘html5 is ready’ to Facebook’s claim ‘html5 is not ready’ please understand its a bit misleading because the comparison is done in a safari browser and if it was embedded performance wouldn’t have been half as good.