iOS 9 Search API – A killer way to engage with users

Note: I’m currently at WWDC watching the live sessions, I haven’t been able to include all session details and only the public information, as more information becomes public I will post more details.

Did you know that in iOS 86% of time is spent in apps?

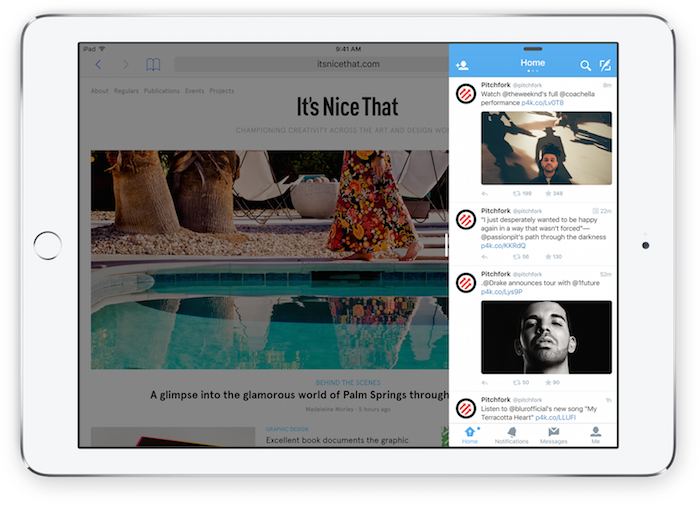
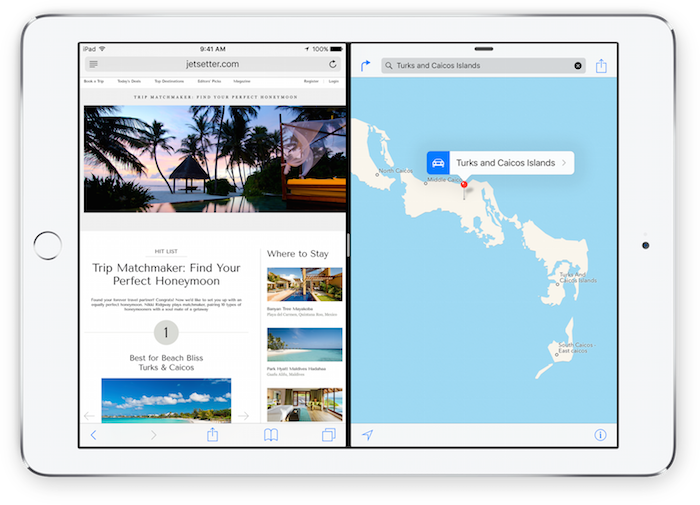
Apps are now allowed to integrate with the search in iOS9, this is a bit of a killer feature for iOS 9, not only for app developers but also for users.

Imagine the scenario where you’ve booked a hotel room from an app, you want to find some details about the hotel room at a later time, with search API you can put in a query directly in the iOS search bar and details of that booking can appear and deep link you into your app.

Below is an example in which a person has booked a holiday to Maui, from AirBnB and Kayak.

ios-search

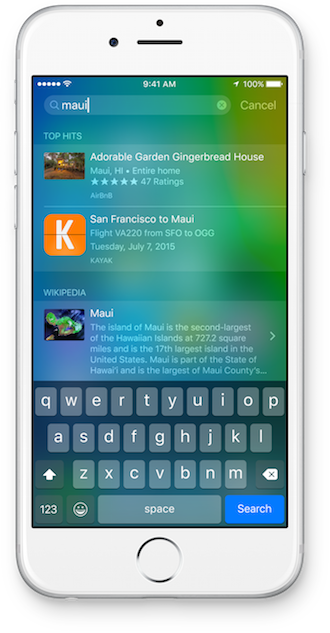
As developers we can choose exactly what to index with a lightweight API. As a added bonus the results also appear in the safari search, still including the deep linking into the apps which is awesome. You can also tag content as public, meaning very popular public content will also appear in the search result.

There’s three API for supporting iOS 9 search:
NSUserActivity – Which is previously viewed app content
CoreSpotlight – Which you can add any app content
Web Markup – App content which is also supported on the web

NSUserActivity

Was introduced in iOS 8 but is now indexed and searchable, it works with iOS Search and Safari search and this allows the user to revisit that activity.

In a NSUserActivity you can select many options via the metadata, like if it’s eligible for handoff, if it’s eligible for search and public indexing.

Some of the fields you can handle on this include title, userInfo, keywords, contentAttributeSet, expirationDate, webpageURL, eligibleForSearch, becomeCurrent and thumbnailData.

In order to support returning to your app you need to support the method continueUserActivity.

If you want the Activity to work on the web then you can set – eligibleForPublicIndexing, but this data remains anonymous (via a hash) until the activity is popular enough too appear in the results.

This is also how you can support SIRI smart reminders and Handoff e.g.. ‘remind me about this”

CoreSpotlight

CoreSpotlight allows you to index any part of your application, you can take a list of data from your backend and index all the items in the list using the CSSearchableIndex and CSSearchableItem. You can add a bunch of attribute data using CSSearchableItemAttributeSet like title, description, thumbnail and data.

In order to handle this deep linking you only need to handle Appdelegate.continueUserActivity.

It’s up to you/your app to manage the indexed content you have you can update a Item by using the same ID and calling indexSearchableItem and if you want to delete you can use deleteSearchableItem.

This is a basic overview but generally it is this simple.

WebMarkup

This is a App Deeplink, so it will be a simple URL (a real URL, like www.apple.com/product/iphone) that goes to a website when on OS X but on IOS will Deep Link into your app.

There’s a few requirements for WebMarkup:

  • The website must contain the Markup for Deeplinks
  • It should match the support URL and marketing URL
  • Ensure your website has smart app banners

Universal Links are better then customURL schemes, as their Unique, Secure and Flexible.

Apple are also going to be supporting Twitter Cards and Facebook App Links. I’m sure more details on this will come soon, but overall it’s very cool.

Best Practices

Make sure you give the items that same ID, you don’t want to be duplicating any items.

Apple have put in a lot of work to protect relevance, spammers are downlinked and engagement ratios are tracked.

Some tips for indexing:

  • Use a description
  • Use a thumbnail
  • Provide the key information
  • Use keywords
  • Proactivityely index items

iOS search is flexible and limitless, it’s going to be very awesome for both User and Developers, I’m really looking forward to it.

If you have any questions please contact me on my website, I’m happy to answer any questions.

Thanks

Michael


Introduction to iOS9 Multitasking and Xamarin.Forms first-thoughts

Note: I’m currently at WWDC watching the live sessions, I haven’t been able to include all session details and only the public information, as more information becomes public I will post more details.

Split screens on iPad, ah scary, now we have even more things to worry about.

Just in case you haven’t heard about what multitasking is on the iOS9, it’s basically being able to run two apps side by side on an iPad. There’s three different modes, Slideover, SplitView and Picture-in-Picture.

Slideover

slideover

SplitView

splitview

Picture-In-Picture

picture-in-picture

One of the first things you need to understand about multitasking in general, the User is in control of the apps and the sizes of the apps. You can never set the size of a window.

We all now need to adopt a multitasking mindset, which means two things 1) avoid using device idiom or interface orientation and instead adapt to the window size 2) we need to ensure our apps are ‘good citizens’ and not leaking memory, growing in an unbounded fashion, or blocking the main thread

In regards to handling different sizes and layout, Adaptivity is the solution, if you’ve been using the features like AutoLayout and Size classes then supporting multitasking in your app should be easy. Apple aren’t afraid to say I told you so, ‘participating in iOS 9 multitasking is straightforward when you’ve adopted Apple’s best-practice recommendations for iOS 8.’

If you’re developing with Xamarin.iOS and you’ve been doing it with best practices then this should be a simple transition.

The basic steps to support multi-tasking in your app are:

1) Build your app with iOS 9 SDK
2) Support all orientations
3) Use launch storyboards

If you want to opt-out of multitasking then you can add the key ‘UIRequiresFullScreen’ in your plist, this is not recommended as user will expect that your apps support multitasking and their not going to be happy if they can’t use multitasking. Apple recommends Most apps should adopt Slide Over and Split View.

The simulator in xcode 7 will allow you to simulate the functionality so testing your app them should be fairly easy. Currently only the iPad Air 2 support the full SplitView, I would guess this is due to performance.

The biggest change is about resource management. Every iOS app—even one that opts out of using multitasking features—needs to operate as a good citizen in iOS 9. Now, even full-screen apps don’t have exclusive use of screen real estate, the CPU, memory, or other resources.

It’s important to note that we shouldn’t be using rotation events in iOS9, the events we should be using are similar to this (more details TBA).

willTransitionToTraitCollection
viewWillTransitiontoSize
traitCollectionDidChange
animateAlongsideTransition
completion


Multitasking with Xamarin.Forms first thoughts

If you’re using Xamarin.Forms then there’s no direct support for autolayout or size classes but if you design your layouts to look good at all sizes then you should be ok. I’m feeling that in general multitasking won’t be an issue in Xamarin.Forms, even ‘as-is’ Xamarin.Forms we can use the current system to have adaptable screen sizes using the various Xamarin.Forms layouts like StackLayout, Grid and RelativeLayout. Additionally this is just a thought but possibly, the Xamarin.Forms team could add a Device.Size property which could help us make a decision on how to layout the main areas of the screen, possibly add even a event.

Here’s some initial thoughts on handling the new feature.

  • Avoid making layout decisions on Idoim(Tablet/Phone), use the window size
  • Avoid making layout decisions on device orientation
  • Avoid absolute layout
  • Use RelativeLayout, StackLayout and Grid to help with adaptable screen sizes
  • MasterDetail should already function correctly
  • It would be possible to add (polyfil) an event into Xamarin.Forms to notify when a Screen Size changes, allowing us to change the primary navigation style

One other thing to note is Xamarin.Forms has no concept of ‘readable content guide’, so if you want text content to be a good reading experience in your Xamarin.Forms applications then you’ll need to come up with a alternative solution.

If you have any questions about iOS9 multitasking or Xamarin.Forms feel free to get in touch as I’m always keen to help.

Thanks

Michael


Introducing WatchKit and watchOS 2

Watch development now has three new frameworks, WatchKit, ClockKit and Watch Connectivity.

WatchKit

As I mentioned before the WatchKit extension now runs on the watch but apart from the architectural changes the extension primarily stays the same. There’s a few implications on how you develop your WatchKit extension.

You must implement your extension using the watchOS SDK instead of the iOS SDK. If a API isn’t available in the watchOS then you’ll need to rely on your iPhone app to perform the task. It’s very surprising but the API available on the watch is very large, ClockKit, Contacts, CoreData, HomeKit, CoreGraphics, CoreLocation, CoreMotion, EventKit, HealthKit, Watch Connectivity.

Your extension now stores files and data on the Apple Watch, but any data that’s not a part of your Watch app or WatchKit extension bundle must be fetched from the network or companion iOS app running on the iPhone. You cannot rely on a shared group container to exchange files with your iOS app.

WatchKit now has support for Networking via the NSURLSession object, with full access to the NSURLSession capabilities include the ability to download files in the background. While I think this is very cool it also scares me how much this can be abused by app developers and dramatically reduce the battery life on the watch.

One more thing to note is that WatchKit extensions not longer have direct access to iCloud technologies.

ClockKit and Complications

A complication is a small UI element that displays custom information on the clock face of Apple Watch. Like your app’s glance, complications are a way to display your app’s most important information to the user quickly. Your complications can be displayed alongside system complications for displaying the current date, moon phases, sunrise times, user activity, and many other types of information.

There’s a few different methods to update complications in your apps, if you’re complication data is known from now and into the future then you can send all the data for the timelines up to the complication, this also allows your complication to support the Time Travel feature. Other options to update data include scheduled updates and certain types of push notifications.

All apps the support a complication must have a class that implements the CLKComplicationDataSource and all methods must be implemented, to register this in your app add the key CLKComplicationsPrincipalClass into your Info.plist.

ClockKit manages the life cycle of your complication, launching your extension at appropriate times, creating your data source object, and asking it for data. Complications run on an update cycle, which your able to configure via getNextRequestedUpdateDateWithHandler. You provide the ClockKit with data from the past, present and future data. It’s recommended to provide enough data for hours and not minutes, then if your data changes you can invalidate the data using CLKComplicationServer.

To display the UI for your complication you use a placeholder template, ClockKit only ask for your placeholder templates once after your app is installed on the device. It caches the data your provide and does not refresh unless your app is reinstalled or updated. Templates seem to support Images and Text must support the different shapes, ring, small and large.

Connectivity

The WatchConnectivity framework provide a two way communication between an iOS app and Watch app and basically we can use it to pass data back and forth between the phone and watch, live communication is possible when both apps are active otherwise data is sent in the background.

The new framework consists of just a few classes, WCSession, WCSessionFile, WCSessionFileTransfer, WCSessionUserInfoTransfer and finally the WCSessionDelegate.

The WCSession (and it’s delegate) is the primary facilitator of communication between the Watch and Phone. The WatchKit extension and the iOS app must configure their own session objects, activating the session opens a channel that allows each app to communicate with its counterpart.

When both apps are active you can send data directly using sendMessage otherwise you can send messages in the background using transferUserInfo or transferFile. All messages are delivered in the same order that they are sent.

The transferCurrentComplicationUserInfo on the WCSession allows iOS Apps to directly send data to the WatchApps and update the complication.

Custom Interfaces for Notifications

Yippee, Watch apps now have support for Actionable notifications introduced in iOS 8, which is a way to add buttons to your notification interface. This is something I’ve been waiting for as currently I find Notifications on the Watch aren’t amazingly useful. Apple Watch automatically adds the button to the notification, as developers we just need to handle the action the user selects.

Notifications have a short look that cannot be customised and the long look which can be customised. The long look also contains any action buttons that you support.

Summary

Apple has really thought about how developers can build awesome user experiences with the Apple Watch and they’ve opened up a lot more than I would have expected. Well it looks like us app developers have our work cut out, there’s a lot to learn about Watch development, and Apple is betting big on the Watch.

Current none of these APIs are supported by Xamarin and I’m sure it wouldn’t too far away, except they do have a bit of work cut out for them.


WWDC n+1 – The Keynote + Platforms State of the Union

Considering WWDC is a developers conference the keynote seemed more like a advertisement for Apple Music than anything else. We got 30 minutes of Apple Music, 2 minutes of swift and no code.  The Platforms presentation was much more interesting and finally included some code.

Below I list my highlights as a Xamarin developer, I’m going to keep these blogs focused on the interesting parts for Xamarin developers.

Multitasking in iOS 9  

More specifically designed for iPad Multitasking allows you to view two apps in a Slide Over, Split View, and Picture in Picture. The most interesting part of this is the layout, if you’ve been using auto layout it’s possible that your app might work with this already but if you haven’t then you might have a bit of work on your hands. If you’re using Xamarin.Forms this might be even more of a problem, but we will see once we’ve spent some more time with the new feature, this seems like a good item for some R&D and a blog post.

Search APIs in iOS 9

Apps are now allowed to interface with search in iOS 9, with the ability to deep link into the app. The API is called CoreSpotlight and is not supported by Xamarin yet. If your building website, there’s also the ability to include webmarkup that will appear in users search results. More info in a future blog post.

New game development APIs

Advancements in SceneKit, SpriteKit, and Metal. New APIs including GameplayKit makes it simple to build better quality games that involve complex rules, states, and behaviors. Model I/O gives you powerful control over the rendering of physical object models with materials and realistic lighting. ReplayKit lets users easily record and share great game content.

App Thinning

With iOS 9, the App Store allows users to download apps that are specifically optimized for their device. This means apps will download, install and launch faster while taking up less storage space than before. Build support for slicing, on-demand resources, and bitcode, and give your users smaller, more convenient updates to your apps. At the moment I’m not sure how this will work but stay tuned and you’ll find out soon.

Swift 2.0 and Open Source

The next version of swift has been announced with advanced error-handling, availability checking, and lots of enhancements to syntax. In even bigger news Apple is planning to make swift open source sometime this year, I’m not sure exactly how this relates to Xamarin but it’s still good news for developers.

WatchKit for watchOS 2

Apple announced a updated watch operating named watch OS 2, giving developers a bunch of new APIs and functionality, such as programmatic access to the Digital Crown and animation APIs for more dynamic user interfaces. New APIs for playing audio, video and microphone. Access to the Taptic engine, you can add haptic feedback in your Apple Watch apps. Extensions now run Native on the watch and don’t require a round trip to the phone resulting in a faster and responsive watchapp, developers can also create iPhone not present apps and full networking with NSSession and can work when iPhone is out of range. WatchApps now have a larger API a little similar to the iOS API, but with the extras like Digital Crown, Tapic Engine etc.

watchOS 2 also includes many enhancements to other existing frameworks such as HealthKit, enabling access to the health sensors that access heart rate and health information in real-time. CoreMotion enhancements include the ability to use the accelerometer to create engaging experiences on Apple Watch. Notifications on the watch can now have custom buttons and actions directly from the notification.

ClockKit, Time Travel and Complications

Well we all wanted it but weren’t sure if we would get it, but WE DID. Apps can now have their own data/information on the watch clock face, this information can be live updated via few different methods. And with the new Time Travel feature in watchOS 2, users can turn the Digital Crown to go backward and forward in time to display information in Complications from that time. Users can even enable multiple versions of your app’s Complications on the same clock face to display a variety of information.

Free App Development + $99 for all platforms

It’s now Free for developers to develop apps for all platform and now it’s only $99 if you want a developer account. The developer account is required to distribute and has a range of other features like access to early versions.

OS Upgrade Improvements 

Apple noted the problem of ‘free-space’ that many faced when attempting to update to iOS 8, so now iOS 9 will only require 1.4 GB of freespace to update. Apple are committed to pushing users to upgrade their OS.

iOS 9 Improved Battery Life & Low Power Mode

iOS 9 has an extra hour of battery life over iOS 8. iOS 9 now comes with a low power mode which can increase battery life by 3 hours..

Universal Links

App developers are now able to have a single link that opens in safari on the desktop but deep link into a app on the iPhone.

Summary

It’s been a long day but I’m very excited about learning more about these new features. I’ve got many more blog posts to come so stay tuned.

Thanks

Michael


FreshMvvm Quick Start Guide

FreshMvvm is designed to be easy and simple. So getting started is also fairly simple.

Step 1. Start new project

Start a new Xamarin.Forms Project using Portable Class Libraries.

Step 2. Obtain FreshMvvm from Nuget

Obtain FreshMvvm from Nuget by searching for FreshMvvm, make sure to do this on your Xamarin.Forms PCL project.

Step 3. Create QuoteList Page

Once you’ve got the packages you can then create your first Page and PageModel. In the Xamarin.Forms PCL project, let’s create a QuoteListPage.xaml and corresponding QuoteListPageModel.cs.

QuoteListPage.xaml

<?xml version="1.0" encoding="UTF-8"?>
<BasePage xmlns="http://xamarin.com/schemas/2014/forms" 
		xmlns:x="http://schemas.microsoft.com/winfx/2009/xaml" 
		x:Class="FreshMvvmSampleApp.QuoteListPage">
	<BasePage.Content>
		<ListView ItemsSource="{Binding Quotes}" SelectedItem="{Binding SelectedQuote}"  >
			<ListView.ItemTemplate>
				<DataTemplate>
					<TextCell Text="{Binding Total}" Detail="{Binding CustomerName}"></TextCell>
				</DataTemplate>
			</ListView.ItemTemplate>
		</ListView>
	</BasePage.Content>
</BasePage>

QuoteListPageModel.cs

1
2
3
4
5
6
7
8
9
10
11
12
13
14
15
16
17
18
19
20
21
22
23
24
25
26
27
28
29
30
31
32
33
34
35
36
37
38
39
40
41
42
43
44
45
46
47
48
49
50
51
52
53
54
55
56
57
58
59
60
61
62
63
64
65
66
[ImplementPropertyChanged] // uses fody for property changed
public class QuoteListPageModel : FreshBasePageModel
{
    IDatabaseService _databaseService;
 
    public QuoteListPageModel (IDatabaseService databaseService) // injected from IOC
    {
        _databaseService = databaseService;
    }
 
    public ObservableCollection<Quote> Quotes { get; set; }
 
    public override void Init (object initData)
    {
        Quotes = new ObservableCollection<Quote> (_databaseService.GetQuotes ());
    }
 
    // Methods are automatically wired up to page
    protected override void ViewIsAppearing (object sender, System.EventArgs e)
    {
        CoreMethods.DisplayAlert ("Page is appearing", "", "Ok");
        base.ViewIsAppearing (sender, e);
    }
 
    protected override void ViewIsDisappearing (object sender, System.EventArgs e)
    {
        base.ViewIsDisappearing (sender, e);
    }
 
    // This is called when a page id pop'd
    public override void ReverseInit (object value)
    {
        var newContact = value as Quote;
        if (!Quotes.Contains (newContact)) {
            Quotes.Add (newContact);
        }
    }
 
    public Command AddQuote {
        get {
            return new Command (async () => {
                await CoreMethods.PushPageModel<QuotePageModel> ();
            });
        }
    }
 
    Quote _selectedQuote;
 
    public Quote SelectedQuote {
        get {
            return _selectedQuote;
        }
        set {
            _selectedQuote = value;
            if (value != null)
                QuoteSelected.Execute (value);
        }
    }
 
    public Command<Quote> QuoteSelected {
        get {
            return new Command<Quote> (async (quote) => {
                await CoreMethods.PushPageModel<QuotePageModel> (quote);
            });
        }
    }

Step 4. Create Quote Page

We will also need a page which shows the details of a quote. So we can create a QuotePage.xaml and a corresponding QuotePageModel.cs.

QuotePage.xaml

1
2
3
4
5
6
7
8
9
10
11
12
13
14
<?xml version="1.0" encoding="UTF-8"?>
<BasePage xmlns="http://xamarin.com/schemas/2014/forms" xmlns:x="http://schemas.microsoft.com/winfx/2009/xaml" x:Class="FreshMvvmSampleApp.QuotePage">
    <BasePage.Content>
        <StackLayout Padding="15">
            <Label Text="Quote Amount" ></Label>
            <Entry Text="{Binding Quote.Total}"></Entry>
            <Label Text="Customer Name" ></Label>
            <Entry Text="{Binding Quote.CustomerName}"></Entry>
            <Button Text="Save" Command="{Binding SaveCommand}"></Button>
            <BoxView HeightRequest="30"></BoxView>
            <Button Text="Test Modal" Command="{Binding TestModal}"></Button>
        </StackLayout>
    </BasePage.Content>
</BasePage>

QuotePageModel.cs

1
2
3
4
5
6
7
8
9
10
11
12
13
14
15
16
17
18
19
20
21
22
23
24
25
26
27
28
29
30
31
32
33
34
35
36
[ImplementPropertyChanged]
public class QuotePageModel : FreshBasePageModel
{
    IDatabaseService _databaseService;
 
    public Quote Quote { get; set; }
 
    public QuotePageModel (IDatabaseService databaseService)
    {
        _databaseService = databaseService;
    }
 
    public override void Init (object initData)
    {           
        Quote = initData as Quote;
        if (Quote == null)
            Quote = new Quote ();
    }
 
    public Command SaveCommand {
        get {
            return new Command (async () => {
                _databaseService.UpdateQuote (Quote);
                await CoreMethods.PopPageModel ();
            });
        }
    }
 
    public Command TestModal {
        get {
            return new Command (async () => {
                await CoreMethods.PushPageModel<ModalPageModel> (null, true);
            });
        }
    }
}

 Step 5. Setup Navigation

You have the options of using a built-in navigation or implement your own.

With the built in navigation items you have the options of:

  1. FreshNavigationContainer – Which is a basic navigation with push and pop

  2. FreshMasterDetailNavigationContainer – Use for a master detail style app

  3. FreshTabbedNavigationContainer – User for a tabbed style app

  4. For some thing more complex you can implement IFreshNavigationService

In this sample we can use a tabbed style app. In your Xamarin.Forms PCL open your App.cs and in the constructor add the following code.

1
2
3
4
5
var tabbedNavigation = new FreshTabbedNavigationContainer ();
 
tabbedNavigation.AddTab<ContactListPageModel> ("Contacts", null);
 
MainPage = tabbedNavigation;

And that’s it, we now have made the first steps to implementing FreshMvvm. If you wanted a different Navigation style then you could use one of the other types of built in Navigation or even implement your own.

The great sample project similar to this can be found in the sample directory on the project.

https://github.com/rid00z/FreshMvvm


FreshMvvm – A Mvvm Framework designed for Xamarin.Forms

Now available via Nuget FreshMvvm is a Mvvm framework that’s designed specifically for Xamarin.Forms. The reason I say it’s designed for Xamarin.Forms is because it plays on Xamarin.Forms strengths and fills in ONLY the missing parts. It has a requirement for Xamarin.Forms and therefore is smart and can do thing such as wiring up the BindingContext and Page events.

Some of the feature for FreshMvvm include:

  • PageModel to PageModel Navigation

  • Automatic wiring of BindingContext

  • Automatic wiring of Page events (eg appearing)

  • Basic methods on PageModel (init, reverseinit)

  • Built in IOC Container

  • PageModel Constructor Injection

  • Basic methods available in Model, like Alert

  • Built in Navigation containers for SimpleNavigation, Tabbed and MasterDetail

How does it compare to other Mvvm options?

  • It’s super light and super simple

  • It’s specifically designed for Xamarin.Forms, nothing else does this currently

  • Designed to be easy to learn and develop (great when your not ready for RxUI)

  • Uses a Convention over Configuration

The Story

I was part-way into a Xamarin Traditional application when Xamarin.Forms was released. I wanted to move the project onto Xamarin.Forms but on that project I was using MvvmCross. At that time MvvmCross had no support for Xamarin.Forms, so I had the option of 1) adapting MvvmCross, 2) finding an alternative or 3) rolling my own Mvvm. The best part about MvvmCross was it’s two-way databinding to the native iOS/Android controls but since Xamarin.Forms already had the Databinding builtin, that wasn’t useful and the size with MvvmCross was an overhead when I didn’t require it. I also wasn’t able to find an alternative that I could easily move to. So that I could keep it simple and flexible, I ended up rolling my own Mvvm.

It’s grown up from this post on rolling your own Mvvm for Xamarin.Forms. I try hard to keep the simplicity of rolling your own Mvvm for Xamarin.Forms.

It was never a plan to create a framework but after presenting my Mvvm solution at a few events, I found many people wanted it and seemed to be really interested in it. Also considering I’ve been using this Framework in all my projects from the start of Xamarin.Forms I know that it works, so I created FreshMvvm and that’s how it was born.

Conventions

This Framework, while simple, is also powerful and uses a Convention over Configuration style.

Note Different to standard naming conventions, FreshMvvm uses Page and PageModel instead of View and ViewModel, this is inline with Xamarin.Forms using Pages

  • A Page must have a corresponding PageModel, with naming important so a QuotePageModel must have a QuotePage The BindingContext on the page will be automatically set with the Model

  • A PageModel can have a Init method that takes a object

  • A PageModel can have a ReverseInit method that also take a object and is called when a model is poped with a object

  • PageModel can have dependancies automatically injected into the Constructor

Navigation

The Primary form of Navigation in FreshMvvm is PageModel to PageModel, this essentially means our views have no idea of Navigation.

So to Navigate between PageModels use:

1
await CoreMethods.PushPageModel<QuotePageModel>(); // Pushes on navigation stack
1
await CoreMethods.PushPageModel<QuotePageModel>(null, true); // Pushes a Modal

The engine for Navigation in FreshMvvm is done via a simple interface, with methods for Push and Pop. Essentially these methods can control the Navigation of the application in any way they like.

1
2
3
4
5
public interface IFreshNavigationService
{
   Task PushPage(Page page, FreshBasePageModel model, bool modal = false);
   Task PopPage(bool modal = false);
}

This is what you as a consumer will need to implement, and then register in the IOC Container.

Within the PushPage and PopPage you can do any type of navigation that you like, this can from a simple navigation to a advanced nested navigation.

The Framework contains some built in Navigation containers for the different types of Navigation.

Basic Navigation – Built In

1
2
3
4
5
var page = FreshBasePageModel.ResolvePageModel<MainMenuPageModel> ();
 
var basicNavContainer = new FreshNavigationContainer (page);
 
MainPage = basicNavContainer;

Master Detail – Built In

1
2
3
4
5
6
7
8
9
var masterDetailNav = new FreshMasterDetailNavigationContainer ();
 
masterDetailNav.Init ("Menu");
 
masterDetailNav.AddPage<ContactListPageModel> ("Contacts", null);
 
masterDetailNav.AddPage<QuoteListPageModel> ("Pages", null);
 
MainPage = masterDetailNav;

Tabbed Navigation – Built In

1
2
3
4
5
6
7
var tabbedNavigation = new FreshTabbedNavigationContainer ();
 
tabbedNavigation.AddTab<ContactListPageModel> ("Contacts", null);
 
tabbedNavigation.AddTab<QuoteListPageModel> ("Pages", null);
 
MainPage = tabbedNavigation;

Implementing Custom Navigation

It’s possible to setup any type of Navigation by implementing IFreshNavigationService.There’s a sample of this in Sample Application named CustomImplementedNav.cs.

1
2
3
4
5
6
7
8
9
10
11
12
13
14
15
16
17
18
19
20
21
22
23
24
25
26
27
28
29
30
31
32
33
34
35
36
37
38
39
40
41
42
43
44
45
46
47
48
49
50
51
52
53
54
55
56
57
58
59
60
61
62
63
64
65
66
67
68
69
70
71
72
73
74
75
76
77
78
/// <summary>
/// This is a sample custom implemented Navigation. It combines a MasterDetail and a TabbedPage.
/// </summary>
public class CustomImplementedNav : Xamarin.Forms.MasterDetailPage, IFreshNavigationService
{
    FreshTabbedNavigationContainer _tabbedNavigationPage;
    Page _contactsPage, _quotesPage;
 
    public CustomImplementedNav ()
    {   
        SetupTabbedPage ();
        CreateMenuPage ("Menu");
        RegisterNavigation ();
    }
 
    void SetupTabbedPage()
    {
        _tabbedNavigationPage = new FreshTabbedNavigationContainer ();
        _contactsPage = _tabbedNavigationPage.AddTab<ContactListPageModel> ("Contacts", null);
        _quotesPage = _tabbedNavigationPage.AddTab<QuoteListPageModel> ("Quotes", null);
        this.Detail = _tabbedNavigationPage;
    }
 
    protected void RegisterNavigation()
    {
        FreshIOC.Container.Register<IFreshNavigationService> (this);
    }
 
    protected void CreateMenuPage(string menuPageTitle)
    {
        var _menuPage = new ContentPage ();
        _menuPage.Title = menuPageTitle;
        var listView = new ListView();
 
        listView.ItemsSource = new string[] { "Contacts", "Quotes", "Modal Demo" };
 
        listView.ItemSelected += async (sender, args) =>
        {
 
            switch ((string)args.SelectedItem) {
            case "Contacts":
                _tabbedNavigationPage.CurrentPage = _contactsPage;
                break;
            case "Quotes":
                _tabbedNavigationPage.CurrentPage = _quotesPage;
                break;
            case "Modal Demo":
                var modalPage = FreshPageModelResolver.ResolvePageModel<ModalPageModel>();
                await PushPage(modalPage, null, true);
                break;
            default:
            break;
            }
 
            IsPresented = false;
        };
 
        _menuPage.Content = listView;
 
        Master = new NavigationPage(_menuPage) { Title = "Menu" };
    }
 
    public virtual async Task PushPage (Xamarin.Forms.Page page, FreshBasePageModel model, bool modal = false)
    {
        if (modal)
            await Navigation.PushModalAsync (new NavigationPage(page));
        else
            await ((NavigationPage)_tabbedNavigationPage.CurrentPage).PushAsync (page); 
    }
 
    public virtual async Task PopPage (bool modal = false)
    {
        if (modal)
            await Navigation.PopModalAsync ();
        else
            await ((NavigationPage)_tabbedNavigationPage.CurrentPage).PopAsync (); 
    }
}

Inversion of Control (IOC)

So that you don’t need to include your own IOC container, FreshMvvm comes with a IOC container built in. It’s using TinyIOC underneith, but with different naming to avoid conflicts.

To Register services in the container use Register:

1
FreshIOC.Container.Register<IDatabaseService, DatabaseService> ();

To obtain a service use Resolve:

1
FreshIOC.Container.Resolve<IDatabaseService> ();

*This is also what drives constructor injection.

PageModel – Constructor Injection

When PageModels are pushed services that are in the IOC container can be pushed into the Constructor.

1
2
3
4
5
6
7
8
public class ContactListPageModel : FreshBasePageModel
{
    IDatabaseService _databaseService;
 
    public ContactListPageModel (IDatabaseService databaseService)
    {
        _databaseService = databaseService;
    }

PageModel Important Methods

1
2
3
4
5
6
7
8
9
10
11
12
13
14
15
16
17
18
19
20
21
22
23
24
25
26
27
28
29
30
31
32
33
34
35
36
37
38
39
40
41
/// <summary>
/// The previous page model, that's automatically filled, on push
/// </summary>
public FreshBasePageModel PreviousPageModel { get; set; }
 
/// <summary>
/// A reference to the current page, that's automatically filled, on push
/// </summary>
public Page CurrentPage { get; set; }
/// <summary>
/// Core methods are basic built in methods for the App including Pushing, Pop and Alert
/// </summary>
public IPageModelCoreMethods CoreMethods { get; set; }
 
/// <summary>
/// This method is called when a page is Pop'd, it also allows for data to be returned.
/// </summary>
/// <param name="returndData">This data that's returned from </param>
public virtual void ReverseInit(object returndData) { }
 
/// <summary>
/// This method is called when the PageModel is loaded, the initData is the data that's sent from pagemodel before
 
/// </summary>
/// <param name="initData">Data that's sent to this PageModel from the pusher</param>
public virtual void Init(object initData) { }
 
/// <summary>
/// This method is called when the view is disappearing.
/// </summary>
protected virtual void ViewIsDisappearing (object sender, EventArgs e)
{
 
}
 
/// <summary>
/// This methods is called when the View is appearing
/// </summary>
protected virtual void ViewIsAppearing (object sender, EventArgs e)
{
}

The CoreMethods

Each PageModel has a property called ‘CoreMethods’ which is automatically filled when a PageModel is pushed, it’s the basic functions that most apps need like Alerts, Pushing, Poping etc.

1
2
3
4
5
6
7
8
9
10
public interface IPageModelCoreMethods
{
   Task DisplayAlert (string title, string message, string cancel);
   Task<string> DisplayActionSheet (string title, string cancel, string destruction, params string[] buttons);
   Task<bool> DisplayAlert (string title, string message, string accept, string cancel);
   Task PushPageModel<T>(object data, bool modal = false) where T : FreshBasePageModel;
   Task PopPageModel(bool modal = false);
   Task PopPageModel(object data, bool modal = false);
   Task PushPageModel<T>() where T : FreshBasePageModel;
}


Sample PageModel

1
2
3
4
5
6
7
8
9
10
11
12
13
14
15
16
17
18
19
20
21
22
23
24
25
26
27
28
29
30
31
32
33
34
35
36
37
38
39
40
41
42
43
44
45
46
47
48
49
50
51
52
53
54
55
56
57
58
59
60
61
62
63
64
65
66
67
68
69
70
71
72
73
74
75
76
77
78
[ImplementPropertyChanged] // Use Fody for Property Changed Notifications
public class QuoteListPageModel : FreshBasePageModel
{
   IDatabaseService _databaseService;
 
   //These are automatically filled via Constructor Injection IOC
   public QuoteListPageModel (IDatabaseService databaseService)
   {
       _databaseService = databaseService;
   }
 
   public ObservableCollection<Quote> Quotes { get; set; }
 
   public override void Init (object initData)
   {
       Quotes = new ObservableCollection<Quote> (_databaseService.GetQuotes ());
   }
 
   //The Framework support standard functions list appeaing and disappearing
   protected override void ViewIsAppearing (object sender, System.EventArgs e)
   {
       CoreMethods.DisplayAlert ("Page is appearing", "", "Ok");
       base.ViewIsAppearing (sender, e);
   }
 
   protected override void ViewIsDisappearing (object sender, System.EventArgs e)
   {
       base.ViewIsDisappearing (sender, e);
   }
 
   //This is called when a pushed Page returns to this Page
   public override void ReverseInit (object value)
   {
       var newContact = value as Quote;
 
       if (!Quotes.Contains (newContact)) {
           Quotes.Add (newContact);
       }
   }
 
   public Command AddQuote {
       get {
           return new Command (async () => {
               //Push A Page Model
 
               await CoreMethods.PushPageModel<QuotePageModel> ();
           });
       }
   }
 
   Quote _selectedQuote;
   public Quote SelectedQuote {
       get {
           return _selectedQuote;
       }
       set {
           _selectedQuote = value;
           if (value != null)
               QuoteSelected.Execute (value);
       }
   }
 
   public Command<Quote> QuoteSelected {
       get {
           return new Command<Quote> (async (quote) => {
               await CoreMethods.PushPageModel<QuotePageModel> (quote);
           });
       }
   }
}
 
So please take a look at it on <a href="https://github.com/rid00z/FreshMvvm">github</a> or nuget. 
 
If you have any questions please contact me via <a href="http://www.michaelridland.com">http://www.michaelridland.com</a>. 
 
Thanks
 
Michael

Top 10 Tips for Building an Apple Watch App

Unless you’ve been living under a rock then you already know about the Apple Watch, have ordered one or your wearing one right now. At the moment I’ve been getting my head around how WatchKit apps will work for my the apps of my clients. The truth be told is that not all apps need a WatchKit component, but many do.

After using an Apple Watch in real, one thing I noticed was the inability to edit calendar events, huh? You can add them but you can’t edit them. Actually in regards to most of the built in apps, there isn’t alot of editing operations. After a lengthy conversation with a product manager at Apple, Apple see’s the Watch primarily being used for super super short intervals, 3-5 seconds. Quickly reading an email or replying to a text message. So essentially we need to keep this in mind when we develop any Watch Apps.

1. Re-think your design from the ground app, don’t just take your Phone app and the images from that app and display it on the watch.

2. Five-Ten Seconds is the amount of time you should keep a users attention, anything more and they should pull their phone out.

3. Bluetooth is slow, and even slower on the device. You need to keep everything lean, compress images, keep images the exact size and no bigger, only update items that have changed (if you even need to). Do you need to upload images or can you use text?

4. Keep is simple, only show the exact data a user needs. If for example your using TripAdvisor, what does the user need to see? The rating, the name and address maybe one more thing, no need to overload the screen you’ve only got 5 seconds anyway.

5. The watch is slow and your app needs to be fast. Lazy-Load for fast startup and then background pre-load where possible, cache where possible, show splash/loading screens. Also another reason to use less content in your apps.

6. Use hand off, this is essential, if you’ve given a user a notification and they jump into your watch app it’s likely they might want to continue the action in further detail on their device. An example would be a user looking at a email and might want to reply on the phone, when the user opens their phone then it must deep link into the mail app with the email open (it already does this btw). This is all available to you as a developer via the WKInterfaceController.

7. Let the iPhone do the work. Communication between your iPhone app and watch app is simple, so don’t be afraid to pass tasks/operations back to the phone.

8. Use dictation – User input is a keystone of useful applications, so while you’ve only got a ‘short time’ with the user it’s still possible to get some input.

9. You only have 10 UI elements in Total, but they can be deeply nested and can be used to create advanced views.

10. Get a Watch and use it. You can’t expect that you’ll be able to create a good user experience unless you live the same user experience. As the saying goes eat your own dog food.

The Apple watch is only a first release product, it’s just a given that the apps and device aren’t going to be overly refined but it’s definitely a glimpse into the future. Oh and FYI it’s not called a iWatch, it’s not, so please don’t call it a iWatch.

Please drop me an email if you have any questions or queries about the Apple Watch, I’m always keen to help people.

Thanks

Michael


WWDC 2015 for a Xamarin Developer n+1 Series

WWDC-2015-invitation

How much can happen in a week? … well a lot, last week I was honoured to be announced as a Xamarin MVP, I purchased my first Apple Watch and… I’ve been lucky enough to win a golden ticket for the Apple World Wide Developers conference (WWDC). When I say win I mean pay apple $1999 AUD for the privilege to attend the conference. The ‘winning’ part is that there’s 9 million apple developers and many thousands apply to attend, so apple have a lottery in which attendee’s are selected at random.

WWDC is on June 8th – June 12th 2015, in San Francisco and will take place at Moscone West. There’s likely to be some new software announcements for iOS and OSX, possibly some more watch features and maybe even a 4K Apple TV. There’s over 100 technical sessions, 1000’s of apple engineers, hands-on labs and the apple design awards.

As an engineer I’m really keen to attend the technical sessions and get my hands dirty with some hands-on labs, maybe a little swift to c# conversion will be in order.

Given that I’ve been lucky enough to win a ticket to WWDC this year I thought it would only be fair if I shared the journey with other Xamarin developers. I’ll be giving daily overviews of different announcements and if possible providing technical detail from the conference, converting the swift applications into C# and F#.

This series of posts will be named ‘WWDC for a Xamarin Developer n+1’… Stay tuned… I think we’ll have some fun!

Michael

50 Shades of Xamarin

One of my favourite parts of Xamarin is it’s flexibility. Using Xamarin and Xamarin.Forms you can actually jump between Native API’s, Forms APIs and Html5 (generated at locally or on the server). This flexibility has enabled me to develop a range of different solutions for clients based on their situation, I wasn’t sandboxed to Native or PhoneGap, I could mash up anything. The best part is that you can mix these up to with seamless experiences between them.

Here’s a graph showing the percentages of technologies I’ve used in my most recent Xamarin Apps, you’ll see some are Forms only, some are Native only, some are a mix of all.

Do you have some Html5 that’s already mobile friendly? Go ahead use Xamarin then you’ll also be able to add in a sexy Native Menu using Xamarin Traditional
Do you have a Xamarin traditional app but need some Crud forms? Go ahead add in Xamarin.Forms, it can be used in Micro Areas of your application.
Do you have a Xamarin.Forms app but need to add a little HTML? Go ahead with Xamarin you can easily show Html5.

With Xamarin the Mobile world is your oyster and your possibilities endless…

50 Shades of Xamarin


Thanks

Michael

Debugging Xamarin app network calls on OSX with iOS Simulator

This blog is a quick tip for people trying to debug network calls in their Xamarin/Xamarin.Forms app while on OSX.

While we take it for granted to debug network calls in our web browsers these days, when it comes to a native app it’s not so apparent, especially if you’re on OSX. Note*, this post is for OSX if your using Windows this forum post might help.

In my research I couldn’t find a free debugging proxy but the old faithful Charles Debugging proxy works well.

While you think it might be as simple as opening up Charles there’s actually a few quirks.

Using Charles with iOS Simulator

Thankfully the latest version of Charles proxy can automatically register the certificate on your simulator devices. To do this open Charles and from the Help menu option select ‘Install Charles CA SSL Certificate in iOS Simulators’.

Screen Shot 2015-03-15 at 8.53.09 pm

… run the app in the iOS simulator and that should work right? wrong!

If you’re using Xamarin/Xamarin.Forms and the standard System.Net.HttpClient then this code is fully managed code and will not communicate with the local OS to discover the proxy settings. Luckily we have a little saving grace in that the HttpClient allows for different underlying network implementations, in iOS the native network library is called CFNetwork library. Miguel has previously blogged about this.

Now that’s great but how do I get it working in my Xamarin.Forms app? Well considering the CFNetwork is a Native iOS binding we can’t actually reference it from our Forms PCL, we need to create a dependancy that’s sets it up for us.

It’s the standard way to create a dependancy.

1. Define a interface in our PCL

1
2
3
4
public interface IHttpClientHandlerFactory
{
    HttpClientHandler GetHttpClientHandler();
}

2. Create the Native implementation of the interface

1
2
3
4
5
6
7
8
9
10
11
12
13
14
15
[assembly: Xamarin.Forms.Dependency(typeof(HttpClientHandlerFactory))]
 
namespace App.iOS
{
    public class HttpClientHandlerFactory : IHttpClientHandlerFactory
    {
        public HttpClientHandler GetHttpClientHandler()
        {
            return new System.Net.Http.HttpClientHandler {
                Proxy = CoreFoundation.CFNetwork.GetDefaultProxy(),
                UseProxy = true
            };
        }
    }
}

3. Use the Native implementation

Note* as I’ve only implemented this in my iOS app I’ve got logic which only uses the custom HttpClientHandler when the factory exists.

1
2
3
4
5
6
7
8
9
10
11
12
13
14
var handlerFactory = Xamarin.Forms.DependencyService.Get<IHttpClientHandlerFactory> ();
if (handlerFactory == null) 
{
    client = new HttpClient() {
        BaseAddress = new Uri (ServiceUrl),
    };
} 
else 
{
    var handler = handlerFactory.GetHttpClientHandler ();
    client = new HttpClient(handler) {
        BaseAddress = new Uri (ServiceUrl),
    };
}  

Once you’v done that, first run Charles and then debug your app in the simulator and you should see the network calls come in.

Happy Debugging…